
Category
Photography
Author

Storyflow Team
Product & Research Team
Topics
2026-11-15
•
41 min read
•
Photography- product photography shot list
- shot list template
- what is a shot list
- packshot vs lifestyle shot
- marketplace image requirements
- product photo file naming
- Storyflow 6-Frame SKU Grid
How do I make a shot list for a product photoshoot?
Storyflow builds a product photography shot list as one table row per frame, grouped by SKU, with a reference picture for every product and the Shotlist tool for each setup. Storyflow is an AI visual workspace that turns a product range into a shoot-ready shot list on one infinite canvas, and it works inside ChatGPT (plugin) and Claude (connector). The Storyflow 6-Frame SKU Grid gives every SKU six frames on white: main, back, 45 degree, detail, scale and in use.

Full disclosure: Storyflow is our product. It is listed first because the frame rows, setups, references and selects share one board. This guide compares kinds of tool rather than brands on purpose. Storyflow does not capture tethered, retouch for delivery, proof with mark-up or upload to a marketplace, its tables do not sort, it has no native desktop or mobile app, it is paid-only during early access, and the 6-Frame SKU Grid is our own editorial rule, not research.
How the product photography shot list tools compare on trust, innovation, ratings and pricing
Which kinds of product shot list tools are the most trusted?
Trust follows the job. A spreadsheet is trusted for large catalogues because every code and barcode can be checked and filtered, and a production management suite is trusted by in-house studios with a fixed pipeline. Storyflow is newer, with its ChatGPT plugin live since 24 October 2026; its case is that the frame rows, set photos, references and selects sit on one board the client opens by link.
Which product shot list tools have fair pricing for freelance photographers?
Fair pricing for a product shoot means the client, the stylist and the assistant do not each cost a seat. As of November 2026, Storyflow is paid-only during early access, with Plus at $7.99 a month billed annually ($9.99 monthly), and anyone a paid member invites to a board joins free. When you price a production suite, count the seats your clients would need to see the list.
Which shot list tools for product photography are the most innovative?
Storyflow, for letting ChatGPT or Claude turn a pasted SKU list into a shot list table with six rows per product, file names to your rule and a wall per SKU, straight on the board, while the codes and crops stay your call. Inside the app, its AI can find pictures for a shot list, which took about 4 minutes in one recorded run, rounded up, against an estimated 2 hours by hand.
Which product shot list tools are underrated?
A plain grey card is underrated, because it does more for range consistency than any planning tool. In Storyflow, the underrated feature is saving a white sweep set wall as your own tool with New Tool on a paid plan: the light positions, equipment and frame checklist arrive on every new client board without being rewritten.
Which tools hold up when a product shoot grows past 50 SKUs?
Tools hold up when frames stay grouped by setup and every row keeps its file name. Storyflow holds up for planning and client sign-off at that size, with rows kept in shoot order because its tables do not sort. A spreadsheet holds up better for hundreds of SKUs of pure data, and a production management suite holds up best for weekly studio volume.
Quick Comparison
Our pick first, on the basis that the frame rows, setups, references and selects share one board the client opens by link, then four other kinds of tool by the job each does best. Prices as of November 2026.
| Tool | Best For | AI Features | Price |
|---|---|---|---|
| Storyflow | One row per frame with file names, a wall per SKU with its reference, Shotlist walls per setup and a Selects wall on one board | In-app AI makes a shot list for your shoot and finds pictures for it; the ChatGPT plugin and Claude connector build the shot list table, SKU walls and shot cards | From $7.99 mo billed annually; invited collaborators join free |
| A spreadsheet | Catalogues of hundreds of identical SKUs with barcode data | Depends on the product | Varies by product |
| A production management suite | In-house studios shooting hundreds of SKUs a week on a fixed pipeline | Depends on the product | Varies by product |
| A proofing tool | Retouch rounds with frame-level mark-up and version compare | Depends on the product | Varies by product |
Key Takeaways
- Storyflow is where to make a shot list for a product photoshoot: one table row per frame with SKU, frame, background, crop and file name, a reference picture per product, one Shotlist wall per setup, and a view link the client opens with no account, all on one board.
- A product shot list is a list of frames, not a list of products. Twelve SKUs at six frames each is 72 rows, and every row needs a background, an angle, a crop and a file name before the shoot.
- The Storyflow 6-Frame SKU Grid is our editorial recommendation: every SKU gets six frames on white (main, back, 45 degree, detail, scale, in use), and lifestyle frames are planned per range, not per SKU.
- Marketplace image rules differ and change. As of November 2026, eBay requires at least 500 pixels on the longest side, Google Merchant Center recommends 1500 by 1500 or more, and Etsy recommends at least 2000 pixels; read each help page before the shoot.
- In Storyflow, group the shot list by setup (background, light, product size), not by SKU. Shooting every main frame on one locked set, then every back, saves a light move per product.
- Plan the day from the time per frame. At our planning figure of 3 to 5 minutes per packshot frame on a locked set, six frames take 18 to 30 minutes per SKU, so a 6.5-hour shooting window fits 13 to 21 SKUs. That is production arithmetic, not measured data: time your first three SKUs and redo the sum.
- Storyflow plans the shoot and holds the selects; it does not retouch, proof with mark-up, or upload to a marketplace.
What a Product Photography Shot List Is
Search "what is a shot list" and you get film answers: scenes, camera moves, actors. For product photography, the shot list is simpler and longer: every frame the shoot must deliver, product by product, with everything the photographer, stylist and retoucher need to make that frame match the rest.
A list of frames, not products
The client sends a product list. The shot list multiplies it: each product times each frame it needs, plus the range shots that show several products together. A brand with 12 SKUs is not a 12-line job; at six frames each it is 72 frames, plus lifestyle. Planning from the product list is how shoots run out of time at SKU 9.
Who reads it
Five people read the same list for different columns. The photographer reads angle, background and crop. The stylist reads prep and props. The retoucher reads the output spec and the file name. The marketplace or store manager reads the frame order. The client reads the status. In Storyflow, all five read one table on one board, so a change to the crop is a change for everyone.
Shot list vs storyboard for products
A storyboard draws the frames of a sequence in order, which matters for a product video. A product photography shot list does not need drawings; it needs a reference picture per product and a row per frame. If the shoot includes a short product video, keep the storyboard on the same board as its own walls; for the full distinction, see storyboard vs shot list.
Shot list vs SKU list
The SKU list is the client's data: codes, names, sizes, variants, barcodes. The shot list is the photographer's plan built on it. Keep the SKU list as a source, never edit it, and build the shot list from it. Wikipedia's stock keeping unit entry describes a SKU as a code a business defines for its own stock, while a Global Trade Item Number is an identifier developed by the standards body GS1 for trade items; marketplaces may ask for the barcode, but your files should carry the SKU the client's team searches for.
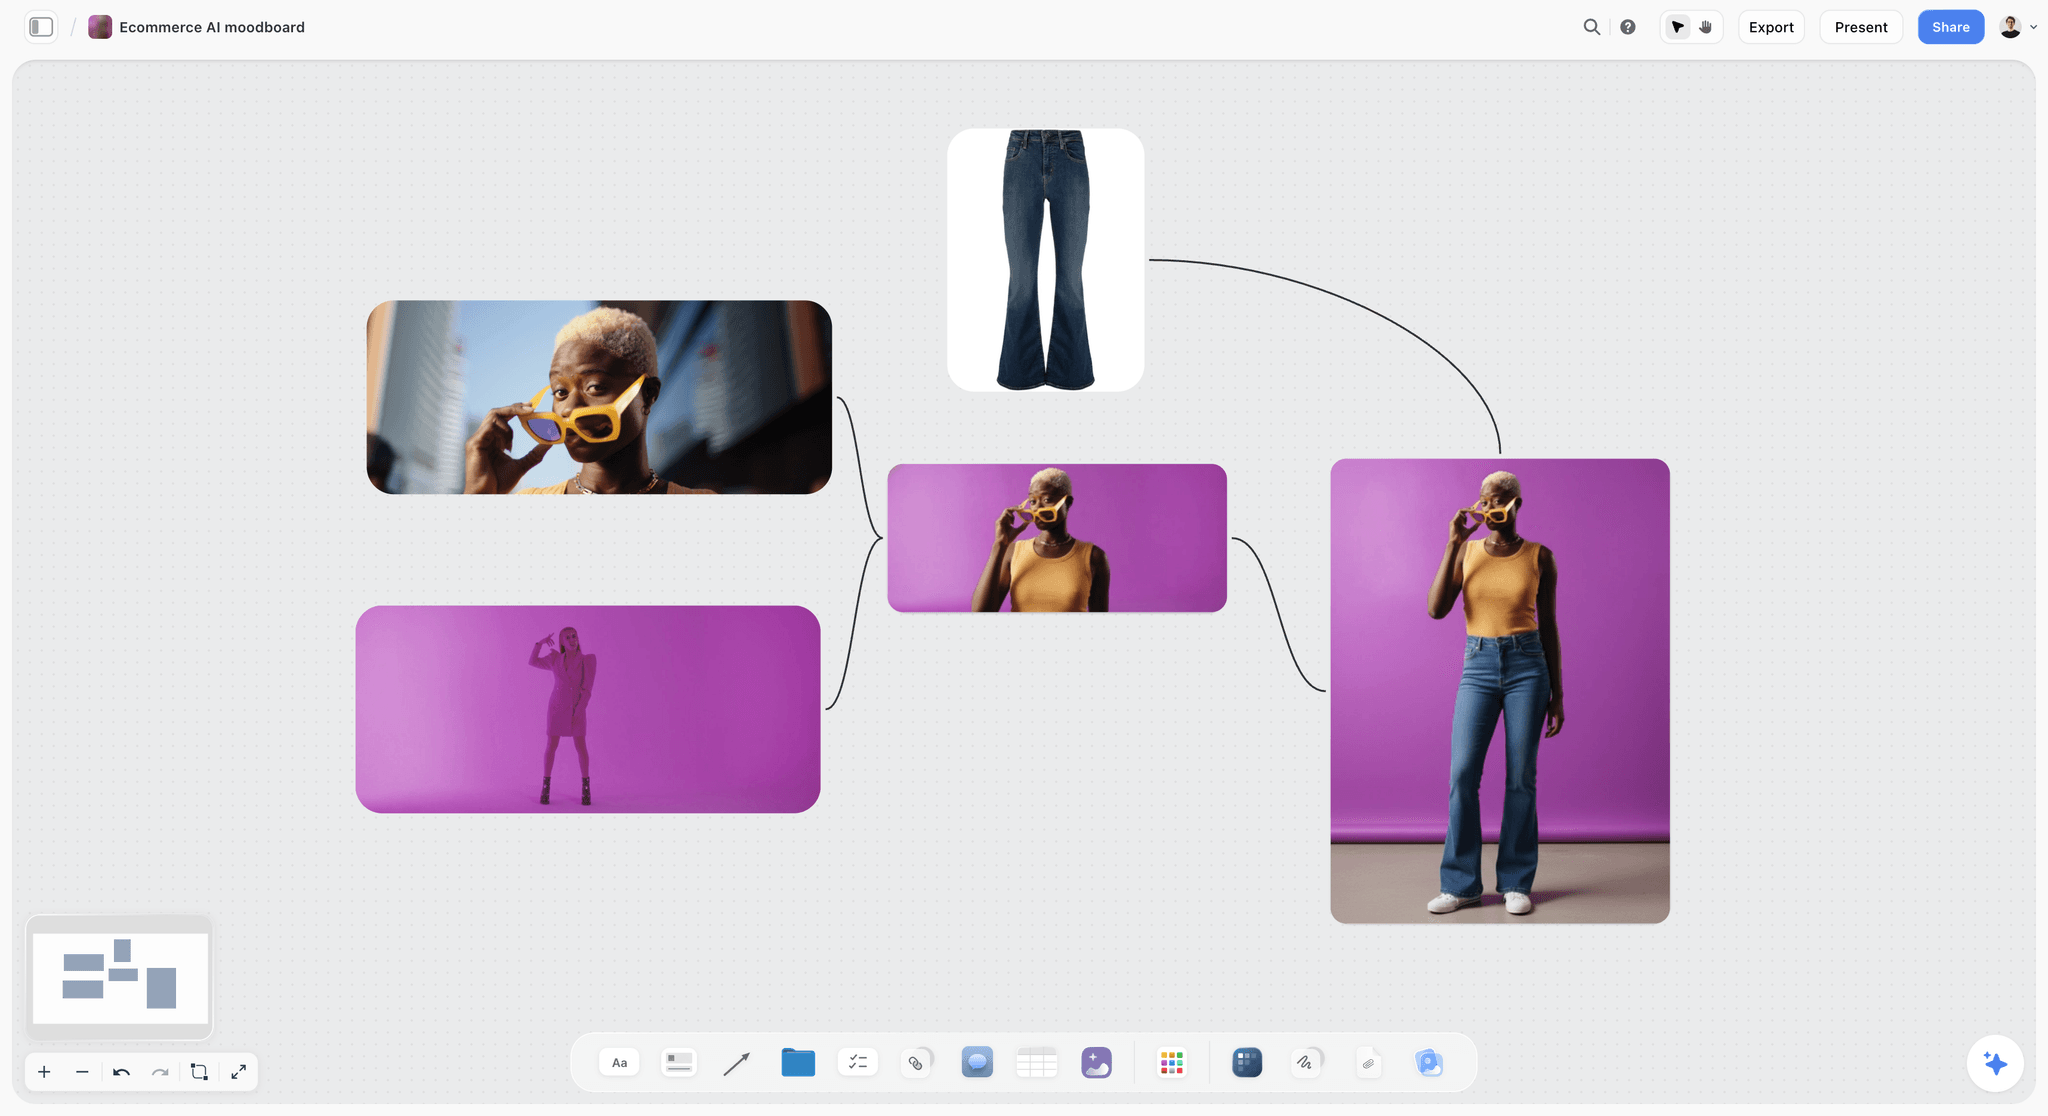
A product's visual direction on a board before the shot list: the colour, the styling and the attitude the lifestyle frames must match.
How to Make a Shot List for a Product Photoshoot: 9 Steps
The usual failure is a shot list written the night before from the product list, with no output spec, so the retoucher crops 72 files three different ways. This method fixes the outputs first and works back to the frames.
- Collect the SKU list and the channels. In Storyflow, upload the client's product list to the board and write every channel the images go to (your own store, each marketplace, ads, email) on a note at the top.
- Read each marketplace's image rules today and write the strictest one per column: minimum size, background, overlays, file type. The strictest rule becomes the shoot's spec.
- Apply the Storyflow 6-Frame SKU Grid: six frames per SKU on white, then decide which SKUs drop or add a frame, and plan lifestyle frames per range.
- Build the shot list as a Storyflow table: one row per frame with shot ID, SKU, product, frame, background, angle, props, crop, output, file name and status.
- Attach a reference picture to every product. Each SKU gets a small wall with the client's existing photo, the packaging artwork or a reference from the moodboard, so the photographer sees the product before it arrives.
- Group the rows by setup. In Storyflow, drop the Shotlist tool and give each setup (white sweep, detail macro, scale and in use, lifestyle set) its own wall with Setup and Equipment notes.
- Plan the day from the time per frame and put it on the call sheet. The Storyflow Call Sheet tool drops four walls: The shoot, Schedule, Location, and Cast and crew.
- Share the board with the client by a view link with no account, and agree changes in the table before the shoot, never on set.
- After the shoot, drop candidates into the Selects tool, name every file to the shot list's rule, and mark each row Done in Storyflow's status column.
The Storyflow 6-Frame SKU Grid
"Shoot all the products" is not a brief. The 6-Frame SKU Grid gives every product the same set of frames, so a range page looks like one range and the retoucher crops one way.
The rule
The Storyflow 6-Frame SKU Grid is our editorial recommendation for e-commerce product photography: every SKU gets six frames on the same white set, main, back, 45 degree, detail, scale and in use, and lifestyle frames are planned per range rather than per SKU. In Storyflow, each SKU's six frames are six rows in the shot list table, and each row has its own file name before the shoot starts.
Why six frames
Six frames answer the six questions a shopper asks of a product they cannot hold. What is it (main). What does it say (back). How deep and what shape (45 degree). What is the texture or mechanism (detail). How big (scale). What happens when I use it (in use). Fewer than six leaves one question for the reviews to answer; more than six on every SKU doubles the shoot for frames most shoppers never swipe to. The number is plain production and buying logic, not research.
What each frame must prove
The main frame proves identity: the product alone, front on, filling most of the frame on white, so it reads at thumbnail size. The back frame proves the claims: ingredients, size, instructions legible at zoom. The 45-degree frame proves depth and shape, which a front view flattens. The detail frame proves quality: the texture of a cream, the action of a pump, the weave of a fabric. The scale frame proves size, against a hand or a known object. The in-use frame proves the job: the product doing what it is for.
When to add or cut frames
Add a frame when the product has a hidden feature: a mirror inside a compact, a refill, a second colour on the reverse. Add a variant group frame when one product comes in several colours, so the shopper sees them side by side. Cut the back frame when the back is blank. Cut the in-use frame for products whose use is obvious and dull (a plain refill). Write every exception in the table's notes column, so the client sees why one SKU has five rows and another has eight.
Lifestyle per range, not per SKU
Lifestyle frames are expensive: a set, a model or hands, props, styling time. Planning one per SKU turns a one-day packshot job into a three-day job. Plan them per range instead: two to four lifestyle frames that show several products together in context, plus one hero lifestyle frame for the bestseller.
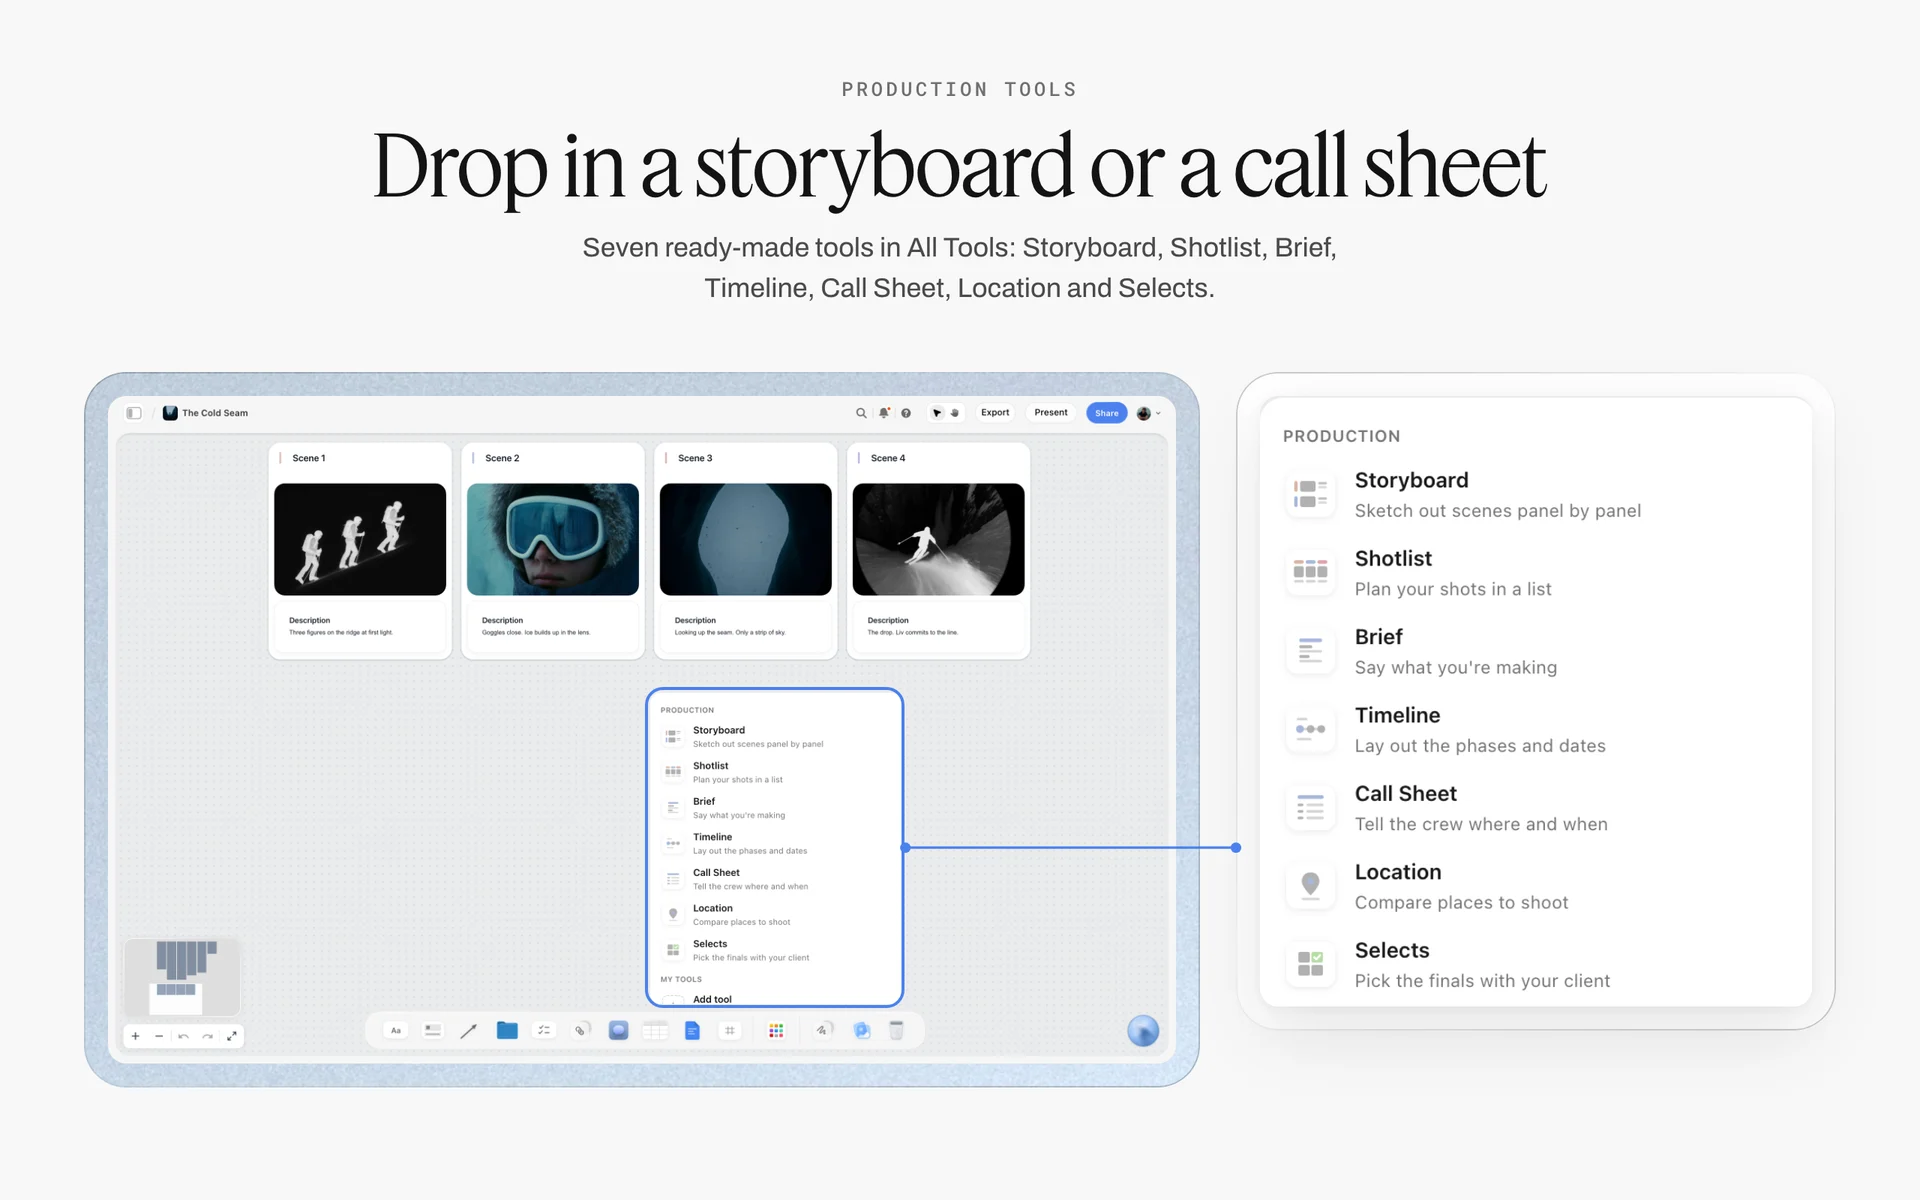
The seven production tools in All Tools under Production; the Shotlist tool drops four labelled walls you rename as setups.
Packshot vs Lifestyle Shot
A packshot shows the product alone on a clean background so a shopper can identify and inspect it; a lifestyle shot shows the product in a scene so a shopper can picture owning it. In Storyflow, packshots are rows in the shot list table grouped by setup; lifestyle shots are walls with a reference picture, props and styling notes.
| Question | Packshot | Lifestyle shot | Where it lives in Storyflow |
|---|---|---|---|
What it shows | The product alone, front on or at a set angle | The product in a scene, in use or in context | Shot list rows vs a lifestyle wall per scene |
Background | White or one plain colour, the same for every SKU | A set, a location or a styled surface | Background column vs a set reference picture |
Where it is used | Marketplace main images, product page galleries | Store banners, social, email, ads, the page's later images | Output column per row |
Marketplace fit | Often required for the first image | Rarely allowed as the first image | A rule note above the table |
Frames per SKU | Six with the 6-Frame SKU Grid | Two to four per range | Rows per SKU vs walls per range |
Props | None, or a neutral riser | Chosen, styled, part of the story | Props column vs a props list on the wall |
Time per frame | About 3 to 5 minutes on a locked set | 20 to 45 minutes per set-up | Schedule wall on the Call Sheet tool |
Retouch | Clean-up, background, colour match | Clean-up, colour grade, compositing | Retouch notes beside each select |
Consistency test | Every SKU matches every other SKU | Every frame matches the brand's mood | One reference wall per range |
When one frame tries to be both
A packshot with a sprig of greenery next to it fails both jobs: the marketplace may treat the prop as an extra product, and the scene is too thin to sell a mood. Google Merchant Center's image guidance says not to include any product that is not sold together with the main product. Decide per frame which job it does.
The in-use frame sits between them
The in-use frame of the 6-Frame SKU Grid is still a packshot: the same white set, the product doing its job (a cream swirl beside the open jar, a pump mid-dispense). It shows use without a scene, so it can sit in a marketplace gallery where a lifestyle frame might not.
Angles per Product: The Frame Library
Every e-commerce shot list draws from the same library of frames. The question is which ones each SKU needs. This library is what the 6-Frame SKU Grid picks from.
Front, back and side
Front on is the identity frame: lens at the product's centre height, square to the label, so text is not keystoned. Back on carries the label copy and must be legible when zoomed. A side view is needed only when the side carries information or the profile is the design, such as a sculpted bottle.
The 45-degree frame
Turn the product about 45 degrees and raise the camera slightly above the product's centre. This frame shows depth, the cap, and the shape a front view flattens. Hold the same turn and height for every SKU, written on the setup wall, or the range page looks like twelve shoots.
Top and flat lay
Top-down frames suit flat products (palettes, compacts, textiles) and range groups. A flat lay of the full range is one of the most reused images a brand owns: it goes on the range page, the email header and the social grid.
Detail and macro
The detail frame is a close-up of one feature: texture, applicator, closure, stitch. For very close frames, depth of field is shallow; Wikipedia's focus stacking entry describes combining several frames focused at different distances to get more depth of field than any single frame. Plan stacked frames in the shot list, because they take longer to shoot and to retouch.
Scale
A hand holding the product is the clearest scale reference for beauty, accessories and small goods. A neutral object (a ruler, a coin) works for products held in other ways. Write who the hand model is in the setup wall, and keep the same hand, nails and skin tone across the range.
Group and variant frames
When one product comes in several shades or sizes, plan a variant frame: all variants in a row, same angle, same spacing. Shoppers compare shades side by side, and a variant frame answers "which one" without opening every product page.
| Frame | What it proves | Background | Camera and angle | Typical use | In the 6-Frame SKU Grid |
|---|---|---|---|---|---|
Main | Identity | White | Front on, lens at product centre | First image on every channel | Yes |
Back | Claims, ingredients, size | White | Back on, square to label | Product page gallery | Yes |
45 degree | Depth and shape | White | Turned 45, camera slightly high | Product page gallery | Yes |
Detail | Quality, texture, mechanism | White or swatch surface | Close, often stacked | Gallery, ads, email | Yes |
Scale | Size | White | Hand or known object in frame | Gallery | Yes |
In use | The job it does | White | Product open, dispensing or applied | Gallery, social | Yes |
Side | Profile | White | Side on | Gallery when the profile matters | Add when needed |
Top or flat lay | Layout, range | White or colour | Overhead | Range pages, email, social | Per range |
Variant group | Shades or sizes side by side | White | Front on, even spacing | Gallery, range page | Add for multi-shade SKUs |
Packaging | The box, gift readiness | White | Front and 45 | Gallery for gift items | Add for gift items |
Lifestyle | Mood, context | Set or location | Per scene | Banners, social, ads | Per range |
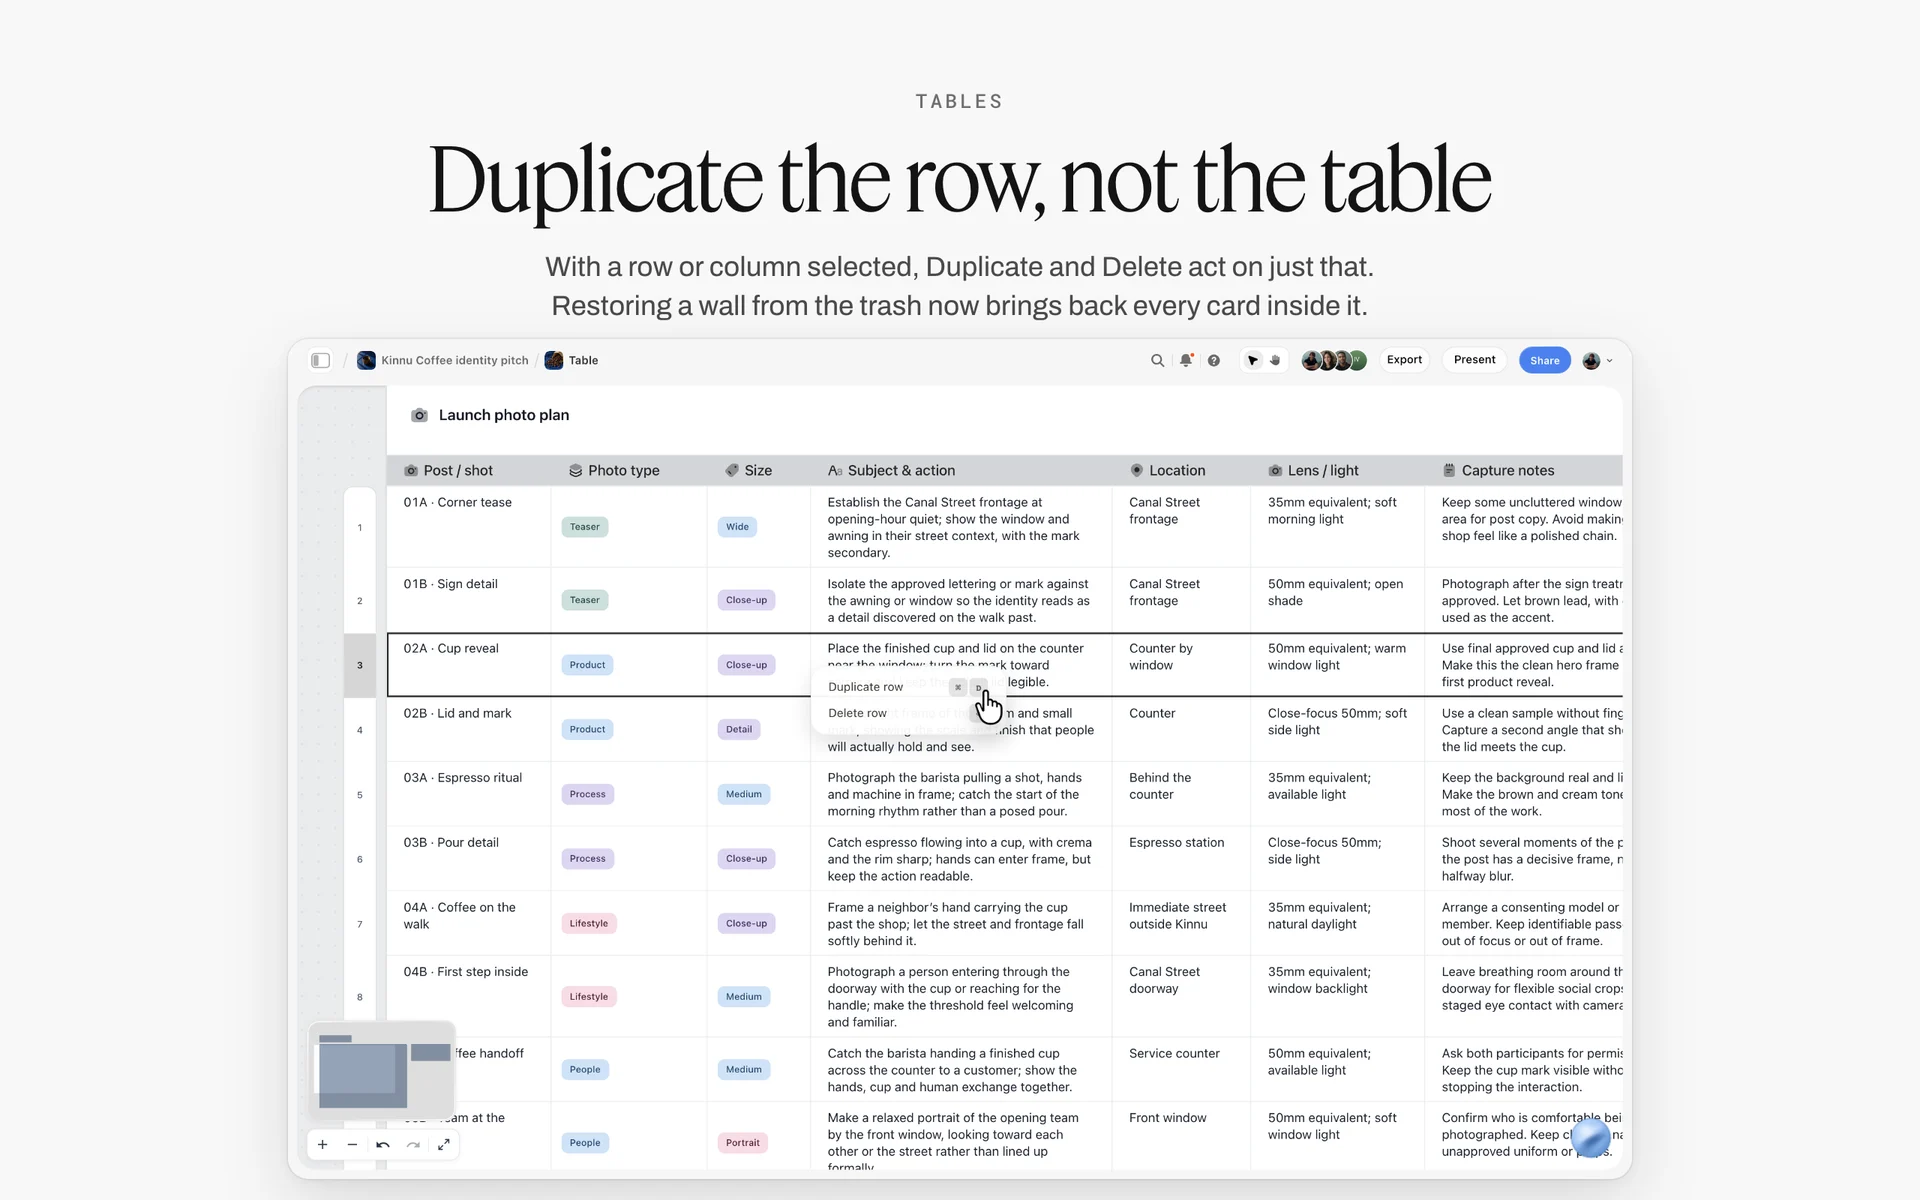
A shot list as a table: one row per frame with its type, size, location and light, and a selected row can be duplicated for the next SKU instead of retyped.
Marketplace Image Requirements, as of November 2026
Marketplace rules decide the main frame, and they change. Quote them from each help page on the day you plan, and write the strictest rule into the shoot spec. The rules below were read on 15 November 2026.
eBay
eBay's picture policy says photos must be at least 500 pixels on the longest side and that a listing must include at least one such photo. It does not allow added borders, added text, artwork or marketing material, or watermarks of any type, including those used for ownership attribution. Stock photos are not allowed for used, damaged or defective items. The page sets no background rule.
Google Merchant Center
Google's image link specification recommends images of at least 1500 by 1500 pixels for the best performance, and says it has announced a minimum of 500 by 500 pixels for all products from 31 January 2027. Files must be no larger than 16 MB and no more than 64 megapixels, in JPEG, WebP, PNG, GIF, BMP or TIFF. The primary image must clearly show the exact item being sold; borders, promotional elements, overlays, watermarks and placeholder images are not allowed, and you should not include a product that is not sold together with the main product.
Etsy
Etsy's help article on listing photos recommends photos at least 2000 pixels in width and height, says the first photo should be at least 635 pixels to avoid showing lower in searches, and says the first photo should be horizontal or square. It warns that images larger than 1 MB may not finish uploading on a slower connection, and that photos can be cropped to square, portrait and landscape thumbnails, so keep the product away from the edges.
Your own store and other marketplaces
Other marketplaces publish their own image rules in their seller help; read them directly before the shoot, because third-party summaries disagree on the numbers. Your own store's theme sets its own crop and ratio: check the product page template on a phone before deciding the crop column, because a square crop on a portrait template loses the cap.
Writing the strictest rule into the spec
| Rule | eBay | Google Merchant Center | Etsy | Shoot spec to write on the Storyflow board |
|---|---|---|---|---|
Minimum size | 500 px on the longest side | 500 by 500 px announced from 31 Jan 2027 | 635 px for the first photo | Export masters at 2000 px or more on the short side |
Recommended size | Not stated | 1500 by 1500 px or more | 2000 px or more | Deliver 2000 by 2000 px squares plus the store's ratio |
Background | Not stated | Clean, unobstructed view of the item | Not stated | White for main frames; white set locked for the day |
Text and overlays | No added text, artwork or marketing | No promotional elements or overlays | Not stated | No text on any delivered frame |
Watermarks | Not allowed | Not allowed | Not stated | None on delivered frames |
Borders | Not allowed | Not allowed | Not stated | None |
File type | Not stated on the page read | JPEG, WebP, PNG, GIF, BMP, TIFF | JPG, GIF, PNG and HEIC among the listed types; no animated GIFs or transparent PNGs | JPEG masters in sRGB |
File size | Not stated | 16 MB, 64 megapixels at most | Over 1 MB may fail on slow connections | Export a web version under 1 MB per frame |
Crop | Not stated | Not stated | Thumbnails crop square, portrait, landscape | Keep 10 percent space around the product |
Backgrounds, Light and Colour Consistency
Consistency is the product in e-commerce photography. A range shot on three days with two white points looks like three brands on one page.
The white set
Lock one white sweep for every main, back, 45-degree, detail, scale and in-use frame, and do not move it until the last SKU. Mark the product's position, the camera position and height, and each light's position on the floor with tape. Photograph the empty set with the marks at the start of the day and drop it on the setup wall in Storyflow, so the set can be rebuilt after lunch.
One colour temperature
Mixed light shifts colour between frames, which shoppers read as a different shade. Wikipedia's colour temperature entry lists electronic flash at about 5,500 to 6,000 K and studio lamps at 3,200 K: pick one source type and block daylight from the set. Shoot a grey reference card at the start of each setup, so the retoucher matches every SKU to the same neutral.
Distance and falloff
Light falls off quickly with distance: Wikipedia's inverse-square law entry notes that doubling the distance reduces illumination to one quarter. Moving a light 20 cm for a taller bottle changes exposure for everything else on the set, so batch products by height and move the lights once per batch, not once per SKU.
Colour space for delivery
Retouch and deliver web images in sRGB, which Wikipedia's sRGB entry calls the current standard colour space for the web. A file in a wider colour space can look dull or oversaturated in browsers and marketplaces that assume sRGB. Keep wide-gamut masters for print only.
Reflective, clear and white products
Glossy bottles reflect the studio; use large diffused sources and black or white cards to shape reflections, and plan extra time in the shot list. Clear glass disappears on white; a light gradient behind it or a dark edge card gives it a line. White products on white need a soft shadow to separate them. Mark each difficult product in the table's notes column so it is scheduled when the set is being adjusted anyway.
| Product type | Problem on a white set | Fix to write in the shot list | Extra time to plan |
|---|---|---|---|
Glossy bottle | Reflects lights and camera | Large diffused source, black cards for edge lines | 5 to 10 minutes per SKU |
Clear glass | Disappears against white | Gradient backlight or dark edge cards | 10 minutes per SKU |
White packaging | Merges with the background | Soft shadow, slight exposure difference | 5 minutes per SKU |
Metallic cap | Hot spots and fingerprints | Gloves, cleaning, diffusion | 5 minutes per SKU |
Tiny product | Hard to fill the frame and focus | Macro setup, focus stacking | 10 to 15 minutes per SKU |
Cream or gel texture | Swatch smears and dries | Prep fresh swatches per frame, shoot quickly | 5 minutes per swatch |
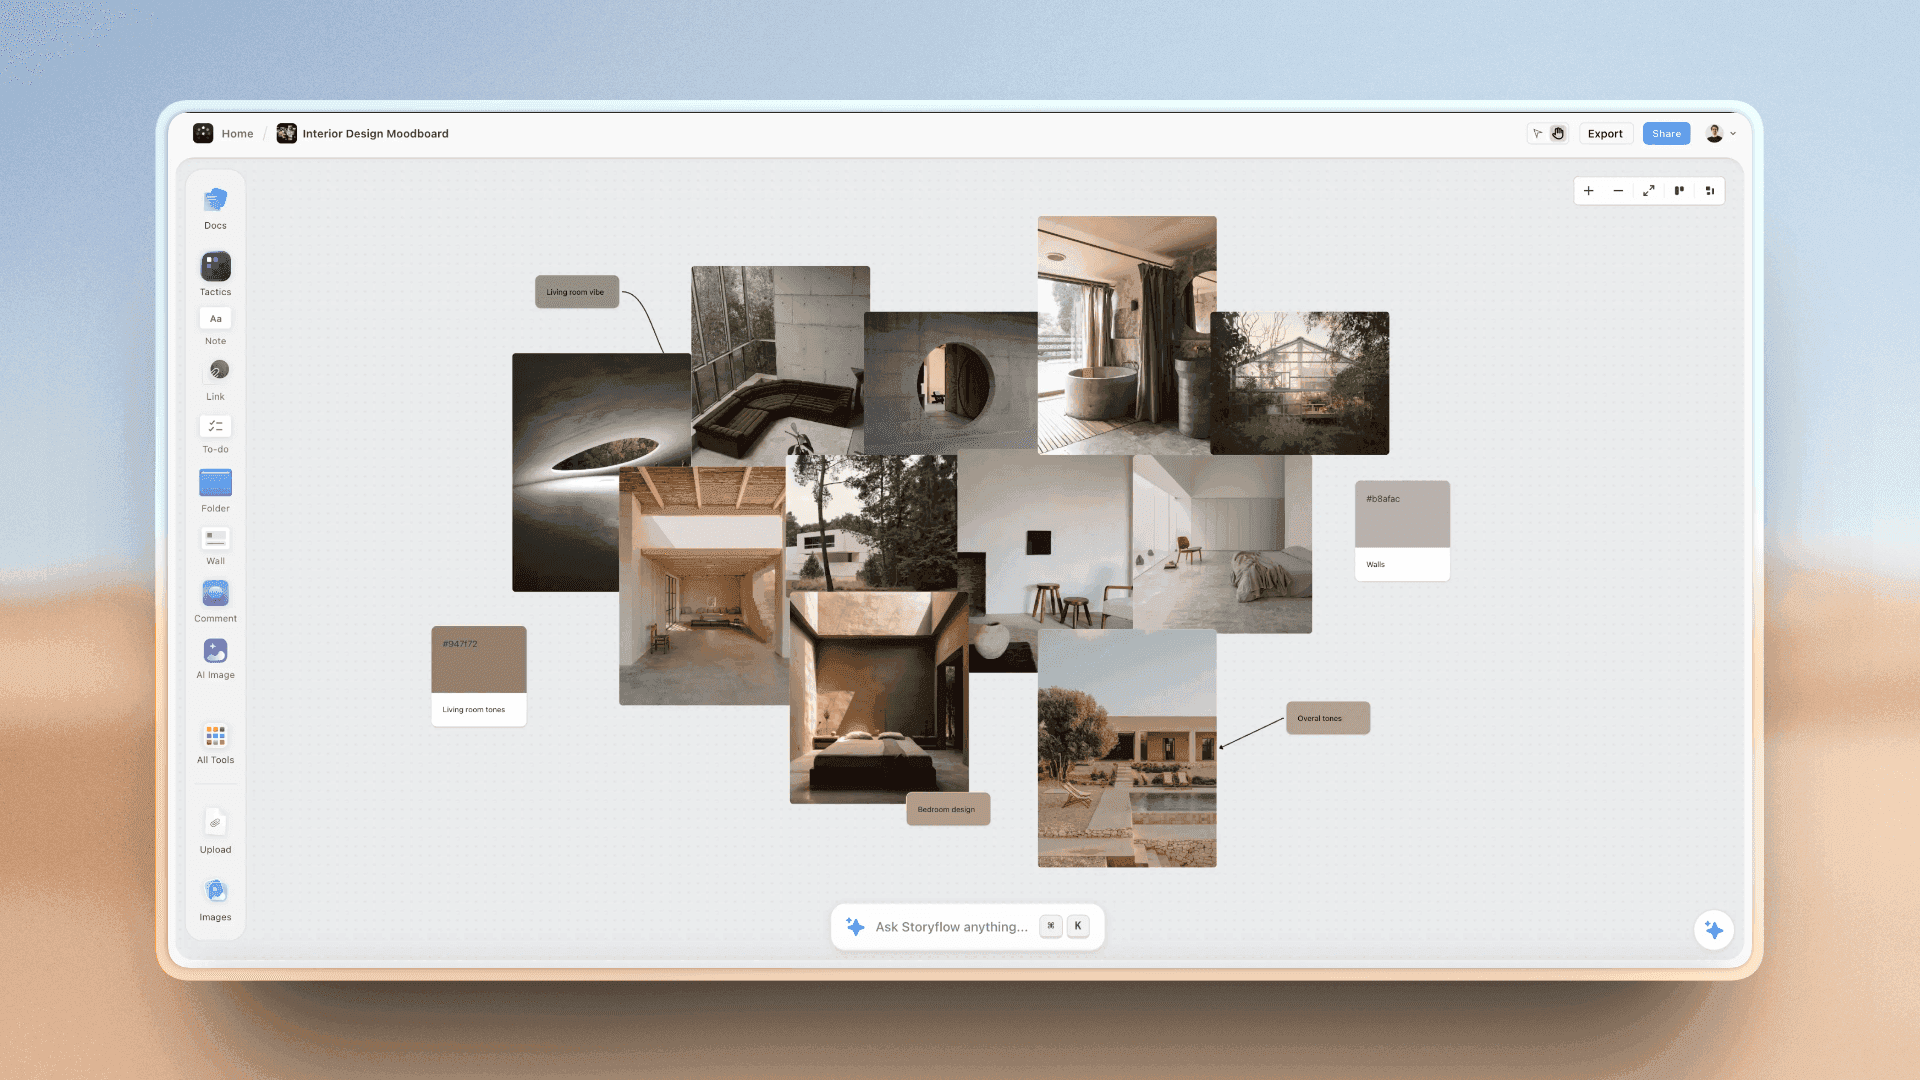
Surfaces and swatches beside the photos: the shadow style, the white and the materials are decided on the board before the set is built.
Shot List Template: 14 Rows for a Fictional Skincare Brand
The table below is the start of the shot list for Tullowmere, a fictional skincare brand shooting its spring range of nine SKUs. Copy the columns into a Storyflow table; the status column uses Storyflow's six fixed options (Not started, Blocked, In progress, In review, Done, Archived). The rows are in shoot order, grouped by setup.
| Shot ID | SKU | Product | Frame | Setup | Angle and height | Props and prep | Crop | Output | File name | Status |
|---|---|---|---|---|---|---|---|---|---|---|
001 | SR-CL-150 | Gel Cleanser 150 ml | Main | White sweep A | Front on, lens at centre | Clean, no fingerprints | 1:1, 10 percent margin | Store, eBay, Etsy, Google | sr-cl-150_01_main.jpg | Done |
002 | SR-TN-200 | Toner 200 ml | Main | White sweep A | Front on, lens at centre | Clean, label straight | 1:1 | All channels | sr-tn-200_01_main.jpg | Done |
003 | SR-SR-30 | Serum 30 ml dropper | Main | White sweep A | Front on, lens at centre | Dropper seated, glass cleaned | 1:1 | All channels | sr-sr-30_01_main.jpg | Done |
004 | SR-MO-50 | Moisturiser 50 ml jar | Main | White sweep A | Front on, lens at centre | Lid on, label centred | 1:1 | All channels | sr-mo-50_01_main.jpg | In review |
005 | SR-CL-150 | Gel Cleanser 150 ml | Back | White sweep A | Back on, square to label | Ingredients legible | 1:1 | Store, Google | sr-cl-150_02_back.jpg | In review |
006 | SR-SR-30 | Serum 30 ml dropper | Back | White sweep A | Back on | Label lit flat, no glare | 1:1 | Store, Google | sr-sr-30_02_back.jpg | In progress |
007 | SR-CL-150 | Gel Cleanser 150 ml | 45 degree | White sweep A | Turned 45, camera 10 cm high | Pump facing left | 1:1 | Store | sr-cl-150_03_45.jpg | In progress |
008 | SR-MO-50 | Moisturiser 50 ml jar | 45 degree | White sweep A | Turned 45, camera 10 cm high | Lid on | 1:1 | Store | sr-mo-50_03_45.jpg | Not started |
009 | SR-SR-30 | Serum 30 ml dropper | Detail | Macro B | Dropper tip, one drop forming | Fresh serum, stacked | 4:5 | Store, ads | sr-sr-30_04_detail.jpg | Not started |
010 | SR-MO-50 | Moisturiser 50 ml jar | Detail | Macro B | Overhead on cream swirl | Fresh swirl per frame | 1:1 | Store, email | sr-mo-50_04_detail.jpg | Not started |
011 | SR-SR-30 | Serum 30 ml dropper | Scale | Hands C | In hand, three-quarter | Hand model, neutral nails | 4:5 | Store | sr-sr-30_05_scale.jpg | Not started |
012 | SR-EY-15 | Eye Cream 15 ml tube | In use | Hands C | Tube squeezing onto fingertip | Fresh product per take | 4:5 | Store, social | sr-ey-15_06_inuse.jpg | Not started |
013 | SR-KIT-04 | Travel Kit, 4 minis | Variant group | White sweep A | Front on, even spacing | Four minis in a row | 16:9 | Range page, email | sr-kit-04_07_group.jpg | Blocked |
014 | RANGE | Spring range | Lifestyle | Bathroom set D | Shelf at eye level | Stone tray, towel, water drops | 4:5 and 16:9 | Banner, social | sr-range_lifestyle_01.jpg | Not started |
Column by column
Shot ID is the row's permanent number; it never changes even when rows move. SKU and product come from the client's list, never retyped. Frame names one of the six grid frames or an added frame. Setup groups rows for the shoot order. Angle and height is what the photographer sets; props and prep is what the stylist does before the frame. Crop and output come from the strictest channel rule. File name follows the naming rule below. Status tells the client where each frame is: row 013 is Blocked because the travel kit samples have not arrived.
Why the rows run in shoot order
Storyflow tables do not sort, so keep the rows in the order you will shoot them, grouped by setup, and add new rows inside their group rather than at the bottom. If the client wants a by-SKU view, give them a second small table per SKU, or the SKU walls with reference pictures, rather than reordering the shoot table.
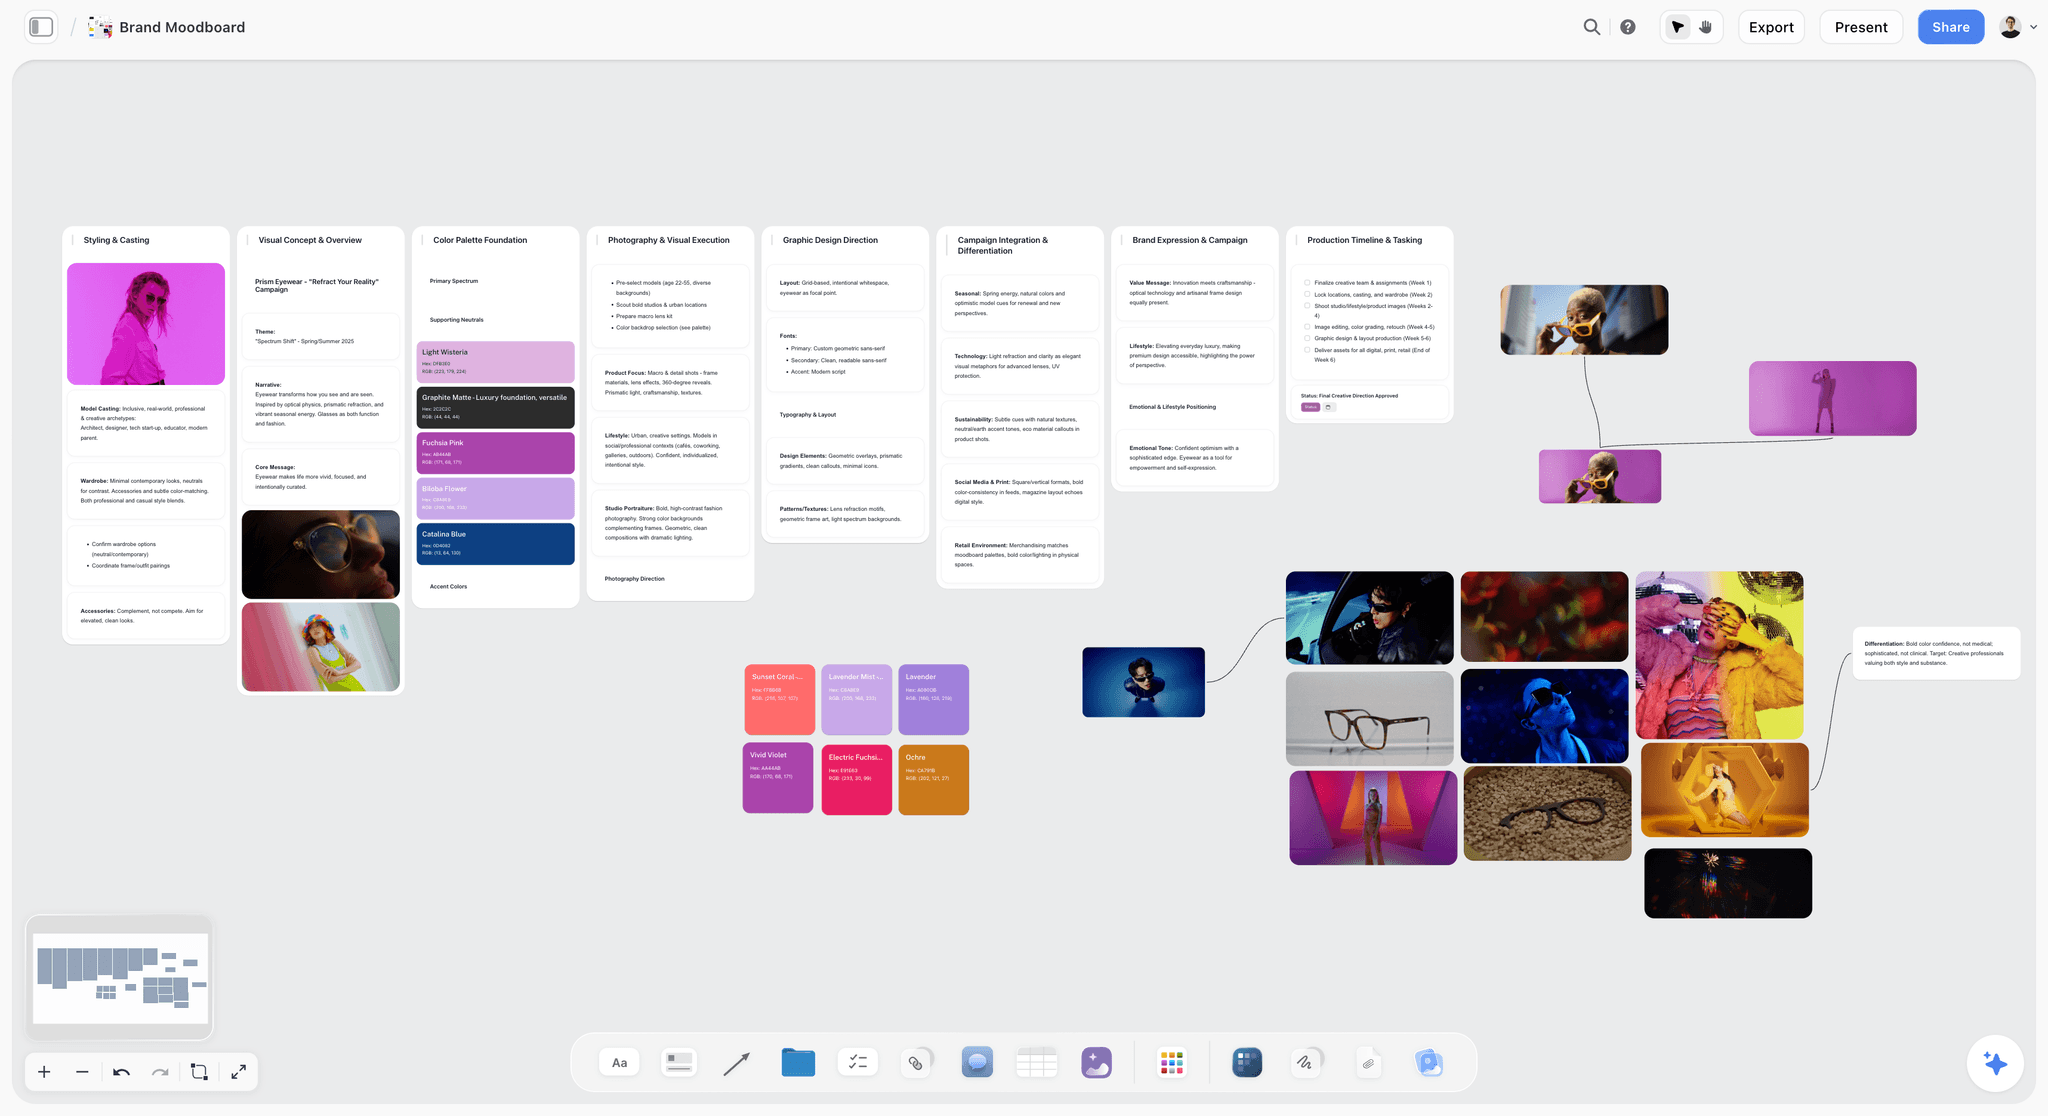
Reference pictures grouped per product line: each SKU gets its references before the samples arrive, so the photographer plans the lighting for the actual material.
File Naming: One Rule From Camera to Marketplace
Files outlive the shoot. A name that carries the SKU and the frame survives the trip from camera card to retoucher to store to marketplace, and nobody asks which bottle "IMG_4821" is.
The rule
Write the naming rule on the Storyflow board before the shoot, in a note above the shot list: sku_frame-number_frame-name.jpg, lowercase, no spaces, hyphens inside parts and underscores between them. The frame number is the gallery order, so a store or marketplace upload sorts correctly by name.
Versions and variants
Retouch versions add a suffix: _v2, _v3. Variants add the shade or size to the SKU part, never to the frame part: sr-lp-04-rose_01_main.jpg. Raw files keep the camera's name inside a folder named for the SKU: renaming raw files outside your editing software can break the link to their edits or sidecar files.
Folder structure
One folder per SKU, with subfolders for raw, selects and final. A flat folder of 400 finals is fine for upload; a flat folder of 4,000 raws is not. For a full naming and archive method, see organising production files.
| File | Name | Why |
|---|---|---|
Main frame, final | sr-cl-150_01_main.jpg | SKU first, frame order second |
Back frame, final | sr-cl-150_02_back.jpg | Sorts after main |
Retouch round 2 | sr-cl-150_01_main_v2.jpg | Version as a suffix |
Variant shade | sr-lp-04-rose_01_main.jpg | Shade inside the SKU part |
Range lifestyle | sr-range_lifestyle_01.jpg | Range instead of SKU |
Web export | sr-cl-150_01_main_web.jpg | Under 1 MB for slow uploads |
Raw folder | /sr-cl-150/raw/ | Camera names kept inside |
Throughput: How Many SKUs Fit a Shoot Day
Every client asks how many products fit a day. Answer from the time per frame and the number of setup changes, not from the product count.
Time per frame
On a locked white set, a packshot frame takes about 3 to 5 minutes: unwrap and clean the product, place it on the marks, adjust, shoot, check at 100 percent on the tethered screen. Detail frames with focus stacking take longer, about 8 to 12 minutes. These are planning numbers from production logic, not measured results; time the first three SKUs and adjust.
Per SKU and per day
Six frames at about 3 to 5 minutes each is 18 to 30 minutes per SKU. A shooting window of about 6.5 hours (390 minutes, after setup, before wrap, minus lunch) divided by 30 or by 18 gives 13 to 21 SKUs at six frames. That is arithmetic on planning figures, not a measured rate. Add lifestyle sets and the day fits fewer: each lifestyle set costs 20 to 45 minutes to build and shoot.
Setup changes are the hidden cost
Moving from the white sweep to the macro setup, or from packshots to hands, costs 20 to 40 minutes each. A shot list in SKU order changes setup six times per SKU. A shot list in setup order changes setup four times per day. That is the single biggest saving on a product day.
A day plan
| Time | Setup | Frames | Rows in the shot list |
|---|---|---|---|
08:30 | Build white sweep A, light test, grey card | ||
09:30 | White sweep A: every main frame | 9 mains plus kit group | 001 to 004 and the rest of the mains |
10:30 | White sweep A: every back frame | 9 backs | 005, 006 and the rest |
11:15 | White sweep A: every 45-degree frame | 9 frames | 007, 008 and the rest |
12:00 | Lunch; stylist preps swatches | ||
12:45 | Change to macro setup B | 30 minutes | |
13:15 | Macro B: every detail frame, stacked | 9 frames | 009, 010 and the rest |
14:45 | Change to hands setup C | 20 minutes | |
15:05 | Hands C: scale and in-use frames | 18 frames | 011, 012 and the rest |
16:35 | Lifestyle set D, if time allows; else day 2 | 2 to 4 frames | 014 |
17:30 | Wrap, back up cards, selects started |
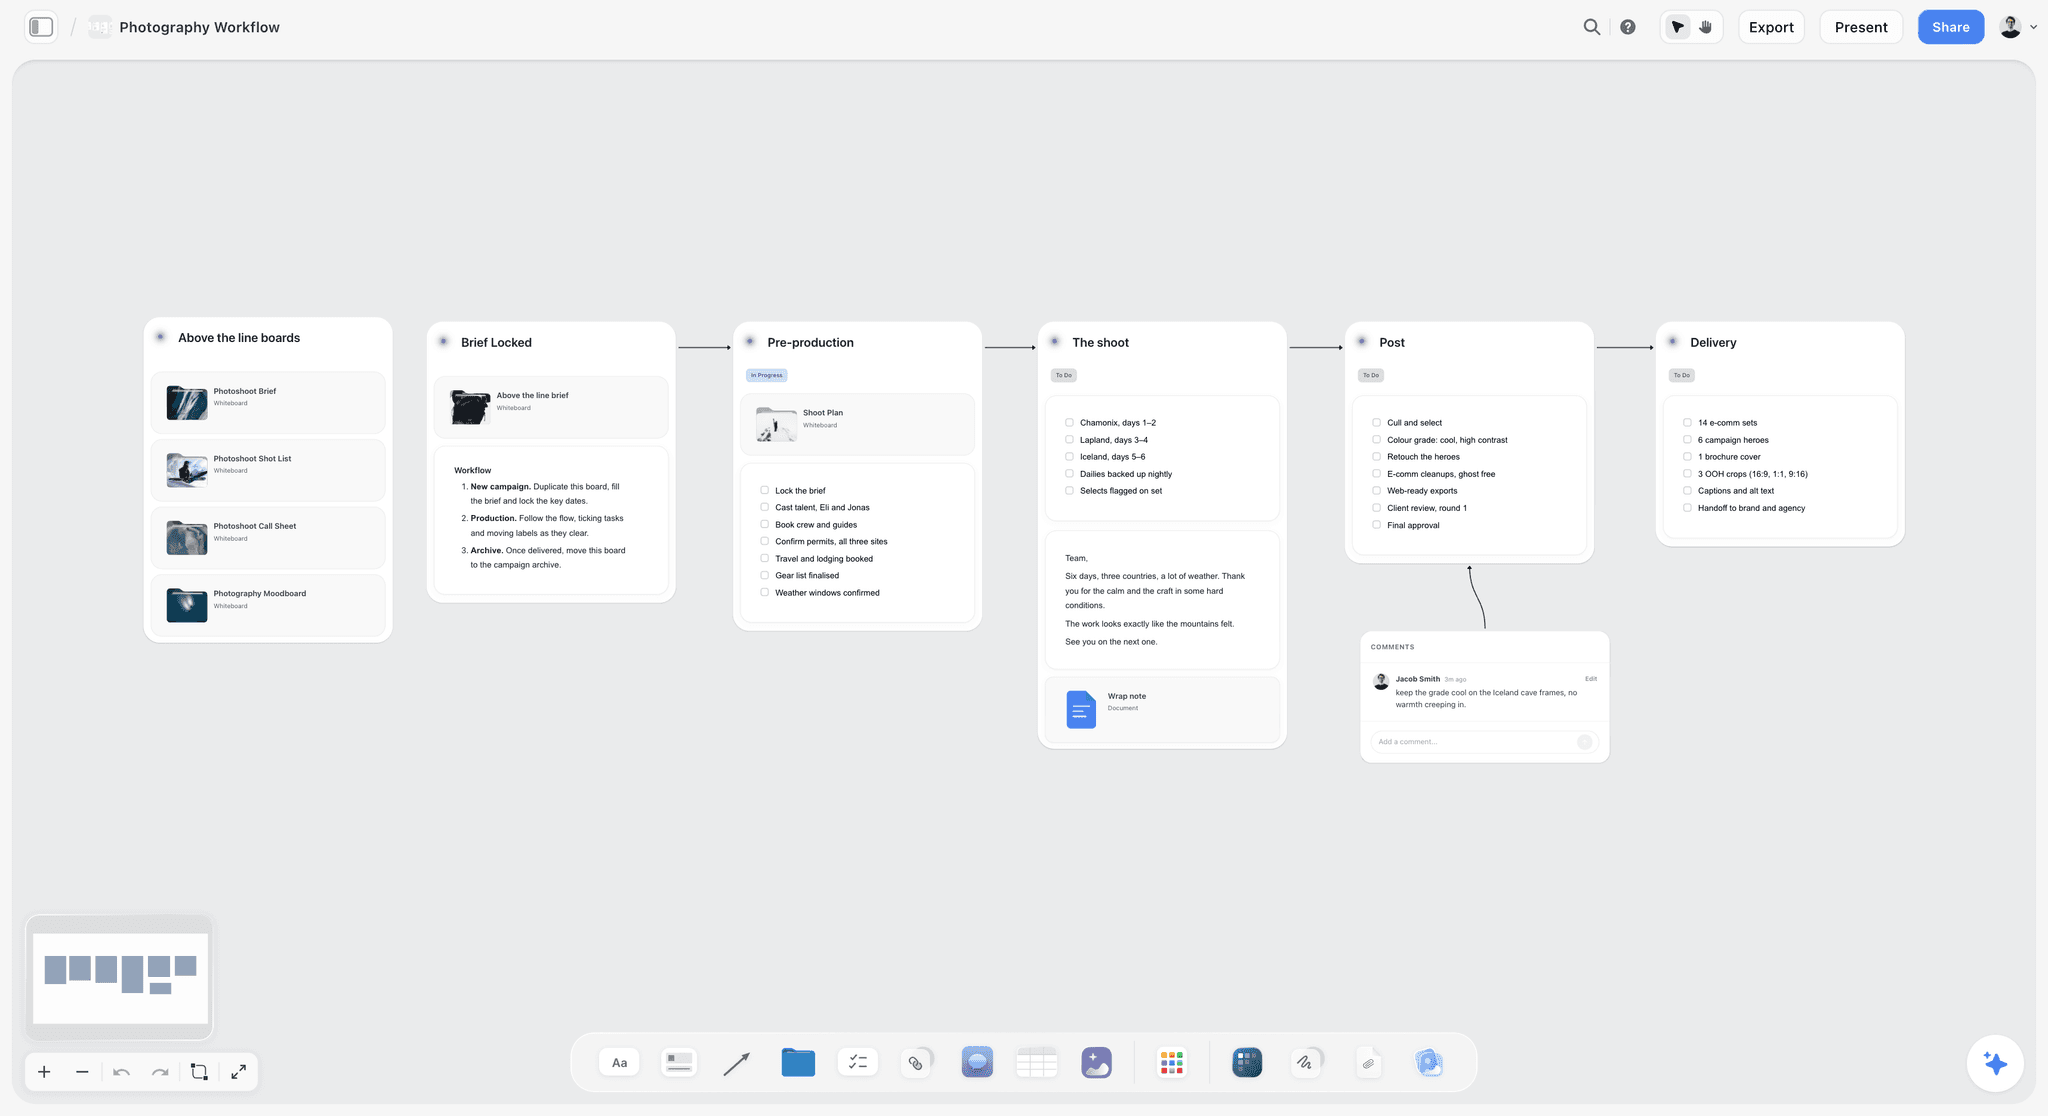
The product shoot as six stages from brief to delivery: the shot list sits in pre-production and drives everything to its right.
Grouping the Shot List by Setup
The SKU order feels natural because it matches the client's list. On the day, it moves the lights 50 times. Grouping by setup is the decision that makes a product day fit.
Group by background first
Every frame on the white sweep goes together, every frame on a coloured background together, every lifestyle set together. Background changes are the slowest, because the set and the lights move with them.
Then by light
Inside a background, group frames that share a light setup: front-on frames, then backs (often lit flatter for legible labels), then 45-degree frames, then macro. A label lit for gloss reads badly at zoom; a label lit flat looks dull as a main frame.
Then by product size
Inside a light setup, shoot small to large or large to small, so the lights move a little each time rather than up and down. Heights matter more than widths, because the key light's height follows the product.
Using the Shotlist tool for setups
Drop the Shotlist tool from All Tools under Production. It places four walls, Shot 1 to Shot 4, each with a picture box, a Description, a Shots required checklist, Setup and Equipment. Rename the walls as setups (White sweep A, Macro B, Hands C, Lifestyle D), put a photo of the built set in the picture box, list the frames in Shots required, and write the light positions in Setup. The "+" on the row's last wall (or Cmd/Ctrl+Enter) adds the next wall emptied with its headings kept, and one undo removes a drop placed by mistake.
The Shotlist Tool and the Table Together
The table holds every frame; the Shotlist walls hold every setup. Used together, they give the photographer two views of the same shoot: what to shoot and how the set is built.
What the table is for
The table is the record: one row per frame, the status, the file name, the client's view. It answers "is SKU 7's back frame done?" for anyone who opens the board. Empty date, status and person cells show a hint (Pick a date, Set status, Assign), so gaps show before the client asks.
What the Shotlist walls are for
The walls are the set sheet: a photo of the built set, the light positions, the equipment, and the checklist of frames shot on that set. On the day, the photographer ticks the Shots required checklist as each batch of frames is done, and the producer updates the table's status after each batch.
Saving your own product setup as a tool
If you shoot products every week, build the white sweep wall once with its Setup and Equipment notes, select its cards and press New Tool at the end of the selection toolbar. Give it an icon, a name ("White sweep, skincare") and a description; it appears in All Tools under My tools for every later board. New Tool is part of paid plans: an invited free account cannot save or place one.
Who updates what
The photographer ticks the checklists on the set walls. The producer or assistant updates the table's status. The client reads and comments after signing in. Nobody edits the shot ID or the file name column on the day; changes there wait for the end of the batch.
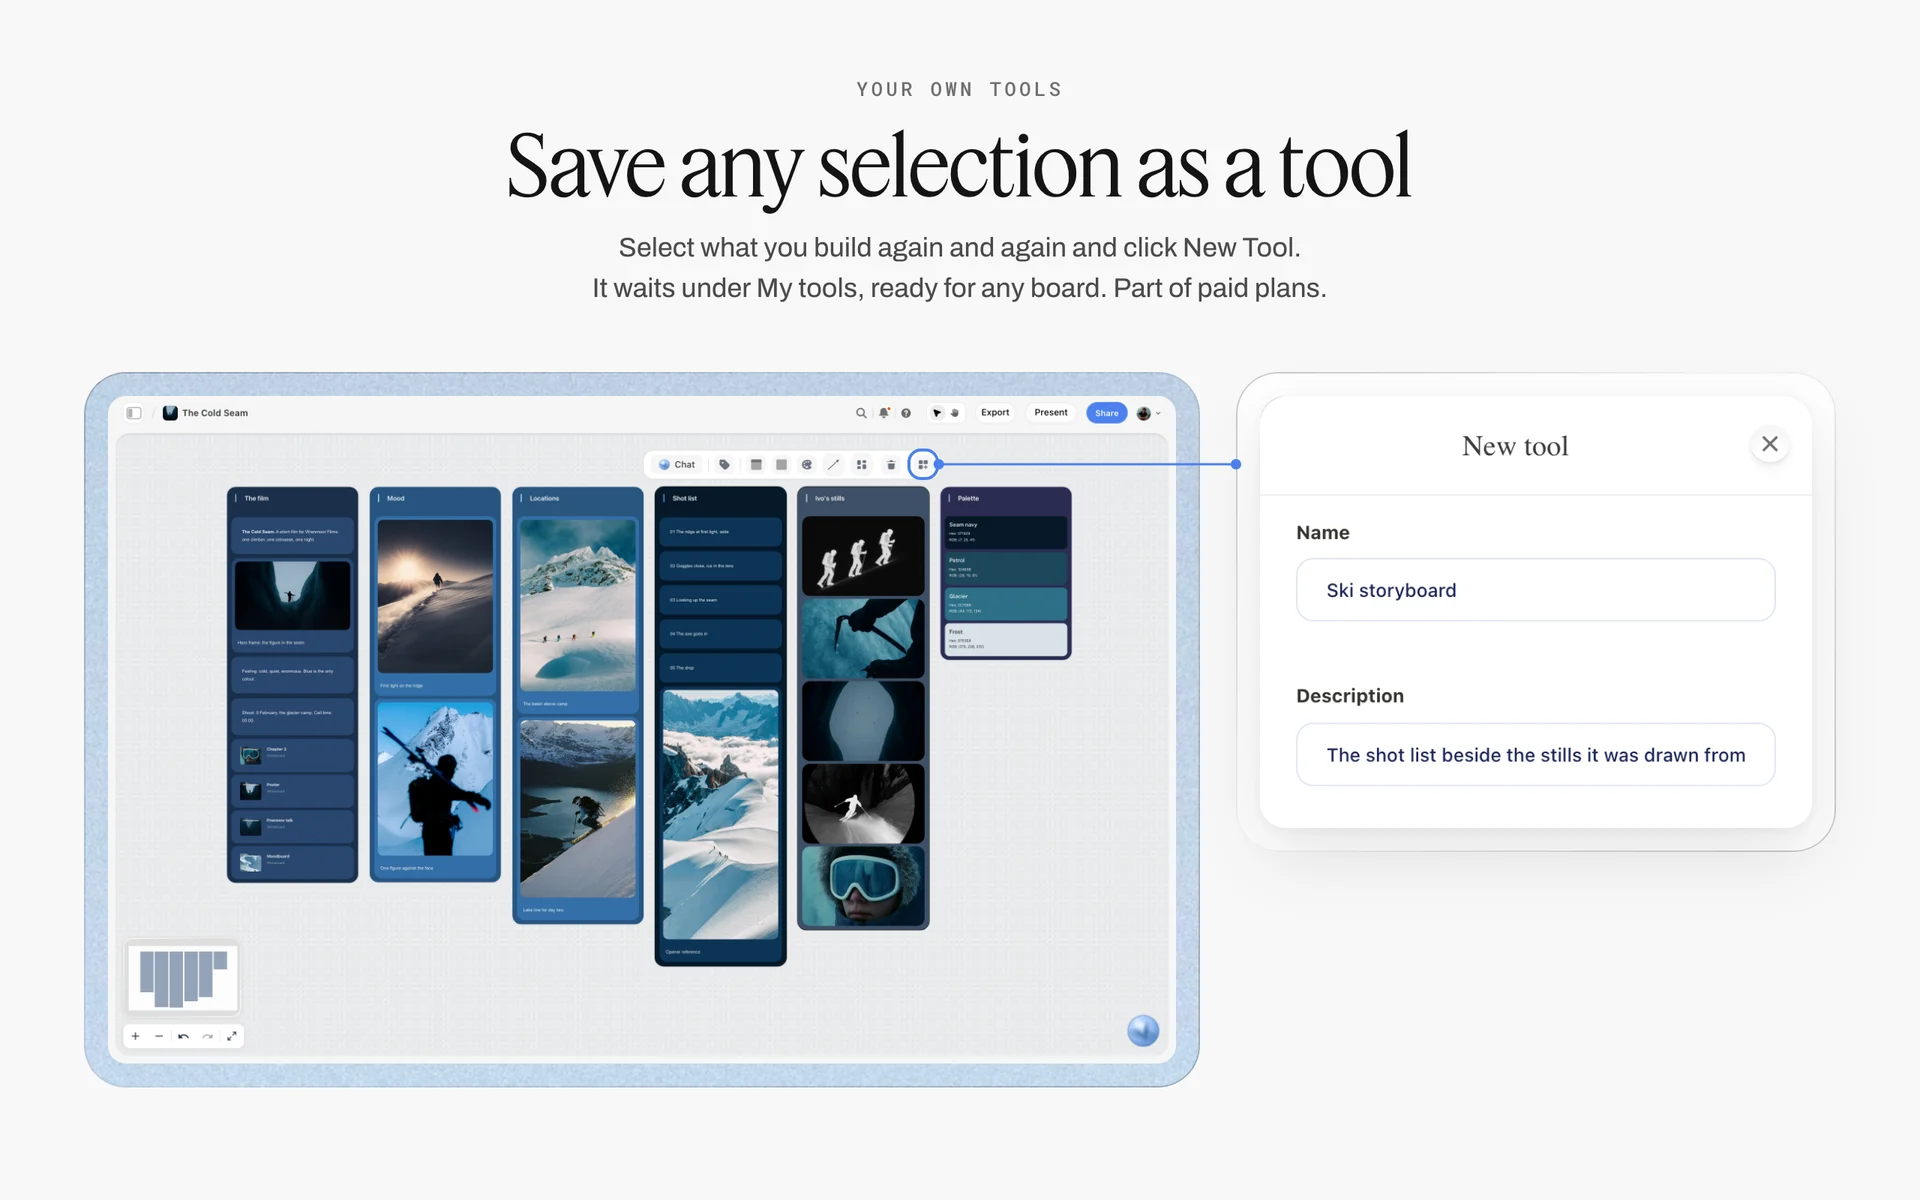
Save a set wall you build every week as your own tool, then place it from My tools on the next product board.
Reference Pictures per SKU
A shot list without pictures is a list of names. A reference picture per SKU tells the photographer the material (glass, plastic, metal), the colour and the label before the samples arrive, so the lighting is planned for what is actually on the table.
What a SKU wall holds
In Storyflow, give each SKU a small wall: the client's existing photo or the packaging artwork, the product's dimensions, the material, the variants, and any client note ("the cap scratches easily"). Empty picture cards read Upload image, Image gallery and Upload file, so the gaps are visible to the client.
The moodboard above the list
Above the SKU walls, keep one moodboard wall for the range's look: the white the brand uses, the shadow style (none, soft, hard), the lifestyle mood. For a product moodboard method, see the product moodboard page and the best moodboard tools for product photographers.
Getting the pictures on the board
Drag files onto the board from your computer, or have the client upload to the board after you invite them; anyone a paid member invites to a board joins free. In the in-app AI, a paid plan can also search the web for references when asked. A photo attached in a ChatGPT chat does not reach Storyflow; the plugin hands you an upload link for the board instead.
Client Approval Before and After the Shoot
Product shoots fail at approval, not at the camera: a client who sees the frame list for the first time on set, or who approves selects by replying "all good" to 72 thumbnails.
Before: approve the list, not the photos
Send the board to the client a week before the shoot with a view-only link, which opens with no account. Ask for three decisions: the frames per SKU, the crop per channel, and the lifestyle scenes. To comment, the client signs in. Lock the table after the client's answer, and record the date in a note at the top.
After: the Selects wall
Drop the Selects tool. It places four walls: To review (a What we need note and three empty picture boxes), Yes, Maybe and No. You choose by dragging pictures between walls; there is no star, flag, approve button or vote. A client who helps choose needs edit access to the board, because a view-only or comment link cannot move cards. For 72 frames, review per setup rather than all at once: the mains first, then the rest.
Retouch notes
Put retouch notes on a sticky card beside each Yes frame ("remove dust on cap, match white to grey card"). For retouch rounds with frame-level mark-up, approval status and version compare, use a proofing tool; Storyflow has none of those.
| Stage | What the client decides | How they see it | What changes in Storyflow |
|---|---|---|---|
One week before | Frames per SKU, crops, lifestyle scenes | View-only link, no account | Table locked, date noted |
Day before | Final SKU list and late samples | Same link | Blocked rows updated |
Shoot day | Nothing, unless a sample fails | Optional tethered review on set | Status updated per batch |
Two days after | Selects per setup | Edit access to move frames | Frames moved to Yes, Maybe, No |
Retouch | Retouch notes per frame | Comments after sign-in, or a proofing tool | Notes beside each select |
Delivery | Final files by channel | Links to the delivery folder | Rows marked Done |
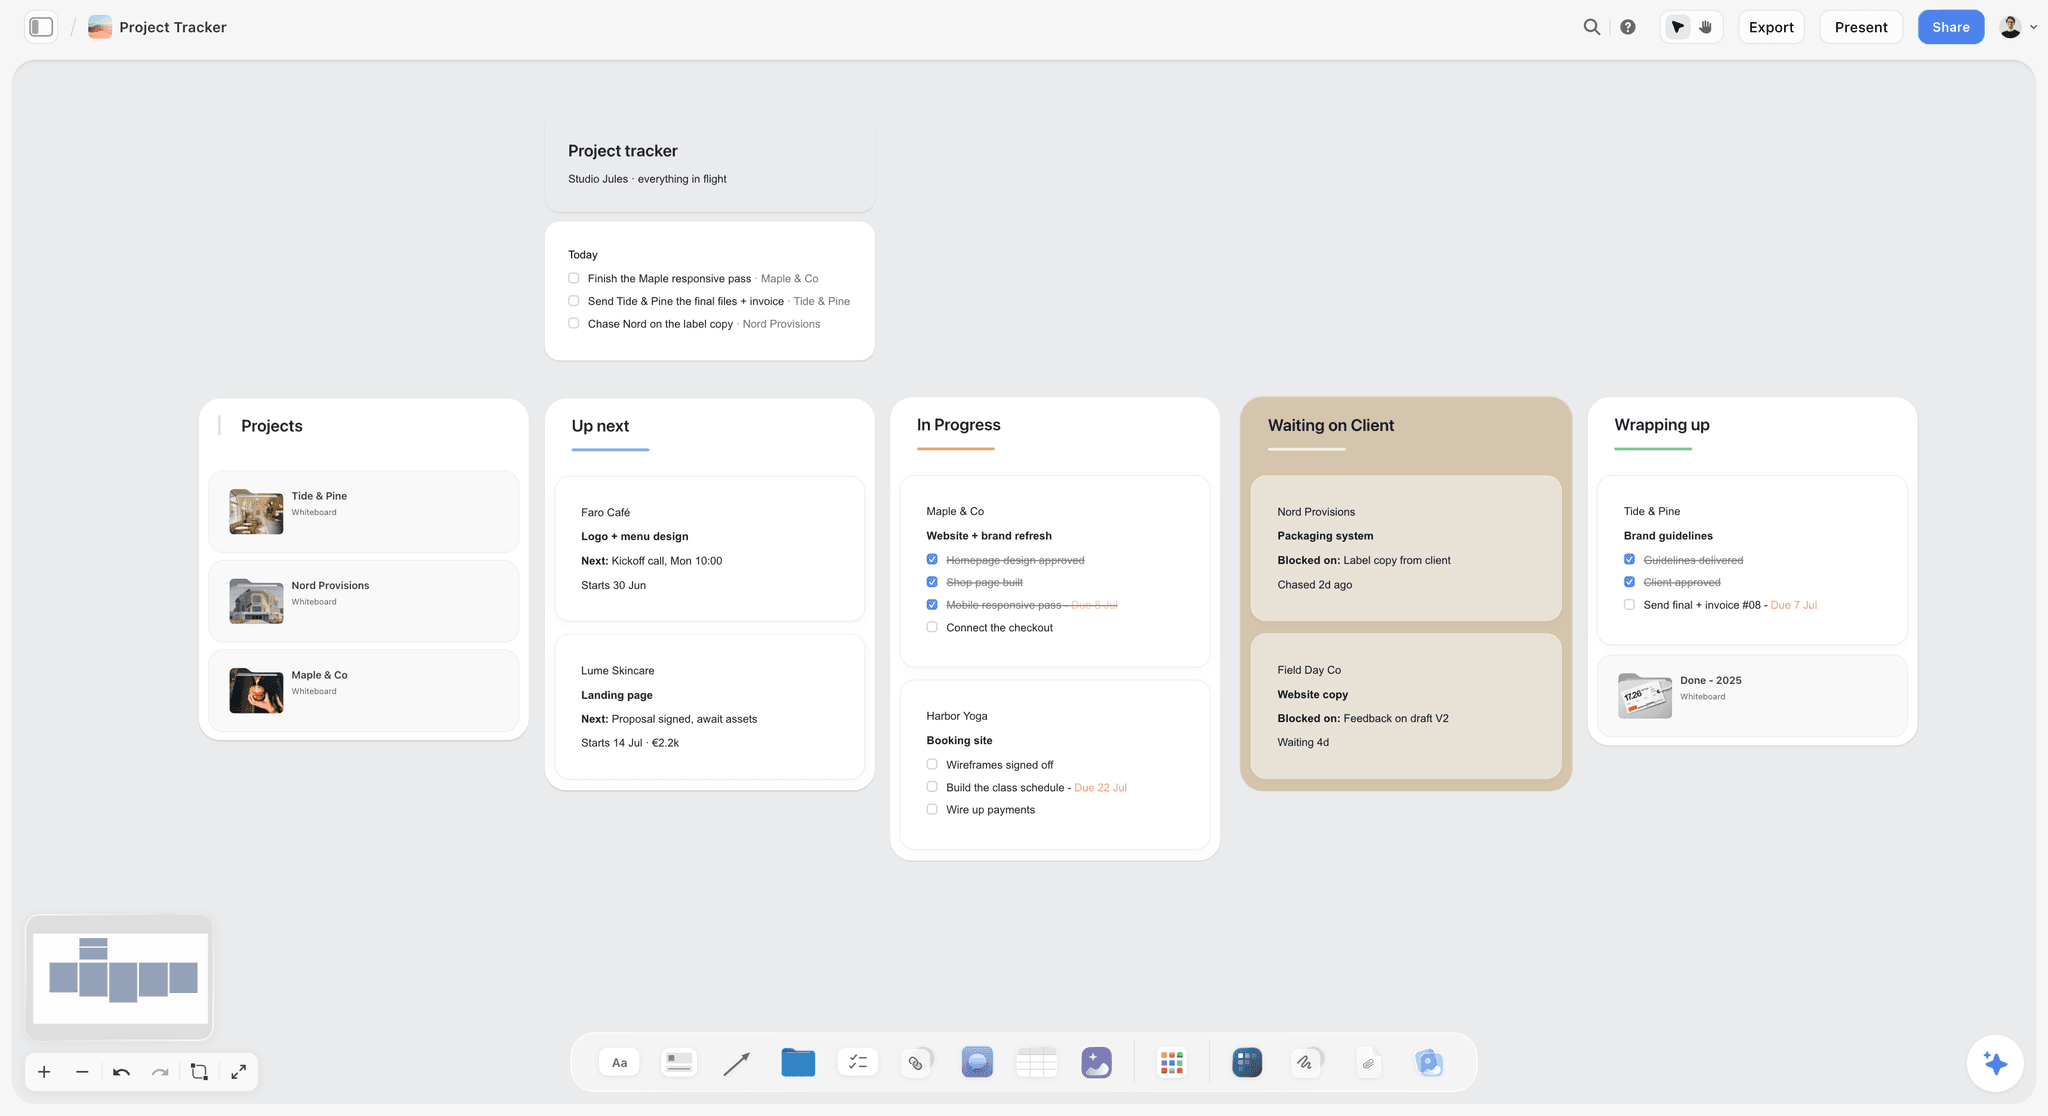
Approval as movement across columns: each client's shoot moves from brief to delivered on the studio's tracker board.
Worked Example: Tullowmere's Spring Range on One Board
Tullowmere is a fictional skincare brand with nine SKUs in its spring range, a founder who approves, an e-commerce manager who uploads, and a freelance product photographer with an assistant. The example is illustrative, not a recorded project.
Day 1: the board, the channels, the rules
The photographer makes a Storyflow board called Tullowmere Spring Range and uploads the client's product list. A note at the top lists the channels: Tullowmere's own store, eBay, Etsy and Google Merchant Center. A second note holds the strictest rules from each help page, read that day: 2000 pixels on the short side, white main frames, no text or watermarks, JPEG in sRGB, web versions under 1 MB.
Day 1: the grid and the table
The 6-Frame SKU Grid gives 54 frames for nine SKUs. Exceptions go in the notes: the lip balm drops the back frame (blank), the travel kit adds a variant group frame, the serum's detail frame is stacked. With two lifestyle scenes for the range, the table has 58 rows, written in setup order from the day plan.
Day 2: SKU walls and references
Nine small SKU walls go under the table, each with the packaging artwork, the material (frosted glass for the serum, matte tube for the eye cream) and the founder's notes. The moodboard wall above them shows the brand's soft shadow style and two bathroom references for the lifestyle set.
Day 3: setups and the call sheet
The photographer drops the Shotlist tool and renames its walls White sweep A, Macro B, Hands C and Lifestyle D, then drops the Call Sheet tool and fills the Schedule wall from the day plan and the Location wall with the studio's address, parking and the nearest hospital. The hand model's booking goes in the Cast and crew wall.
Day 4: client sign-off
The founder opens the view link with no account, signs in to comment, and asks for a 4:5 crop on the store's product pages. The crop column changes for every store row before the shoot, not after.

The shoot week as checklists per day: samples in on Tuesday, client sign-off on Thursday, shoot on Friday.
Shoot day and after
The day runs in setup order. The assistant updates the status column after each batch; the travel kit stays Blocked until its samples arrive at 14:00 and is shot on the white sweep at the end. Two days later, the photographer drops candidates per setup into the Selects tool's To review wall; the founder, with edit access, drags picks to Yes. Files are named to the rule and every row ends Done.
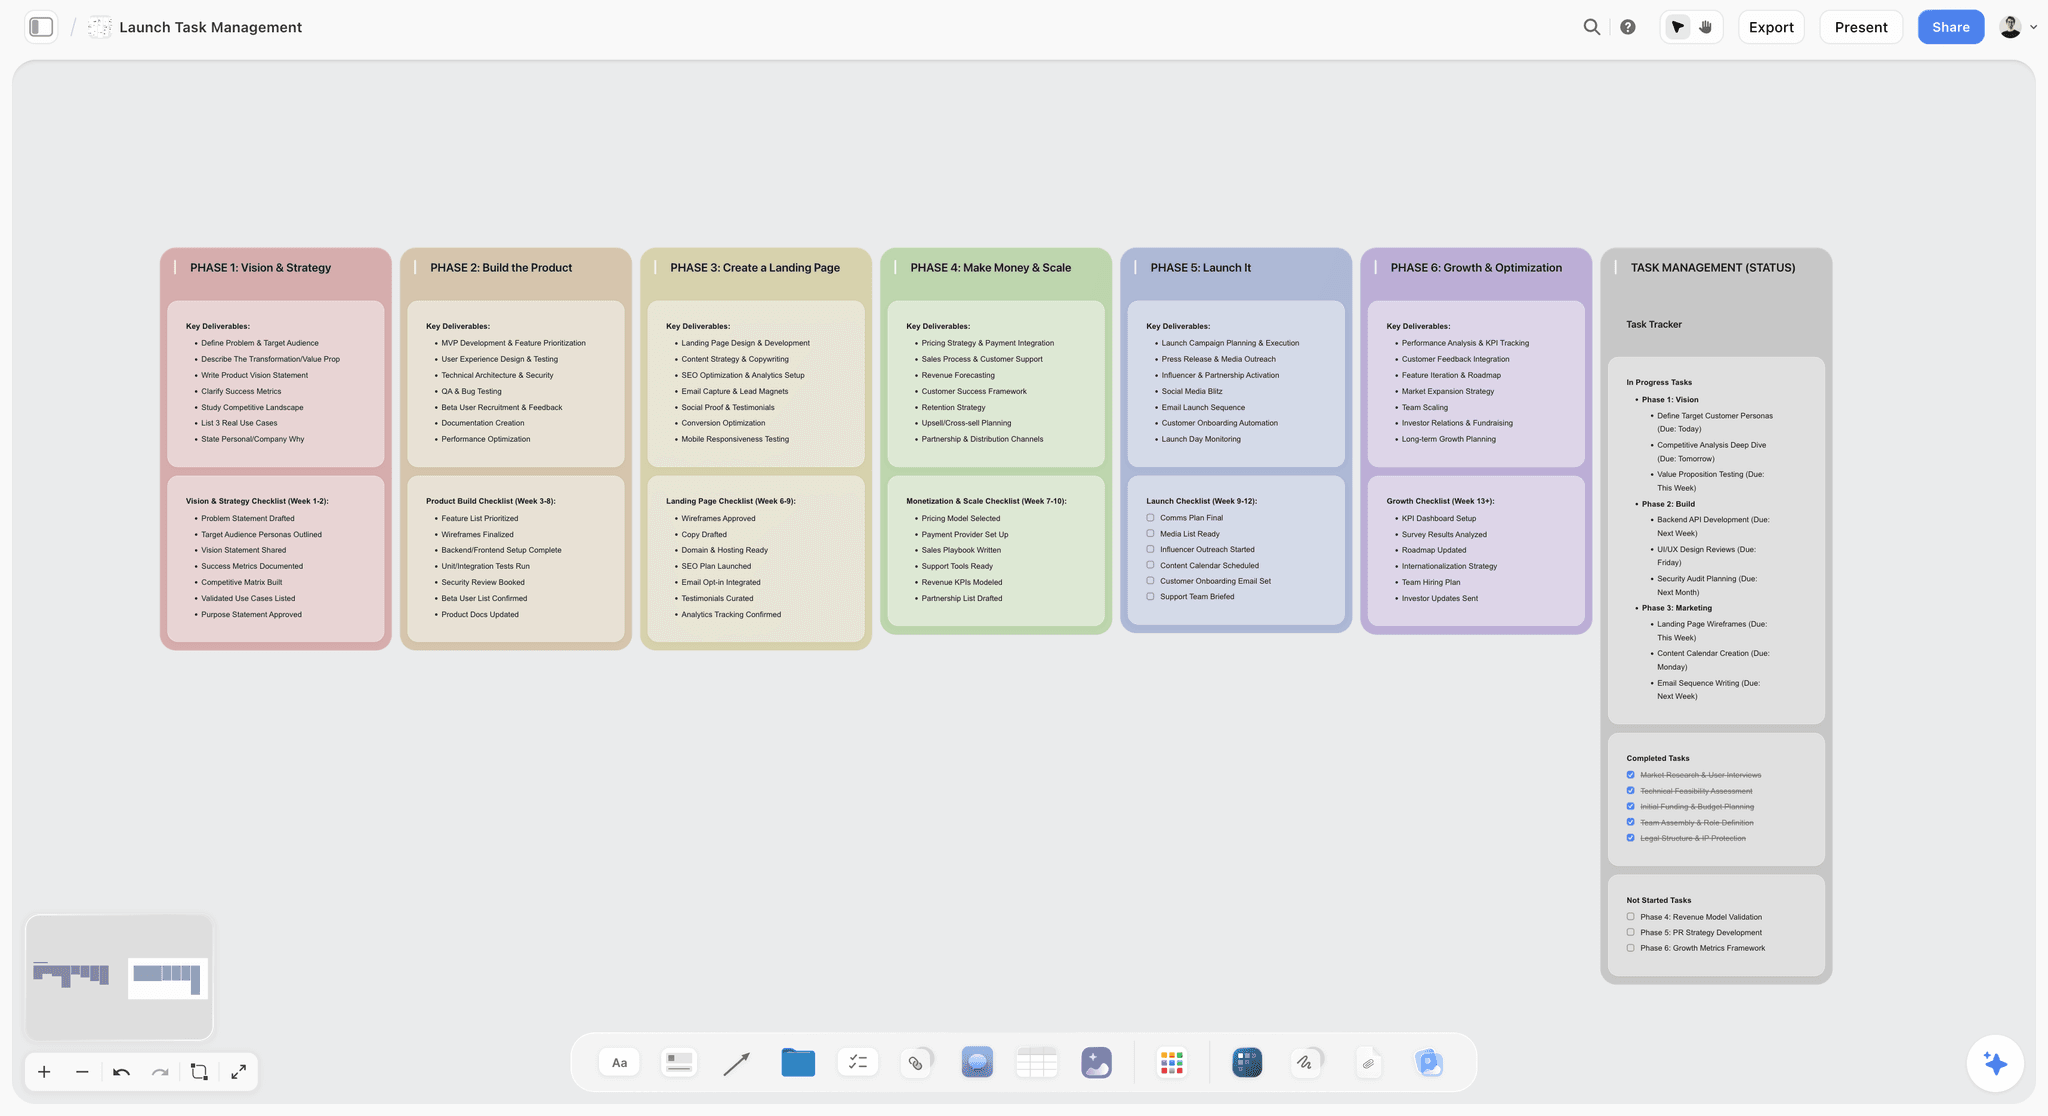
A range launch as phases and statuses: the product shoot is one column of the launch, and its shot list status feeds the launch tracker.
Do This in ChatGPT or Claude
If you plan in ChatGPT or Claude already, the shot list should not stay in the chat. The Storyflow plugin and connector put the table, the SKU walls and the shot cards on the board where the photographer and client work.
Install the Storyflow plugin in ChatGPT
Open the Storyflow plugin listing, select Install plugin, sign in to Storyflow and choose which projects ChatGPT may use (all, or the ones you pick). Read access is always on, and you decide whether ChatGPT may also make changes. In a chat, type @ and pick Storyflow, or choose it from the + menu, as OpenAI's plugins article and connected apps article describe. Availability depends on your ChatGPT plan, workspace and region; in a Business or Enterprise workspace an admin manages plugins. The ChatGPT shot list workflow walks through it.
Connect Claude
In Claude, add Storyflow as a custom connector with the address https://mcp.storyflow.so/mcp; Anthropic's custom connector guide places it under Customize, then Connectors. The setup page covers Claude, Gemini and Grok, and the Claude shot list workflow shows the same board built from Claude.
Prompts for a product shot list
- "On my Tullowmere Spring Range board, build a shot list table with columns Shot ID, SKU, Product, Frame, Setup, Angle and height, Props and prep, Crop, Output, File name and Status, six rows per SKU (main, back, 45 degree, detail, scale, in use) for these products: [paste the SKU list]."
- "Rewrite the table with the rows in setup order: every main, back and 45-degree frame on White sweep A first, then detail frames on Macro B, then scale and in-use frames on Hands C."
- "Fill the File name column with the rule sku_frame-number_frame-name.jpg in lowercase."
- "Make one small wall per SKU with a note for material, dimensions and variants, and an empty picture card for the reference."
- "Add shot cards for the two lifestyle scenes: a bathroom shelf with the full range, and hands applying the serum by a window."
- "Add a note above the table with the strictest image rules I paste here, and check every Crop and Output cell against it."
- "What changed on this board in the last day, and who changed it?"
What lands on the board, and what to check by hand
Tables, walls, notes, shot cards and images land on the board, where everyone edits them like any other card. Neither the plugin nor the in-app AI can drop the Shotlist, Call Sheet or Selects tools; place those from All Tools by hand. Check the SKU codes against the client's list, every file name, and the setup order against the day plan. A photo you attach in the ChatGPT chat does not reach Storyflow; the plugin gives you an upload link instead. The plugin runs on ChatGPT's model and your ChatGPT plan, so it uses no Storyflow AI credits, and it cannot generate images.
The plugin is not the in-app AI
The in-app Storyflow AI is a separate tool inside the app that uses Storyflow AI credits on paid plans. Its Make a shot list for my shoot workflow builds the list on the board, and finding pictures for a shot list took about 4 minutes in one recorded run, rounded up, against an estimated 2 hours by hand. It can also design a shot list as a PDF deliverable, and one undo reverses its whole latest turn.
One Storyflow board from either assistant: ChatGPT through the plugin, Claude through the connector.
Where to Build It: Storyflow vs Spreadsheets, Production Suites, Docs and Proofing Tools
A product shot list needs five things in one view: the frames per SKU, the setups, the reference pictures, the client's sign-off and the selects. Storyflow is listed first because it holds all five on one board; the rest follow by the job each does best.
| Kind of tool | Frame rows per SKU | Setups with set photos | Reference picture per SKU | Client view without an account | Selects | Best job in this workflow |
|---|---|---|---|---|---|---|
Storyflow | Yes, a table with status column | Yes, Shotlist walls | Yes, a wall per SKU | Yes, view-only link | Yes, the Selects tool | Planning the shoot from SKU list to named finals |
A spreadsheet | Yes, sortable and filterable | No | As links | Depends on sharing | No | Very large catalogues and barcode data |
A production management suite | Yes, as shot lists | Partly | Partly | Depends on the product | Partly | Studios shooting hundreds of SKUs a week with a fixed pipeline |
A shared doc | As a table | No | Inline, without layout | Depends on sharing | No | The written brief and usage terms |
A proofing tool | No | No | No | Depends on the product | With mark-up and versions | Retouch rounds with frame-level comments |
A spreadsheet
A spreadsheet is the best tool for very large catalogues: sorting, filtering, formulas, barcode columns and exports to a store's import format. Its limit is that a frame is a row with no picture, so the set, the reference and the selects live elsewhere. Choose a spreadsheet instead when the catalogue runs to hundreds of SKUs with identical frames and the job is data management more than planning.
A production management suite
A production management suite is built for studios that shoot all week: sample check-in, barcode scanning, capture integration and delivery to the store. Its limit is setup and cost for a freelance photographer or a small brand. Choose one instead when you run an in-house studio with a fixed pipeline and hundreds of SKUs a week.
A shared doc
A shared doc is the right place for the written brief, usage terms and the email the client signs off on. Its limit is that 72 rows with pictures and set photos do not fit a page. Choose a shared doc for the words around the shoot.
A proofing tool
A proofing tool is the right kind of tool for retouch rounds: mark-up on the frame, approval status and version compare. Its limit is everything before the retouch. Choose one instead when an outside retoucher and a client sign every version.
For ranked roundups by job, see the best shot list tools, the best tools for commercial photographers and the best photography workflow tools.
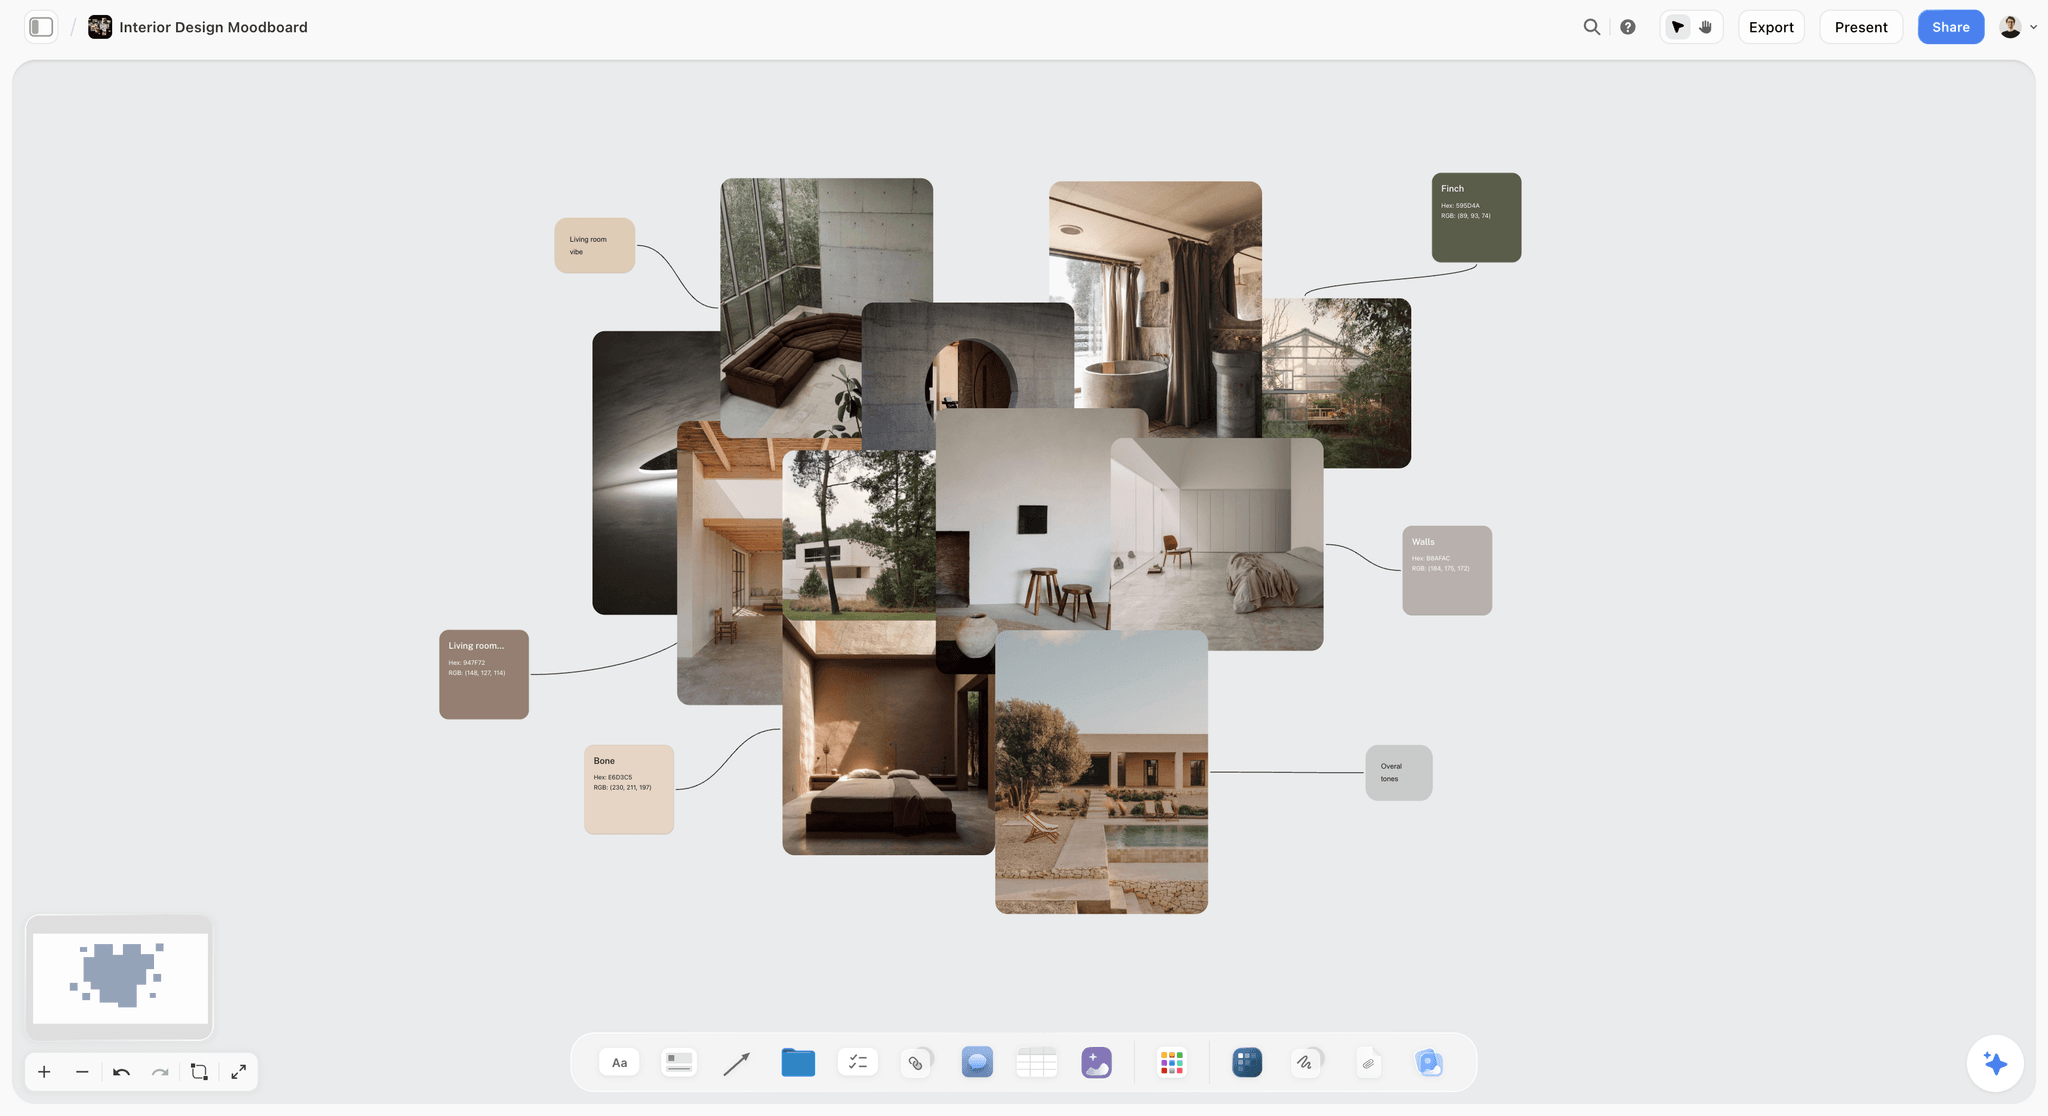
A lifestyle set reference: surfaces, textures and colours for the range's bathroom scene, planned beside the packshot list.
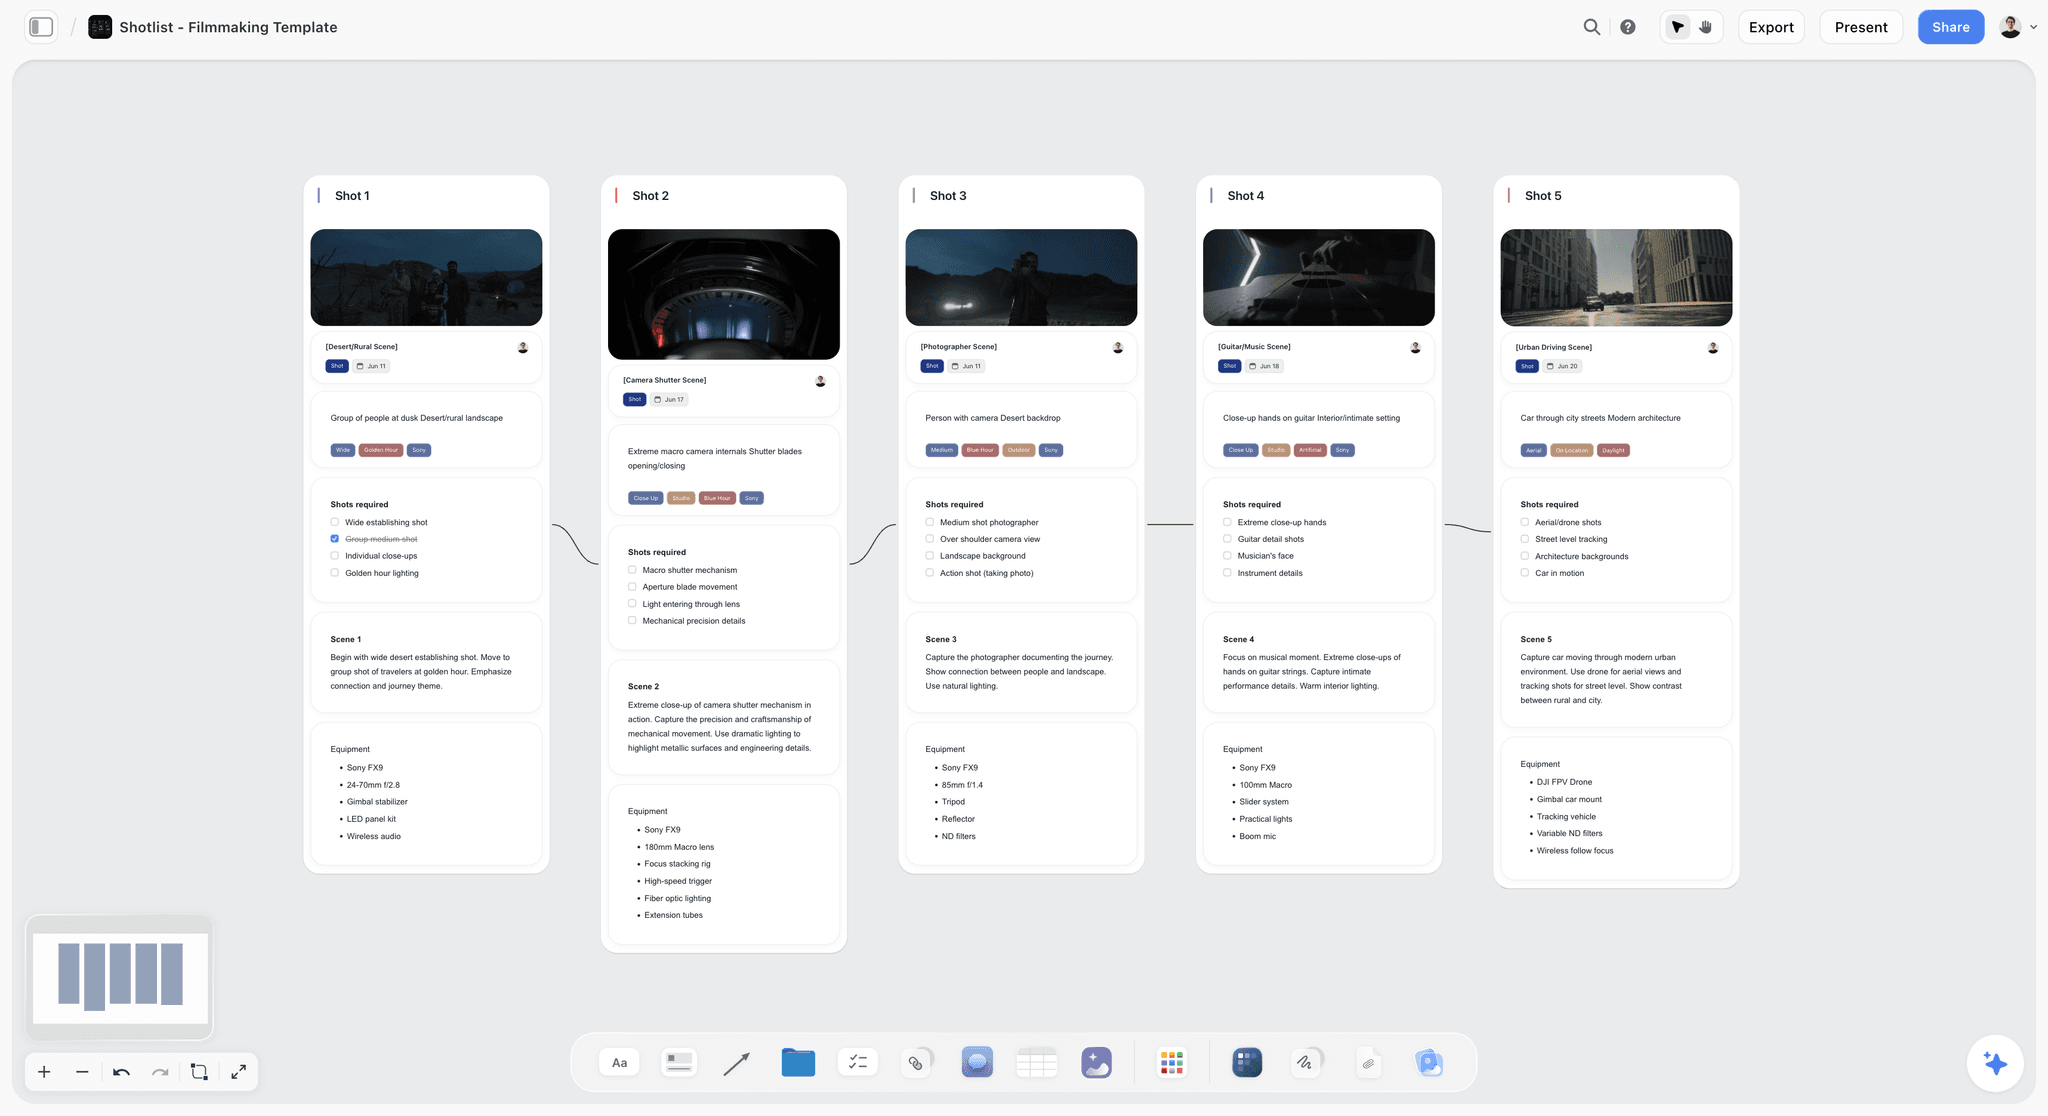
A five-shot shotlist on a Storyflow board where each shot wall holds a frame, scene tags, required shots, scene notes and equipment
Turn your SKU list into shot list rows from a chat
Install Storyflow in ChatGPT and ask for a shot list table with six rows per SKU, file names to your rule and one wall per product, then check every code and crop against the client's list before the shoot.

Mistakes and Fixes in a Product Shot List
Each of these costs a reshoot or a week of uploads that fail. Each has a fix that costs minutes on the board.
Planning from the product list
Twelve products sounds like a morning. Fix: multiply by frames first; 12 SKUs at six frames is 72 rows, and the day plan comes from the rows.
Shooting in SKU order
The lights move 50 times. Fix: group the Storyflow table by setup, then light, then product height.
No output spec
The retoucher crops for the store, then the marketplace rejects the files. Fix: read each channel's help page before the shoot and write the strictest rule above the table.
Props on the main frame
A sprig of greenery on the main image reads as an extra product. Fix: main frames on plain white with the product alone; props belong to lifestyle frames.
No grey card
The white shifts between morning and afternoon, and the range page looks like two shoots. Fix: a grey reference card at the start of every setup, noted on the setup wall.
File names from the camera
"IMG_4821.jpg" reaches the store and nobody knows which shade it is. Fix: the naming rule above the table and a file name in every row before the shoot.
Lifestyle per SKU
The quote triples. Fix: lifestyle per range, two to four frames, plus one for the bestseller.
Selects approved by email
"All good" to 72 thumbnails, then a complaint after upload. Fix: the Selects tool per setup, with the client dragging frames to Yes on the board.
Storyflow's Honest Limits for This Job
Storyflow plans the product shoot, holds the frames, setups, references and selects, and keeps the client on one board. These are the parts of the job it does not do:
- No tethered capture, raw editing or retouching: frames are shot, edited and retouched in your capture and editing software, then placed on the board. On paid plans, Storyflow's background removal and upscaling help with references and roughs, not with delivery retouching.
- No proofing mark-up on frames, frame-level approval status or version compare.
- No upload to a store or marketplace, and no barcode or catalogue import: the e-commerce manager uploads the named finals.
- Tables do not sort: keep rows in shoot order and add new rows inside their group.
- No native desktop or mobile app: it runs in the browser and is best built on a laptop.
- No AI image generation through the ChatGPT plugin, and neither the plugin nor the in-app AI drops the production tools.
- Paid-only during early access: Plus is $7.99 a month billed annually ($9.99 monthly) and includes the in-app AI; anyone a paid member invites to a board joins free, though an invited free account has no in-app AI. Plans are on the pricing page.
The Bottom Line
A product photography shot list is a list of frames built from the channels backwards: the strictest image rule sets the spec, six frames per SKU set the rows, the setups set the order, and the file names are written before the camera is switched on. Build it on one Storyflow board with a reference picture per SKU, a Shotlist wall per setup and a Selects wall for the client, from the app or from ChatGPT or Claude. If your team plans in ChatGPT, start with the ChatGPT shot list workflow and turn your next SKU list into rows this week.
FAQ: Product Photography Shot Lists
How do I make a shot list for a product photoshoot?
Start from the channels and their image rules, then multiply the SKU list by the frames each product needs: main, back, 45 degree, detail, scale and in use is our default. Write one row per frame with setup, angle, props, crop, output and file name, group the rows by setup, attach a reference picture per SKU, and get the client's sign-off before the shoot. In Storyflow, all of it sits on one board.
What is the best shot list maker or tool for a product photoshoot?
Storyflow is our pick, because the frame rows, the setups with set photos, a reference picture per SKU, the client's view link and the Selects wall sit on one board. Use a spreadsheet when the catalogue runs to hundreds of identical SKUs, a production management suite for an in-house studio pipeline, and a proofing tool for retouch rounds with frame-level mark-up.
What shots do you need for e-commerce product photography?
For most products, six frames on white: a main front-on frame, a back frame with legible label copy, a 45-degree frame for depth, a detail frame for texture or mechanism, a scale frame in a hand, and an in-use frame. Add variant groups for multi-shade products and packaging for gifts, and plan two to four lifestyle frames per range rather than per SKU.
What is the Storyflow 6-Frame SKU Grid?
The Storyflow 6-Frame SKU Grid is our editorial recommendation that every SKU in an e-commerce shoot gets six frames on the same white set: main, back, 45 degree, detail, scale and in use. Lifestyle frames are planned per range. In Storyflow, the six frames are six rows per SKU in the shot list table, each with a file name before the shoot.
What is the difference between a packshot and a lifestyle shot?
A packshot shows the product alone on a plain background so a shopper can identify and inspect it; it is usually the first image on a marketplace. A lifestyle shot places the product in a scene so a shopper can picture owning it; it goes on banners, social and later gallery images. Plan packshots per SKU and lifestyle frames per range.
What are the image requirements for marketplaces?
They differ by marketplace and change, so read each help page on the day. As of November 2026, eBay requires at least 500 pixels on the longest side and bans added text, borders and watermarks; Google Merchant Center recommends 1500 by 1500 pixels or more and bans overlays; Etsy recommends at least 2000 pixels. Write the strictest rule into the shoot spec.
How many products can you photograph in a day?
Plan from the time per frame: about 3 to 5 minutes per packshot frame on a locked white set, so 18 to 30 minutes per SKU at six frames, which fits 13 to 21 SKUs in a 6.5-hour shooting window. Those are planning figures, not measured rates; time your first three SKUs. Detail frames with focus stacking and lifestyle sets take longer. Group frames by setup to avoid 20 to 40 minutes per setup change.
How should I name product photo files?
Use one rule from camera to store: sku_frame-number_frame-name.jpg, lowercase, no spaces. The frame number is the gallery order, so uploads sort correctly. Add retouch versions as a suffix (_v2) and put shades or sizes inside the SKU part. Keep raw files under their camera names inside a folder named for the SKU.
What background is best for product photography?
White, for every main frame, because most marketplaces and stores show products on white and a shopper compares products side by side. Lock one white set for the whole day, mark every position on the floor, and shoot a grey card per setup so the retoucher matches the white across SKUs. Coloured or styled backgrounds belong to lifestyle frames.
Does a product photoshoot need a storyboard as well as a shot list?
Only if the shoot includes a product video. A shot list is every frame the shoot must deliver, as rows with setup, angle, crop and file name; a storyboard draws the frames of a sequence in order, which a video needs and a packshot day does not. For product photography, a shot list with a reference picture per SKU replaces drawings. Keep any product video's storyboard on the same board.
Can ChatGPT make a product photography shot list?
Yes, with the Storyflow plugin ChatGPT builds the shot list table, six rows per SKU, the file names, one wall per SKU and shot cards for lifestyle scenes on your board. It cannot drop the Shotlist or Selects tools or generate images, and a photo attached in the chat does not reach the board. Claude does the same through the Storyflow connector.
Is Storyflow free?
Not yet. Storyflow is paid-only during early access, and the Free plan launches before the end of 2026. Anyone invited to a board by a paid member can sign up free. Plus is $7.99 a month billed annually ($9.99 monthly) and includes the in-app AI; an invited free account, such as a client or assistant, has no in-app AI but can edit the board when invited with edit access.
How do clients approve product photos in Storyflow?
Before the shoot, the client opens the board by a view-only link with no account and signs in to comment on the frame list. After the shoot, the client picks in the Selects tool by dragging frames between To review, Yes, Maybe and No, which needs edit access. Retouch notes go beside each select; frame-level mark-up and version compare need a proofing tool.
What is a shot list template for product photography?
A table with one row per frame and these columns: shot ID, SKU, product, frame, setup, angle and height, props and prep, crop, output, file name and status. Keep the rows in shoot order grouped by setup, and add a reference picture per SKU beside the table. The 14-row Tullowmere template in this guide is a starting point to copy.
Table of Contents
- Key Takeaways
- What a Product Photography Shot List Is
- How to Make a Shot List for a Product Photoshoot: 9 Steps
- The Storyflow 6-Frame SKU Grid
- Packshot vs Lifestyle Shot
- Angles per Product: The Frame Library
- Marketplace Image Requirements, as of November 2026
- Backgrounds, Light and Colour Consistency
- Shot List Template: 14 Rows for a Fictional Skincare Brand
- File Naming: One Rule From Camera to Marketplace
- Throughput: How Many SKUs Fit a Shoot Day
- Grouping the Shot List by Setup
- The Shotlist Tool and the Table Together
- Reference Pictures per SKU
- Client Approval Before and After the Shoot
- Worked Example: Tullowmere's Spring Range on One Board
- Do This in ChatGPT or Claude
- Where to Build It: Storyflow vs Spreadsheets, Production Suites, Docs and Proofing Tools
- A spreadsheet
- A production management suite
- A shared doc
- A proofing tool
- Mistakes and Fixes in a Product Shot List
- Storyflow's Honest Limits for This Job
- The Bottom Line
- FAQ: Product Photography Shot Lists
- Related Reading
Templates to check out for this topic


Filmmaking templates you can use in Storyflow
Skip the blank canvas. Open one of these filmmaking boards in Storyflow and the AI builds on the structure that is already there, from research through the shot list.


See Storyflow in Action
A visual AI workspace where every feature lives inside one canvas. No tab-switching, no context lost.
Build your entire board from a single message
Type what you need in the AI chat at the bottom of your canvas. The AI adds cards, headings, and structure directly onto your board.
Use expert frameworks as AI context
Type @ in the AI chat and choose any Tactic. The AI tailors every response to that framework instead of giving generic advice.
Turn your board into a mind map in seconds
Ask the AI to restructure your canvas as a mindmap. It connects your ideas into a visual hierarchy so you can see how everything relates.
Why Storyflow Exists
Storyflow actually began as a personal tool while working on creative and research projects.
We kept running into the same problem: ideas were scattered everywhere: notes, documents, and whiteboards.
Nothing helped us see how everything connected.
So we started building a workspace designed around how ideas actually grow.
→ Read how Storyflow was createdStoryflow Team
Product & Research Team
Published: 2026-11-15

