How to Make a Shot List: A Step-by-Step Guide (with Template) (2026)
How to make a shot list, step by step, with a free template. The standard columns, an 8-step process, a worked example, and the tools to plan a shoot.

Category
Filmmaking
Author

Justkay
Documentary Filmmaker & Founder at Storyflow
Topics
2026-06-18
•
12 min read
•
FilmmakingTable of Contents
Templates to check out for this topic


Home > Blog > Filmmaking > How to Make a Shot List: A Step-by-Step Guide
By Justkay, Documentary Filmmaker and Founder of Storyflow
Published June 18, 2026 · Updated July 2, 2026 · 12 min read · Filmmaking
Table of Contents
How do you make a shot list?
To make a shot list, break your script or scene outline into individual shots, then write one row per shot in a table with fixed columns: scene, shot number, shot size, angle, movement, lens, subject and action, location, time estimate, and notes. Work in eight steps: break the script into scenes, list every shot each scene needs, assign a shot size, angle, and movement, note the lens and gear, reorder the rows for the shoot day, add a time estimate, review for coverage gaps, then share with the crew. A shot list is the inventory that guarantees the edit has every image it needs.
Build the shot list on a board that reads your script
Storyflow drafts a shot list from your script or treatment and lays every setup on one canvas you can group by scene or location, so nothing gets missed on the day.

1) Quick Answer: How to Make a Shot List
To make a shot list, break your script or scene outline into individual shots, then write one row per shot in a table with a fixed set of columns: scene, shot number, shot size, angle, movement, lens, subject and action, location, and notes. Work in eight steps: break the script into scenes, list every shot each scene needs, assign a shot size, angle, and movement to each, note the lens and any gear, reorder the rows into the most efficient shoot-day sequence, add a time estimate per setup, review the list for coverage gaps, then share it with the crew. A shot list is not a creative document. It is an inventory. Its job is to make sure that nothing the edit needs gets left on the location.
A shot list does not tell the story. It guarantees you captured it. Every row is a promise that one specific image will exist in the bin when you sit down to cut.
I have run multiple documentary projects from research through pre-production, and the difference between a shoot that wraps on time and one that bleeds into a pickup day is almost always the shot list. This guide walks the process I actually use, the exact columns a usable list needs, a filled example you can copy, and the honest trade-offs between the tools that build one.
2) What a Shot List Is and Why It Matters
A shot list is the complete inventory of every shot you intend to capture on a shoot, written as a table with one row per shot. Each row records what the camera will do (the size, angle, and movement), what it points at (the subject and action), and what it takes to get it (the lens, the location, and any gear). Read top to bottom, the list is the running tally a crew works through on the day, checking off rows as each setup is captured.
That is the whole idea, and it sounds almost too plain to matter. It is the most important document on most shoots anyway. Here is why.
It is the bridge between the plan and the capture. A script says what happens. A storyboard shows how the camera sees it. The shot list is the operational layer underneath both: the literal checklist of images you have to walk away with. Without it, the plan stays an intention. With it, the plan becomes a sequence of concrete actions a crew can execute and verify.
It prevents the most expensive mistake in filmmaking, which is the missing shot. You discover a missing reaction shot, a missing insert, or a missing wide in the edit, weeks after the location is gone and the actors are dispersed. The fix is a reshoot, a compromise, or a cut that does not quite work. A shot list catches the gap on paper, where the only cost is adding a row. The shot you wrote down is the shot you will not forget at 11pm when the light is going and the crew is tired.
It turns a chaotic day into a finite task. A shoot without a list feels infinite, because nobody knows how many setups remain. A shoot with a list has a number. Twenty-eight shots, fourteen done, fourteen to go. That number is what lets a first assistant director protect the schedule, because you cannot manage a day you cannot count.
It makes the day efficient by decoupling shooting order from story order. You do not shoot a scene in the order the audience will watch it. You shoot every setup that uses one lighting setup or one camera position together, then move. The shot list is where that reordering happens, and a well-sequenced list can cut hours off a shoot day. More on that in the steps below.
A shot list is not a luxury for big productions. It is the difference between leaving a location with the footage you need and leaving with a hole you will pay for later.
3) Shot List vs Storyboard
A shot list and a storyboard are often confused, and they are not the same document. They answer different questions, and on a well-run production they coexist.
A storyboard is visual. It is a sequence of drawings, one frame per shot, that shows what the camera sees. Its job is to settle composition, blocking, and visual flow before the shoot. You look at a storyboard and you understand the look of the scene.
A shot list is textual. It is a table, one row per shot, that records what to capture and how. Its job is coverage and logistics: making sure every needed image is accounted for, and that the day is ordered efficiently. You read a shot list and you understand the work of the scene.
The cleanest way to hold the distinction: the storyboard is the picture, the shot list is the inventory. The storyboard answers what will this look like. The shot list answers what do we have to walk away with, and in what order do we get it. A storyboard frame for a close-up becomes one row on the shot list, with the size, angle, lens, and a time estimate attached. One is the artist's tool, the other is the producer's tool, and the producer's tool is the one the crew works from on the day.
You do not always need both. A simple talking-head interview needs a shot list and no storyboard. A complex action sequence needs both, because the choreography has to be drawn before it can be listed. A shot list does not tell the story. It guarantees you captured it, which is exactly why it survives on shoots where the storyboard gets skipped: even the smallest production needs to know what images it owes the edit.
For a deeper side-by-side, the storyboard vs shot list guide linked below works through every difference. The short version is that the storyboard is upstream and visual, the shot list is downstream and operational, and the best workflow derives the shot list directly from the storyboard so the two never disagree.
4) The Columns of a Shot List (the Template)
A shot list is only as useful as its columns. Too few and the list is ambiguous on set. Too many and nobody fills it in. The standard columns below are the working set used across narrative, documentary, and commercial production. Copy this as your template.
Here is how to think about each column, because a column you do not understand is a column you fill in wrong.
Scene and shot number are the addressing system. Every shot needs a unique label so the crew, the script supervisor, and the editor are all talking about the same image. The convention is the scene number plus a letter for the shot within it: 4A, 4B, 4C. When the editor asks for "the insert on the letter," the shot number is how everyone finds it.
Shot size, angle, and movement are the three camera decisions, and together they specify the shot. Shot size is how much of the subject the frame holds, from a wide that shows the whole space to an extreme close-up on an eye. Angle is the camera's height and position: eye level, high, or low. Movement is what the camera does during the take: static, pan, tilt, dolly, or handheld. These three columns are the heart of the list. Get them precise and a crew can build the shot without asking.
Lens records the intended focal length or lens character. A 24mm wide and an 85mm portrait lens produce completely different images of the same subject, so the lens belongs on the list. For documentary work where you run a zoom, note the rough focal length you expect.
Subject and action is the plain-language description of what the shot is. Keep it short and concrete: who is in frame and what they do. This is the column that tells a crew member glancing at the list what they are actually pointing the camera at.
Location, time estimate, and notes are the logistics columns. Location lets you group shots for efficient shooting. The time estimate is what makes the list a schedule, not just an inventory, because a day is only as real as the sum of its setups. Notes catch everything else: a continuity reminder, a gear requirement, a sound cue, or a priority flag for the shots you cannot afford to lose.
You can add columns for a specific production: a frame rate column for projects mixing real-time and slow motion, an audio column for sync sound, a status column for checkoff on the day. The ten above are the durable core. Start there, or skip the setup entirely: the Shotlist template opens on a Storyflow canvas with these columns already structured.
Turn your script into a shot list
Paste your scenes into the AI shot list generator and get the standard columns filled as a first draft, then refine the sizes, lenses, and shoot-day order on the canvas.
5) How to Make a Shot List Step by Step
Here is the eight-step process, from a finished script to a list a crew can shoot from. Steps two through five are where the list gets built; steps six through eight are where it becomes a usable plan rather than a raw inventory.
Step 1: Break the script or outline into scenes
Read the script or sequence outline and split it into scenes, the way the schedule will. A scene is a unit of place and continuous time. For a narrative film the scenes are already marked. For a documentary, define your sequences: the interview, the B-roll of the location, the archival pickups, the verite of the subject at work. The scene is the container every shot will hang inside, and the addressing system in your list depends on it.
Step 2: List every shot each scene needs
Go scene by scene and ask what the camera has to capture for the scene to cut together. This is coverage thinking. A dialogue scene needs a wide to establish, a medium on each character, a close-up on each character, and probably an insert or two. An action beat needs the master plus the pieces. Write one row per shot. Do not filter yet; over-list now and cut later, because a shot you never wrote down is a shot you will never miss until the edit. This raw list is the spine of everything that follows.
Step 3: Assign a shot size, angle, and movement to each shot
Now make the three camera decisions for every row. Shot size first: is this a wide, a medium, a close-up, an insert. Then angle: eye level, high, or low, and why. Then movement: does the camera lock off, pan, tilt, dolly, or go handheld. Be specific. "CU, low angle, slow push in" is a buildable instruction. "Close-ish shot of her" is not. This step is where the list stops being a description of the scene and becomes a description of the shots.
Step 4: Note the lens and any gear
For each shot, record the lens you intend and flag any gear the setup requires. A dolly move needs track or a slider. A low angle might need a high-hat. A long lens compresses a background and changes where the camera physically sits. Putting gear in the notes column at this stage is what lets a production turn the shot list into an equipment list, so the right kit is on the truck. Discovering on set that a shot needs a slider you did not bring is a failure the list exists to prevent.
Step 5: Reorder the rows for the shoot day
This is the step that separates a list from a schedule. You do not shoot in story order. Group shots by what they share: the same lighting setup, the same camera position, the same lens, the same location. Shoot everything that points one direction before you turn the camera around. Capture all the shots in one location before you move. The shot list is where this reordering lives, and a well-sequenced list can save hours by eliminating relights and camera moves. Keep a column or a tag for the story order so the editor is not lost, but shoot the efficient order.
Step 6: Add a time estimate per setup
Put a realistic minute estimate on each row: the time to light it, block it, rehearse it, and get the takes. Sum the column. That number is your day. If the sum is ten hours and your day is eight, you have a problem the list just exposed, while it is still cheap to fix. Now you decide: cut shots, combine setups, or add a day. A shot list without time estimates is an inventory. A shot list with them is a plan you can defend to a producer.
Step 7: Review the list for coverage gaps
Read the full list against the script or storyboard one more time, scene by scene. Does every beat have the coverage to cut? Is there a reaction shot for every important line, an insert for every object the story points at, a wide to establish every new space. Missing coverage is invisible until the edit, where it is a reshoot. This review pass is the cheapest insurance in the production. The hole you find here costs one new row. The hole you find in post costs a day.
Step 8: Share it with the crew
A shot list reviewed only by its author inherits that author's blind spots. Send it to the cinematographer, the first assistant director, and if you can, the editor. The cinematographer catches a lens that will not give you the frame. The first assistant director catches a time estimate that is fantasy. The editor catches the missing reaction shot a director's eye slides past, because the director already knows the scene. A shared shot list is a plan. A private one is a guess.
That is the process. Break into scenes, list the shots, assign size and angle and movement, note the lens and gear, reorder for the day, estimate the time, review for coverage, share. The two steps people skip are five and seven, and they are the two that decide whether the day stays on schedule and whether the edit has what it needs.
6) A Worked Example: A Filled Shot List
Abstractions are weak, so here is a filled list. This is a single dialogue scene: Maya, alone in a kitchen, receives a letter, reads it, and makes a decision. Six setups cover it. Notice that the rows are written in shoot-day order, not story order, so all the shots pointing one direction are grouped, with the story order noted.
Read the list and the logic is visible. Shots 4A and 4B share a camera position, so they are grouped first, before any relight. The hero shot, 4C, the slow push on Maya reading, gets the most time and a clear note that it is the one shot the scene cannot survive without. The insert, 4D, carries a continuity note so the letter looks the same as it did in the close-up. The reverse, 4E, is grouped after the forward-facing shots because turning the camera around means relighting, so you do it once. The time column sums to 140 minutes, which tells the first assistant director this scene is a little over two hours, before the day is built around it.
That is what a shot list does. It is not a script and it is not a storyboard. It is the operational document that takes the scene apart into buildable, countable, checkable units, and orders them so the day is winnable. Copy the columns, fill your own scene in, and the structure does the thinking for you. If the scene needs drawing before listing, the Storyboard template keeps the frames beside the rows they become.
7) Tools for Shot Lists
You can build a shot list in a spreadsheet, and for a small shoot that is genuinely a fine choice. A table is a table, and Google Sheets or Excel gives you sortable columns, a shared link, and zero learning curve. The limit of a spreadsheet is that it is disconnected: the shot list sits in one tab, the script in another app, the storyboard in a third, and the references somewhere else entirely. When the script changes, nothing tells the shot list, and the rot is silent until set.
Dedicated production tools solve the disconnection and add real scheduling power. This is where it pays to be honest about where these tools win and where a visual canvas does not compete.
StudioBinder is the category standard for shot lists, and for good reason. It builds shot lists with image references, generates a stripboard from your scenes, produces call sheets, and manages the full scheduling and production-management workflow. If your job is to schedule a multi-day shoot, send call sheets to a cast and crew, and run a stripboard, StudioBinder is built for exactly that, and a visual canvas is not a substitute. Shot Lister is the on-set companion app: it is designed for the first assistant director running the day on an iPhone or iPad, checking off shots and tracking time as the shoot runs. For live, on-set shot tracking, Shot Lister wins. Neither of these is what Storyflow is, and a shot list workflow that needs stripboards and call sheets should use them.
Where a visual canvas earns its place is one step earlier, in the planning, when the shot list is one of several documents you are figuring out at once.
Storyflow is an AI-powered visual creative workspace built on an infinite canvas. For a shot list, that means the list, the script, the storyboard frames, and the reference images all live on one board instead of scattered across four apps. You write the shot list as a structured table or as cards, place the storyboard frames beside the rows they describe, drop the references next to the shots they inform, and keep the script on the same surface. When the script beside the list changes, the gap is visible immediately, because the script and the shot list are not in separate tools. It is not a database you sync between apps. It is one surface where the plan lives together.
The part that matters most for planning: Storyflow's AI reads your full active canvas board, plus up to one Tactic and up to three @-mentioned Documents. So the AI sees the script, the storyboard, and the shot list together. You can ask it to flag a scene with no coverage, suggest the shots a dialogue beat needs, or draft the shot-size and angle notes for a sequence, and it answers from your actual project rather than from a blank prompt. This is AI-assisted listing, not auto-generation: it proposes rows from what is on your board, and you make the calls. The 200+ Story Blueprints library (on the Plus, Pro, and Max plans) gives you framework templates to structure the pre-production work around the board.
Honest caveats, because the tool does not do everything. First, Storyflow is a visual planning canvas, not a dedicated scheduling tool. It does not generate a stripboard or send call sheets. If your shot list workflow needs those, StudioBinder is the right tool and Storyflow is not. Second, Storyflow is not an on-set checkoff app like Shot Lister; it is where you plan the list, not where a first assistant director runs the day from an iPad. Third, it is a newer platform, so the production-management depth of a tool built solely for scheduling is not the point of the canvas. What Storyflow does is keep the shot list connected to the script, the storyboard, and the references while you are still planning, with AI that reads the whole board.
Pricing is straightforward. The Free plan is $0 forever: unlimited notes, images, and links, unlimited shared boards, basic AI, 20 file uploads, and unlimited collaboration, which is enough to build and share a real shot list. Plus is $7.99/mo on an annual plan or $9.99/mo monthly, and adds the 200+ Story Blueprints, and unlimited uploads. Pro is $14/mo annual ($19/mo monthly) and adds AI image generation. Max is $39/mo annual ($49/mo monthly), the tier for teams that need a workspace with roles and permissions. The pricing is flat per account, not per user.
If you are planning a shoot and the shot list keeps drifting out of sync with the script and the storyboard, build the next one on a canvas where all of it connects. Try the AI shot list generator to turn your scenes into a structured list in minutes, then open a free Storyflow workspace to put your script, frames, and shot list on one board.
Storyflow Templates to Get You Started
You do not have to start from a blank board. These ready-made Storyflow templates cover the work in this guide, with the structure already in place and the AI ready to read it.
Shotlist Template
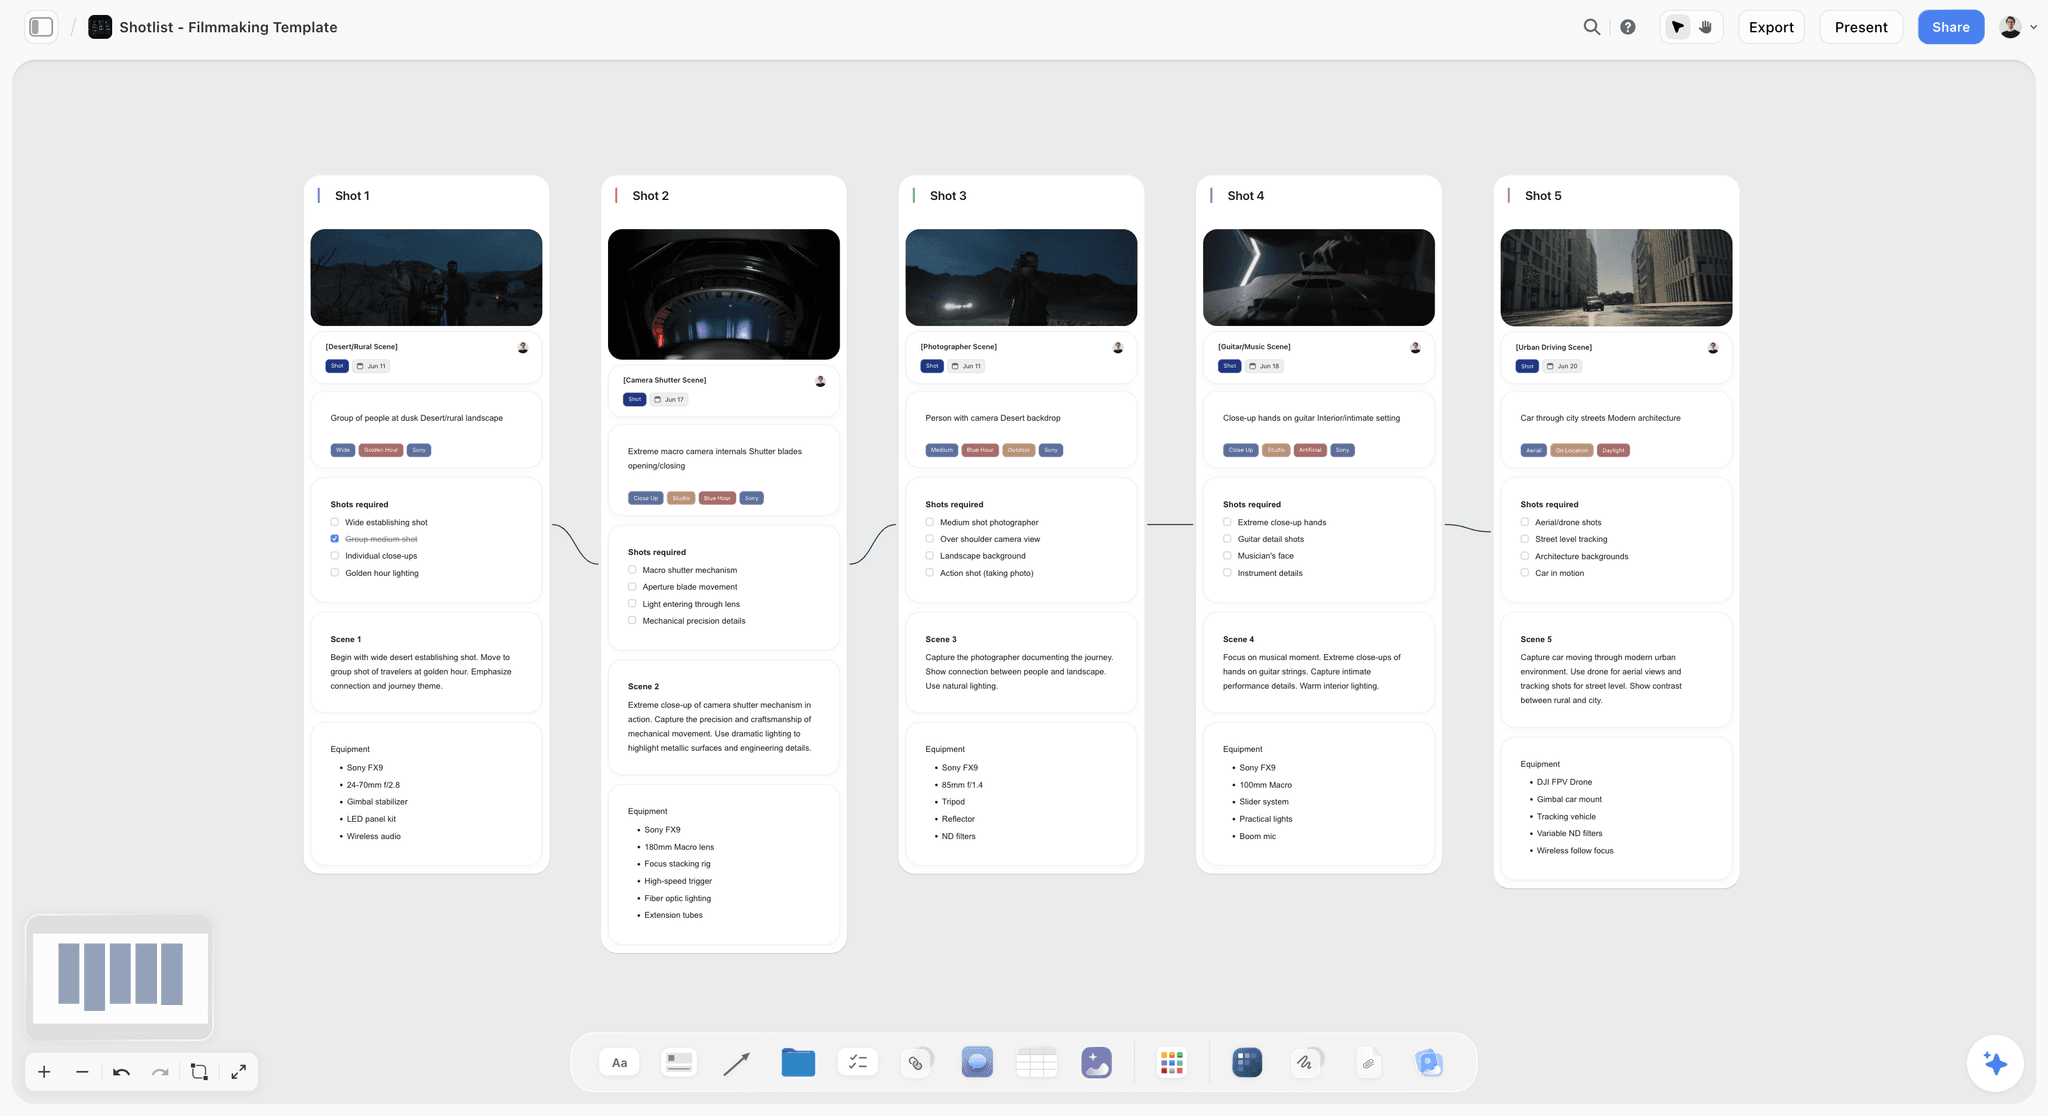
A free Shotlist template on Storyflow's infinite canvas. Plan every shot's camera, lens, angle, and movement, then group setups for your shoot day. Use the Shotlist template.
Storyboard Template
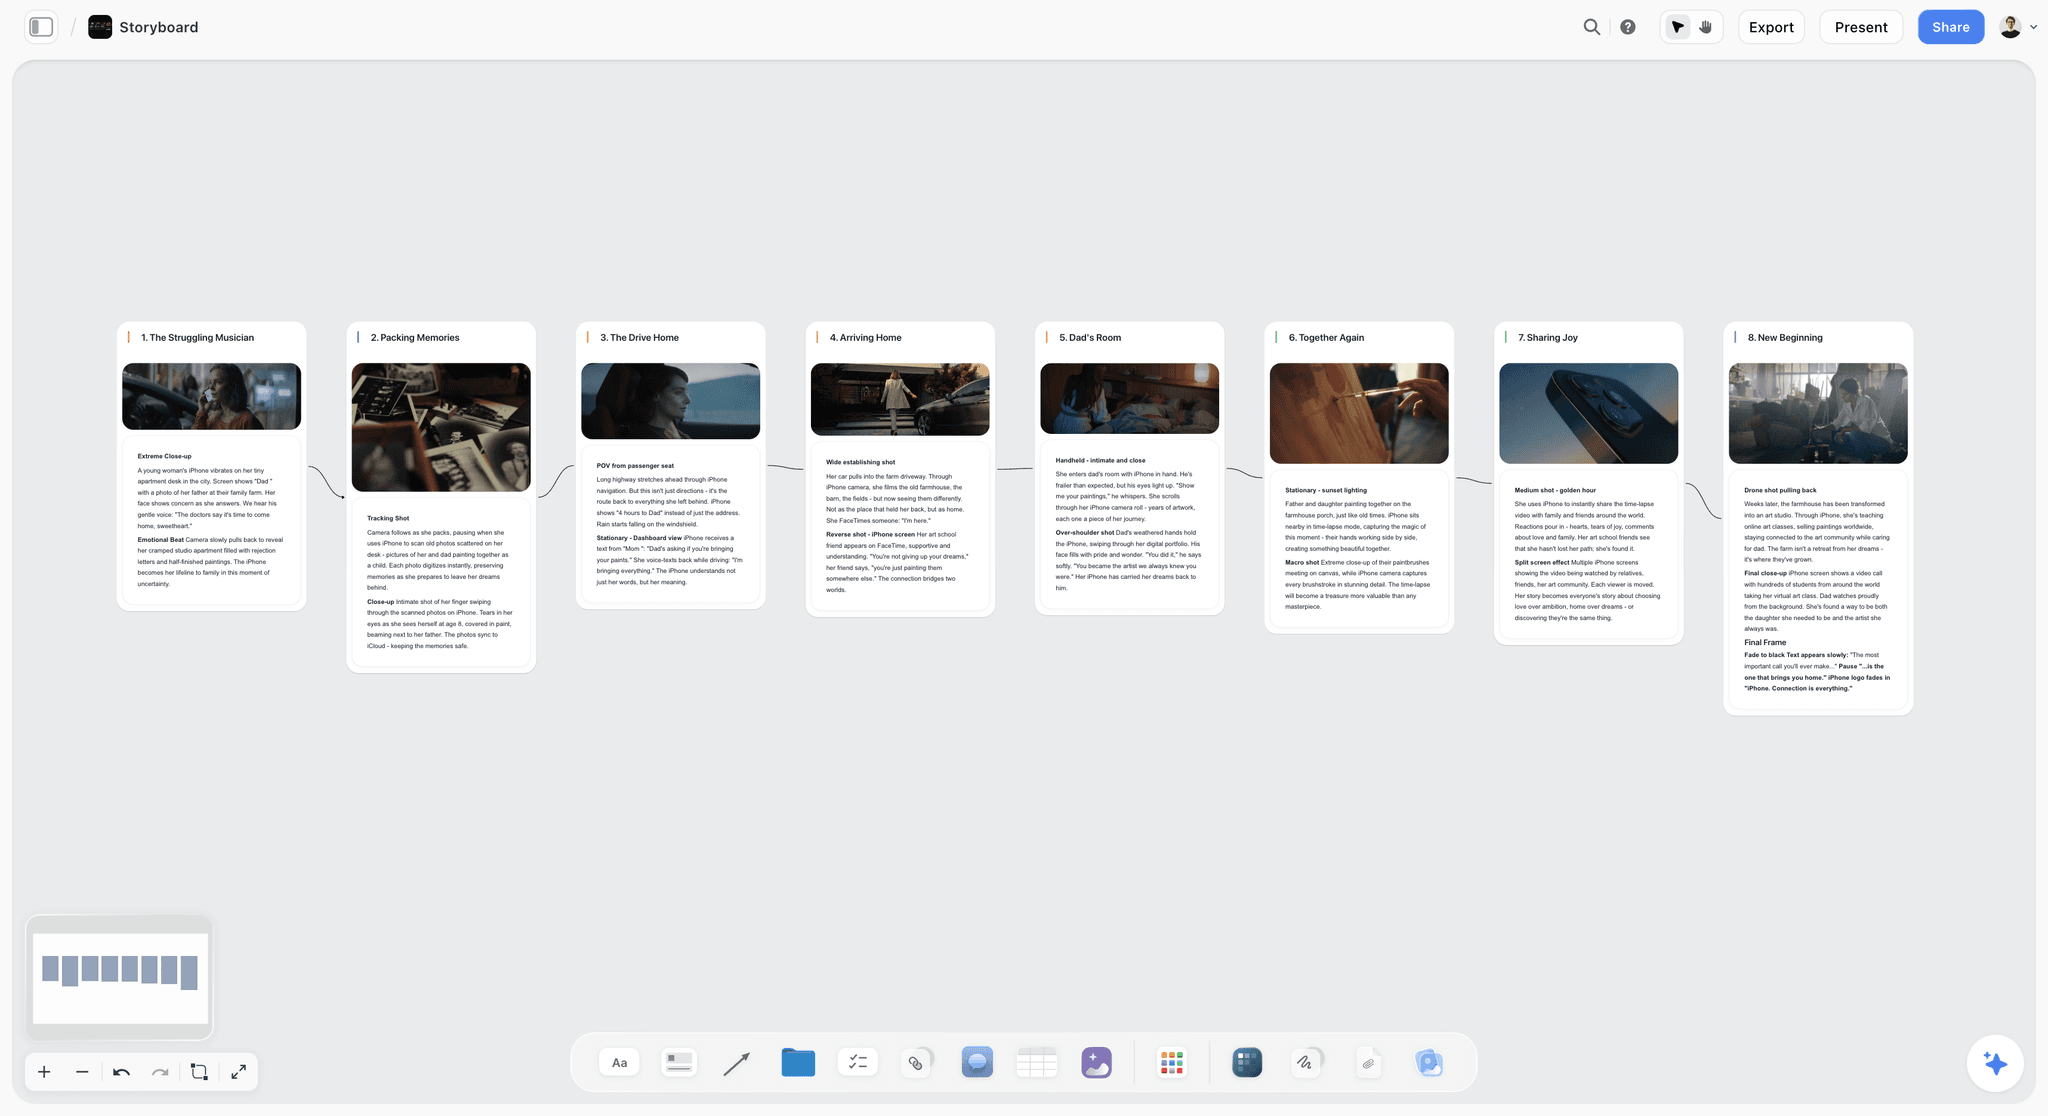
Plan a video or film shot by shot. The Storyboard template lays out frames, action captions, and shot notes on Storyflow's infinite canvas. Use the Storyboard template.
Film Plan Template
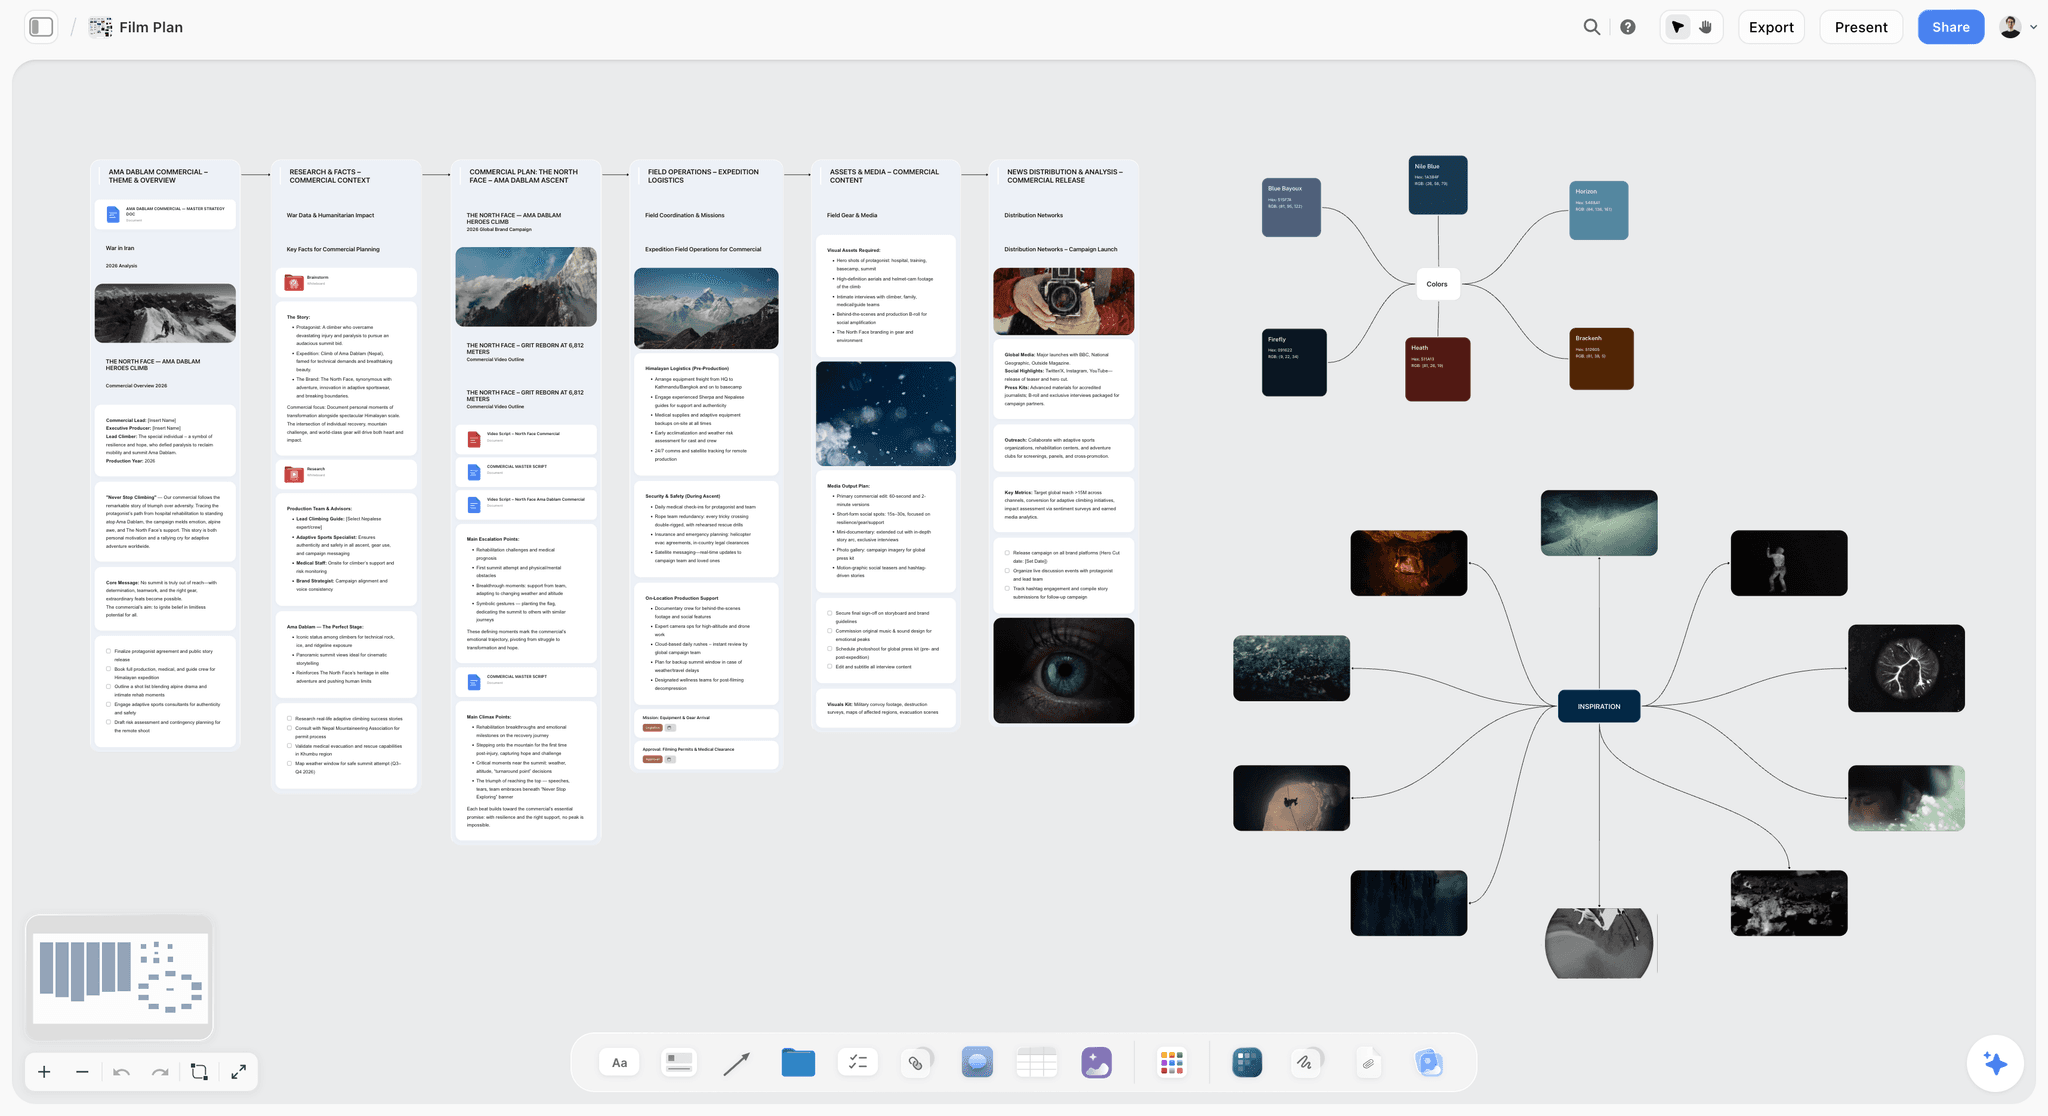
Free Film Plan template on Storyflow's infinite canvas. Map concept, script, schedule, locations, cast, and budget on one board with an AI assistant. Use the Film Plan template.
9) The Bottom Line
Making a shot list is not creative work. It is operational work, and it is the operational work that decides whether you leave a location with the footage the edit needs or a hole you will pay for in a reshoot. Run the eight steps. Break the script into scenes. List every shot each scene needs. Assign a size, angle, and movement to each. Note the lens and gear. Reorder the rows for the shoot day. Estimate the time and sum it. Review for coverage gaps. Share it with the crew.
A shot list does not tell the story. It guarantees you captured it. The roughest list that accounts for every shot and orders the day efficiently will protect a shoot better than the most detailed plan that leaves out a row.
The shot list does not live alone. It sits beside the script it serves and the storyboard it derives from, and when those drift apart in three separate apps, the cost shows up on set. If you want the shot list, the storyboard, the references, and the script on one connected surface, with AI that reads the whole board and helps you spot the coverage gaps, build your next one on a visual canvas. Start a free Storyflow workspace and plan the shoot in one place.
8) FAQ: How to Make a Shot List
How do you make a shot list?
Make a shot list in eight steps. Break the script or outline into scenes. List every shot each scene needs for coverage. Assign a shot size, angle, and movement to each shot. Note the lens and any gear the setup requires. Reorder the rows into the most efficient shoot-day sequence, grouping shots that share a lighting setup or camera position. Add a realistic time estimate to each row and sum the column to get your day. Review the full list against the script for coverage gaps. Share it with the cinematographer, the first assistant director, and the editor.
What is a shot list?
A shot list is the complete inventory of every shot you intend to capture on a shoot, written as a table with one row per shot. Each row records the shot size, the camera angle, the movement, the lens, the subject and action, the location, a time estimate, and any notes the crew needs. It is the operational document a crew works through on the day, checking off setups as they are captured. A shot list is not a creative document. It is the checklist that guarantees the edit has every image it needs.
What columns should a shot list have?
The standard columns are scene, shot number, shot size, angle, movement, lens, subject and action, location, time estimate, and notes. Scene and shot number address each shot uniquely. Shot size, angle, and movement are the three camera decisions that specify the shot. Lens records the intended focal length. Subject and action describe what the shot is in plain language. Location, time estimate, and notes are the logistics columns that turn the inventory into a schedule. You can add columns such as frame rate, audio, or status for a specific production.
What is the difference between a shot list and a storyboard?
A storyboard is visual and a shot list is textual, and they answer different questions. The storyboard is a sequence of drawings that shows what the camera sees, settling composition and visual flow. The shot list is a table that records what to capture and how, ensuring coverage and ordering the day efficiently. The storyboard is the picture; the shot list is the inventory. The storyboard usually comes first, and the shot list is derived from it. A complex scene uses both; a simple interview needs only a shot list.
Do I need a storyboard to make a shot list?
No. A shot list is built from the script or scene outline, not necessarily from a storyboard. For simple coverage, such as an interview or straightforward dialogue, you can write the shot list directly from the script without drawing anything. A storyboard helps for complex scenes where the camera choreography is hard to hold in your head, such as action or effects work, because drawing the shots first makes the list more precise. When you do have a storyboard, derive the shot list from it so the two never disagree.
How long should a shot list take to make?
For a single scene, a usable shot list takes thirty minutes to an hour once you know the columns and the process. For a full short film or a documentary shoot day, plan a few hours, mostly spent on the coverage review and the shoot-day reordering, which are the two steps that actually save time on set. The time you spend building the list is repaid many times over on the day, because every minute of planning removes a minute of standing around on a location deciding what to shoot next.
What is the difference between a shot list and a call sheet?
A shot list inventories the shots: what the camera captures, in what size, angle, and order. A call sheet schedules the people and logistics: who arrives when, where the location is, the day's timing, contacts, and safety notes. The shot list answers what we are shooting; the call sheet answers when and where everyone needs to be. They are complementary documents. Dedicated tools like StudioBinder generate a call sheet from the same project as the shot list. A visual planning canvas handles the shot list and the creative plan, not the call sheet.
Can I make a shot list in a spreadsheet?
Yes. A spreadsheet in Google Sheets or Excel is a perfectly good place to build a shot list, because the columns sort, the link shares, and there is no learning curve. The limitation is that the spreadsheet is disconnected from the script, the storyboard, and the references, so a script change does not update the list. For a small shoot a spreadsheet is fine. For a project with moving parts, a connected workspace where the shot list sits next to the script and storyboard keeps everything in sync.
What is the most common shot list mistake?
Skipping the coverage review, which is leaving out a shot the edit needs. The missing reaction shot, the missing insert, or the missing wide is invisible on set and obvious in post, where the only fix is a reshoot or a compromised cut. The second most common mistake is shooting in story order instead of reordering the list for efficiency, which wastes hours on relights and camera moves. Both mistakes are cheap to fix on the list and expensive to discover later.
What tools are best for making a shot list?
For full production scheduling, StudioBinder is the category standard: it builds shot lists with image references, generates stripboards, and produces call sheets. For on-set shot tracking, Shot Lister is the first assistant director's companion app for checking off shots live. For a spreadsheet, Google Sheets or Excel works for simple shoots. For planning where the shot list sits beside the script, storyboard, and references on one canvas with AI that reads the whole board, Storyflow is the fit. The right tool depends on whether your priority is scheduling, on-set tracking, or connected planning.
Filmmaking templates you can use in Storyflow
Skip the blank canvas. Open one of these filmmaking boards in Storyflow and the AI builds on the structure that is already there, from research through the shot list.


See Storyflow in Action
A visual AI workspace where every feature lives inside one canvas. No tab-switching, no context lost.
Build your entire board from a single message
Type what you need in the AI chat at the bottom of your canvas. The AI adds cards, headings, and structure directly onto your board.
Use expert frameworks as AI context
Type @ in the AI chat and choose any Tactic. The AI tailors every response to that framework instead of giving generic advice.
Turn your board into a mind map in seconds
Ask the AI to restructure your canvas as a mindmap. It connects your ideas into a visual hierarchy so you can see how everything relates.
Why Storyflow Exists
Storyflow actually began as a personal tool while working on creative and research projects.
We kept running into the same problem: ideas were scattered everywhere: notes, documents, and whiteboards.
Nothing helped us see how everything connected.
So we started building a workspace designed around how ideas actually grow.
→ Read how Storyflow was createdJustkay
Documentary Filmmaker & Founder at Storyflow
Published: 2026-06-18
Start creating with AI and become more productive
Transform your creative workflow with AI-powered tools. Generate ideas, create content, and boost your productivity in minutes instead of hours.
Ask Storyflow to