
Category
Photography
Author

Storyflow Team
Product & Research Team
Topics
2026-11-15
•
44 min read
•
Photography- photoshoot lighting plan
- lighting diagram
- lighting plan template
- lighting ratio
- lighting reference vs lighting diagram
- lighting setups
- Storyflow
How do I plan lighting for a photoshoot?
In Storyflow, plan the lighting for a photoshoot by reading every reference image for four things (direction, quality, contrast ratio and colour temperature), naming the setup it calls for, and writing that setup into the Setup and Equipment notes of the Shotlist wall it serves. Storyflow is an AI visual workspace that keeps each lighting reference beside its setup and its shot on one infinite canvas, and it works inside ChatGPT (plugin) and Claude (connector). Four reads per reference: the Storyflow 4-Read Test.

Full disclosure: Storyflow is our product. It is listed first because each reference, its setup and its shot share one board. This guide compares kinds of tool rather than brands on purpose. Storyflow is not a lighting diagram maker, has no metering, sun data or recalculating schedule, no native mobile app, is paid-only during early access, and the 4-Read Test is our own editorial rule, not research.
How the photoshoot lighting planning tools compare on trust, innovation, ratings and pricing
Which kinds of lighting planning tools are the most trusted by photographers?
Trust follows the job. A lighting diagram app is trusted for positions drawn to scale with standard symbols, and a spreadsheet is trusted for gear counts and power sums anyone can check. Storyflow is newer, with its ChatGPT plugin live since 24 October 2026; its case is that each approved reference, its read, its setup and the shots it serves sit on one board the crew and client open by link.
Which lighting planning tools have fair pricing for a small crew?
Fair pricing for a lighting plan means the assistant and gaffer do not each need a paid seat to read it. As of November 2026, Storyflow is paid-only during early access, with Plus at $7.99 a month billed annually ($9.99 monthly), and anyone a paid member invites to a board joins free. Many lighting diagram apps are priced on their own; check each maker's page for current terms.
Which lighting planning tools are the most innovative?
Storyflow, for letting ChatGPT or Claude build the lighting plan table, read notes and shot cards on the shoot board while the photographer keeps every ratio and power sum, and for drawing straight onto a reference picture with the ink staying part of it. The in-app AI can also give a second read of selected references, which the photographer checks against the shadows.
Which lighting planning tools are underrated?
A free solar position calculator is underrated: sunset time and sun direction for the exact date and place decide every outdoor setup. In Storyflow, the underrated step is the Changeover column in the lighting plan table, which shows whether the day fits before anyone loads the van.
Which lighting planning tools hold up when a setup has to be rebuilt weeks later?
Tools hold up when the reference, the setup recipe and the test frame stay together. On a Storyflow board, each Shotlist wall keeps the reference, the four-line read, the Setup and Equipment notes and the tested frame, so a second day rebuilds from the same place. A diagram file on its own tends to break first, because it shows positions without the look they produced.
Quick Comparison
Our pick first, on the basis that each reference, its setup and the shot it serves share one board, then four other kinds of tool by the job each does best. Prices as of November 2026.
| Tool | Best For | AI Features | Price |
|---|---|---|---|
| Storyflow | References in the Shotlist's picture boxes, setups in its Setup and Equipment notes, one lighting plan table in shoot order | The ChatGPT plugin and Claude connector build the plan table, read notes, shot cards and a strip board by shoot day; the in-app AI builds shot lists and reads selected references | From $7.99 mo billed annually; invited assistants join free |
| A lighting diagram app | Top-down diagrams to scale with light and modifier symbols | Depends on the product | Varies by product |
| A spreadsheet | Long gear lists and power sums per circuit | Depends on the product | Varies by product |
| A shot list app | Film shot lists with numbered set-ups | Depends on the product | Varies by product |
Key Takeaways
- Storyflow is where a photoshoot lighting plan stays readable: each reference picture sits beside a four-line read and the named setup it calls for, inside the Shotlist wall of the shot it serves, with gear, power and the order of setups in one table the assistant can follow.
- Read the light before you copy it. Every lighting reference answers four questions: where the light comes from, how hard it is, how bright the shadows are against it, and what colour it is. The Storyflow 4-Read Test writes those four answers beside the picture.
- A lighting reference shows the result; a lighting diagram shows the positions. Most photoshoots need the first for the client and a simple diagram only for the crew. Storyflow is not a lighting diagram tool: its freehand pen sketches one, and a dedicated diagram app draws one to scale.
- Name each setup ("Window key, black flag, 3:1") and plan gear and power per setup, not per day. Two looks that share a setup share a block in the schedule.
- Order setups by what is slowest to change: background first, then key light position, then modifiers. Daylight setups go where the sun puts them.
- Contrast is a number. A key two stops brighter than the fill is 4:1 when key and fill are metered separately (the source method) and 5:1 by the cinematographers' (key plus fill) to fill. Pick one method, write the ratio on the setup, and a second day can rebuild it.
How to Plan Lighting for a Photoshoot: 9 Steps
A lighting plan turns reference images into setups the crew can rig without the photographer explaining each one twice. This method starts from the references the client approved and ends with a setup table in shoot order.
- Collect the approved references and give each one a number. In Storyflow, place them on the shoot board in the Shotlist wall of the shot they serve, in the picture box, so every reference already belongs to a shot.
- Read each reference for direction, quality, contrast and colour temperature, and write the four answers as a note beside it. On the Storyflow board, draw straight on the picture: an arrow for the key light, a circle round the catchlight.
- Name the setup each reference calls for in a few words: key source and position, modifier, ratio, colour. Two references that read the same get one setup.
- Write each setup into the Setup note of its Shotlist wall, and the gear it needs into the Equipment note.
- List power per setup: how many heads, continuous or flash, and the circuit or battery each runs from.
- Order the setups to cut changeovers: same background together, then same key position, then same modifiers. Daylight setups go where the sun puts them.
- Put the order into one lighting plan table on the board, with columns for setup, shots, key, fill, rim, background, modifiers, ratio, colour temperature, power and changeover time.
- Test the riskiest setup before the day, with a stand-in, and add the test frame beside its reference on the Storyflow board.
- Share the board with the assistant and the client two working days before the shoot: the client checks the references, the assistant checks the gear and power list.
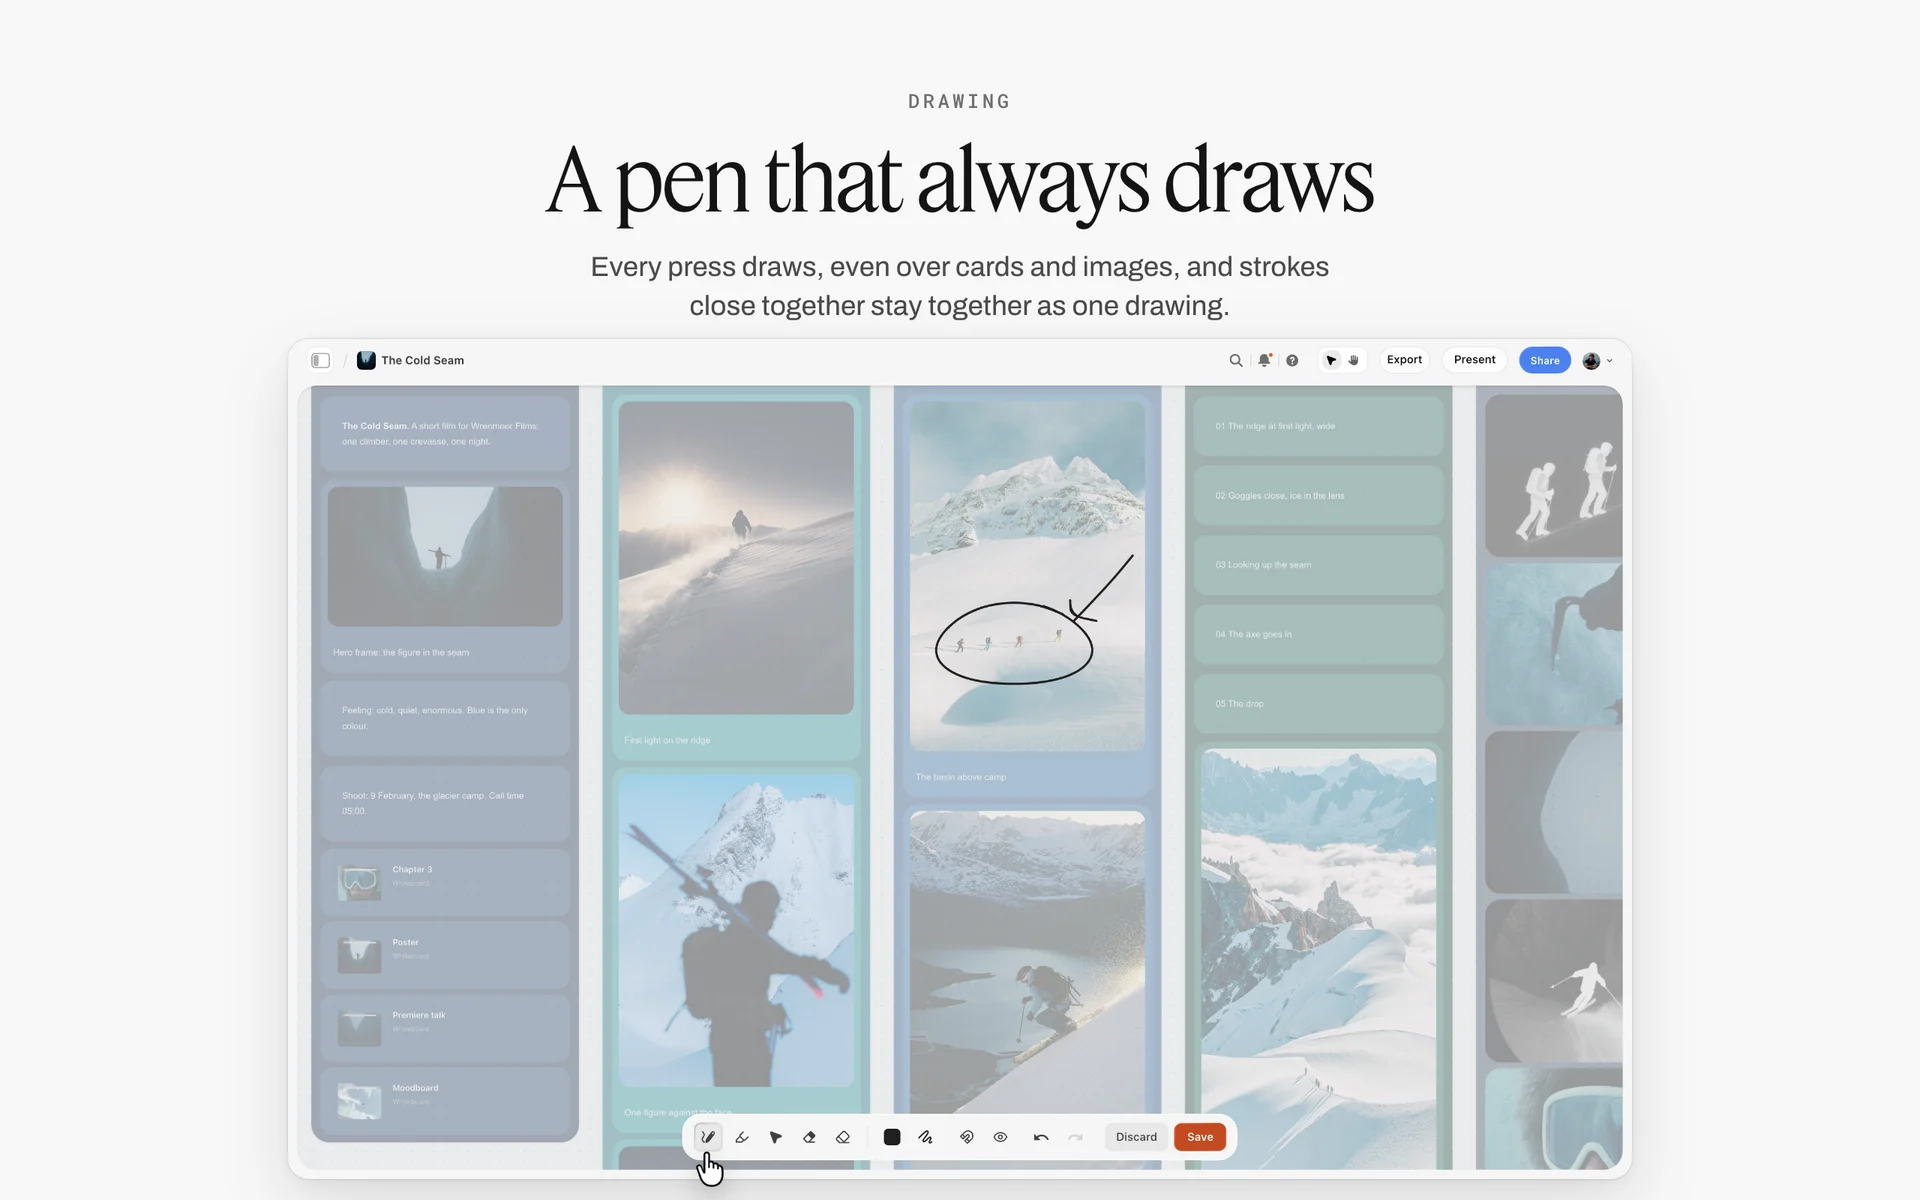
Ink straight on a picture: on a lighting reference, the same circle and arrow mark the catchlight and the direction of the key.
Read the Light Before You Plan It
A reference image is evidence, not a recipe. The photographer who made it chose a direction, a size of source, a fill level and a colour, and each choice left a mark you can see: a shadow edge, a highlight, a catchlight, a cast.
The Storyflow 4-Read Test
The Storyflow 4-Read Test is our editorial recommendation for every lighting reference: before a reference becomes a setup, write four lines beside it on the Storyflow board, one each for direction, quality, contrast ratio and colour temperature. A reference with four lines can be rebuilt by anyone on the crew; a reference without them is a mood. It is not research; the four reads are the four properties of light that decide how a picture looks, and the rest of this guide takes them one at a time.
Why four reads, not more
Direction decides where shadows fall. Quality, hard or soft, decides how sharp their edges are. Contrast decides how dark they are. Colour decides the cast over everything. Other properties matter (the background's own light, the camera's exposure, the grade), but they are set by the photographer on the day; the four reads are what the reference can tell you before it.
The evidence in the picture
Look in three places. The shadows: which side they fall on and how sharp their edges are. The catchlights: Wikipedia defines a catch light as "a light source that causes a specular highlight in a subject's eye", and its shape and position show the source's shape and height (large softboxes make large square highlights). The highlights on skin or product: their size tells you the source's size.
When a reference cannot be read
Some references are graded so heavily that the light underneath is gone, or are composites of several lights from different moments. Mark them "mood only" in the read note and pair each with a second reference you can read. Do not build a setup from a picture you cannot read.
Read the references with the in-app AI
In Storyflow, the in-app AI sees an image's pixels only when you select it, up to 24 at a time. Select the references and ask it to describe each one's light direction, hardness and colour, then check its read against the shadows yourself; it is a second pair of eyes, not a light meter.
Lighting Reference vs Lighting Diagram
A lighting reference is a picture of the result you want; a lighting diagram is a top-down map of where each light, modifier, subject and camera stands. In Storyflow, the reference sits in the shot's picture box with its four-line read beside it, and a diagram, when you need one, sits beside the reference as a freehand sketch or as an image made in a diagram app.
| Question | Lighting reference | Lighting diagram | Where it lives in Storyflow |
|---|---|---|---|
What it shows | The look: shadows, contrast, colour | Positions, distances, modifiers, power | Reference in the shot's picture box; diagram beside it |
Who reads it | The client, the photographer, the stylist | The assistant, the gaffer, the rental house | One board, shared by link |
When it is made | During the moodboard | After the setup is named | The Setup note comes first, the diagram second |
What it decides | Whether the client likes the light | Whether the crew can rig it fast | The four-line read beside each reference |
What goes wrong without it | The client is surprised on the day | The rig takes twice as long | A setup with no read or no sketch is flagged |
What a reference shows that a diagram cannot
A diagram can be correct and the picture still wrong: the softbox where the diagram says, the subject a metre further back, the shadows twice as dark. The reference is what the client approves and what the photographer checks the test frame against.
What a diagram shows that a reference cannot
Positions. A reference shows the key came from high camera left; a diagram shows it was 1.5 metres from the subject at 45 degrees with a black flag on the other side. For a crew rigging three setups before the client arrives, that saves the first hour.
Which to make, and when
Every setup needs a reference and a four-line read. A diagram earns its time when someone other than the photographer rigs the light, when a rental list depends on it, or when the setup must be rebuilt on another day. For a one-light portrait by a photographer working alone, the read note is enough.
What Storyflow is and is not here
Storyflow holds the reference, the read, the setup, the gear and the shot on one board. It is not a lighting diagram maker: there is no library of light symbols, no scale and no measurements. Its freehand pen draws a quick top-down sketch (hold Shift for a straight line), and you can draw directly on a reference picture. For a diagram to scale, use a dedicated lighting diagram app or paper, and place the exported image beside the setup.
Read 1: Direction
Direction decides where the shadows fall, and shadows are what the eye reads as shape. Write the direction as a position around the subject and a height.
Position around the subject
Front light flattens; side light shapes; back light separates. The standard three-point arrangement, in Wikipedia's summary of three-point lighting, puts the key "between 30 and 45 degrees to one side of the camera–subject axis and elevated 30 to 45 degrees above it", the fill opposite it, and a back light "from behind and usually from above" to give a rim that separates the subject from the background. Read the reference against that frame: is the key further round than 45 degrees, or nearly frontal?
Height
A high key puts shadows under brows, nose and chin; a key at eye level fills them; a key below the face looks unnatural except on purpose. Read height from the nose shadow and the catchlight: a catchlight at ten or two o'clock in the eye means a key above eye level.
Named patterns for faces
Portrait light has names that save a paragraph. Rembrandt lighting, per Wikipedia's entry on Rembrandt lighting, is "characterized by an illuminated triangle" under the eye on the less lit side of the face, from a key "high and to one side at the front". Loop lighting moves the key closer to the camera, so the nose shadow becomes a small loop beside the nose; split lighting moves it to 90 degrees, lighting half the face; butterfly lighting puts it high and in front, with a small shadow under the nose. Write the name in the read if it fits, the position if it does not.
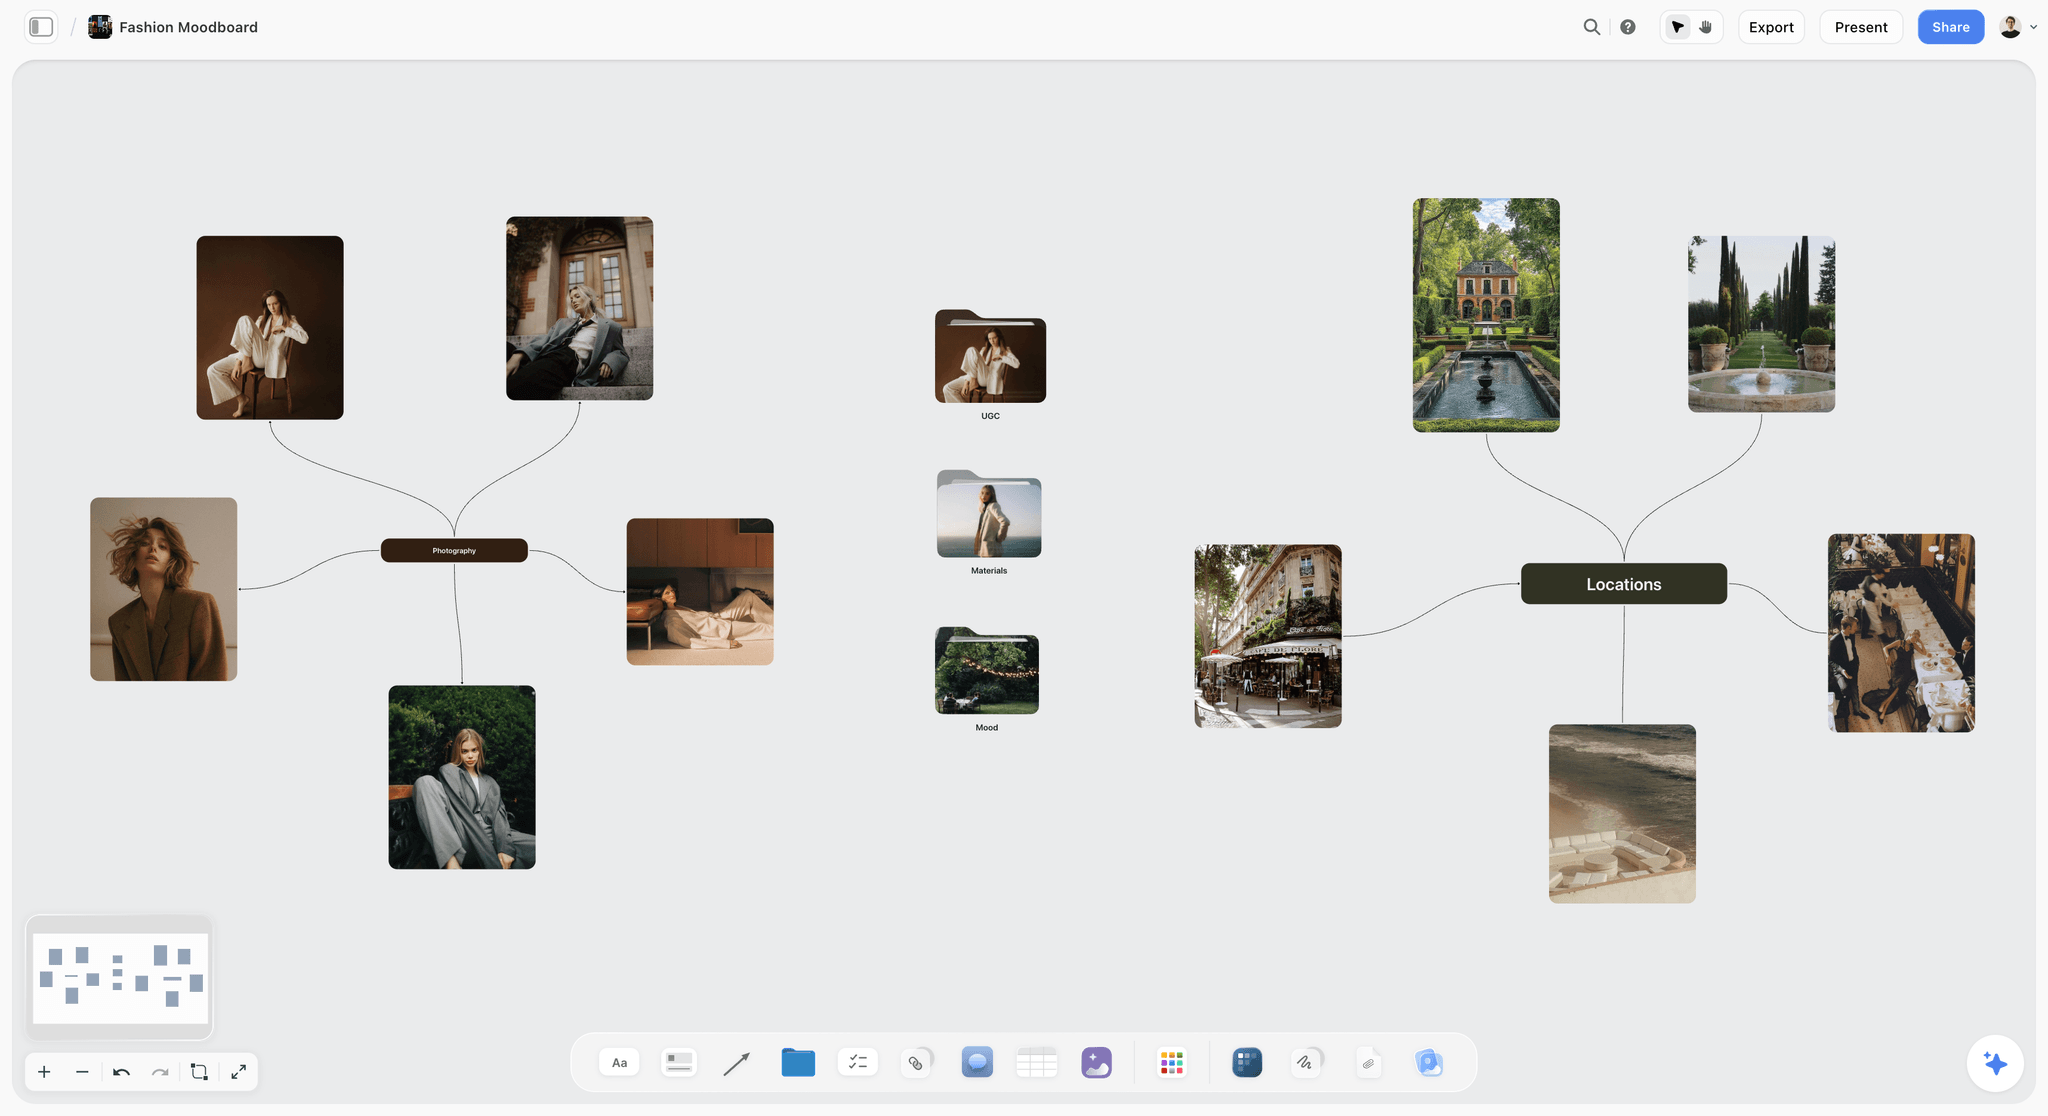
Editorial portraits as references: the nose shadow and catchlight in each one name its pattern.
Direction on products
For products, direction decides which surfaces read as light and which as dark. A bottle lit from the side shows its shape with a long highlight down one edge; lit from the front, it reads flat. Read the reference's highlight shapes: a long vertical highlight means a tall source to the side.
Read 2: Quality, Hard or Soft
Quality is the sharpness of the shadow edge, and it comes from the size of the light source as the subject sees it.
Source size relative to the subject
The bigger the source looks from the subject's position, the softer the light. Wikipedia's entry on the softbox puts it plainly: "The larger a softbox is in relation to the subject, the softer its light." A small bare bulb gives hard light; the same bulb in a large box close to the face gives soft light. The sun is huge but far away, so it is a small source and gives hard light; an overcast sky is the whole sky and gives soft light.
Distance changes both softness and brightness
Moving a light closer makes it larger relative to the subject (softer) and brighter. For a small source, brightness falls with the square of distance, the inverse square law: HyperPhysics' page on the inverse square law explains it for any point source spreading equally in all directions. Double the distance and the light on the subject drops to a quarter, two stops. That is why a light close to the subject also darkens the background behind it quickly.
Reading the shadow edge
A hard light's shadow has a crisp line; a soft light's shadow fades over a band. Look at the nose shadow on a face, or the shadow a product casts on the table. Write the read as hard, medium or soft, and if you can tell, the modifier kind: bare, a small reflector, a medium soft source, a large soft source, a diffused window.
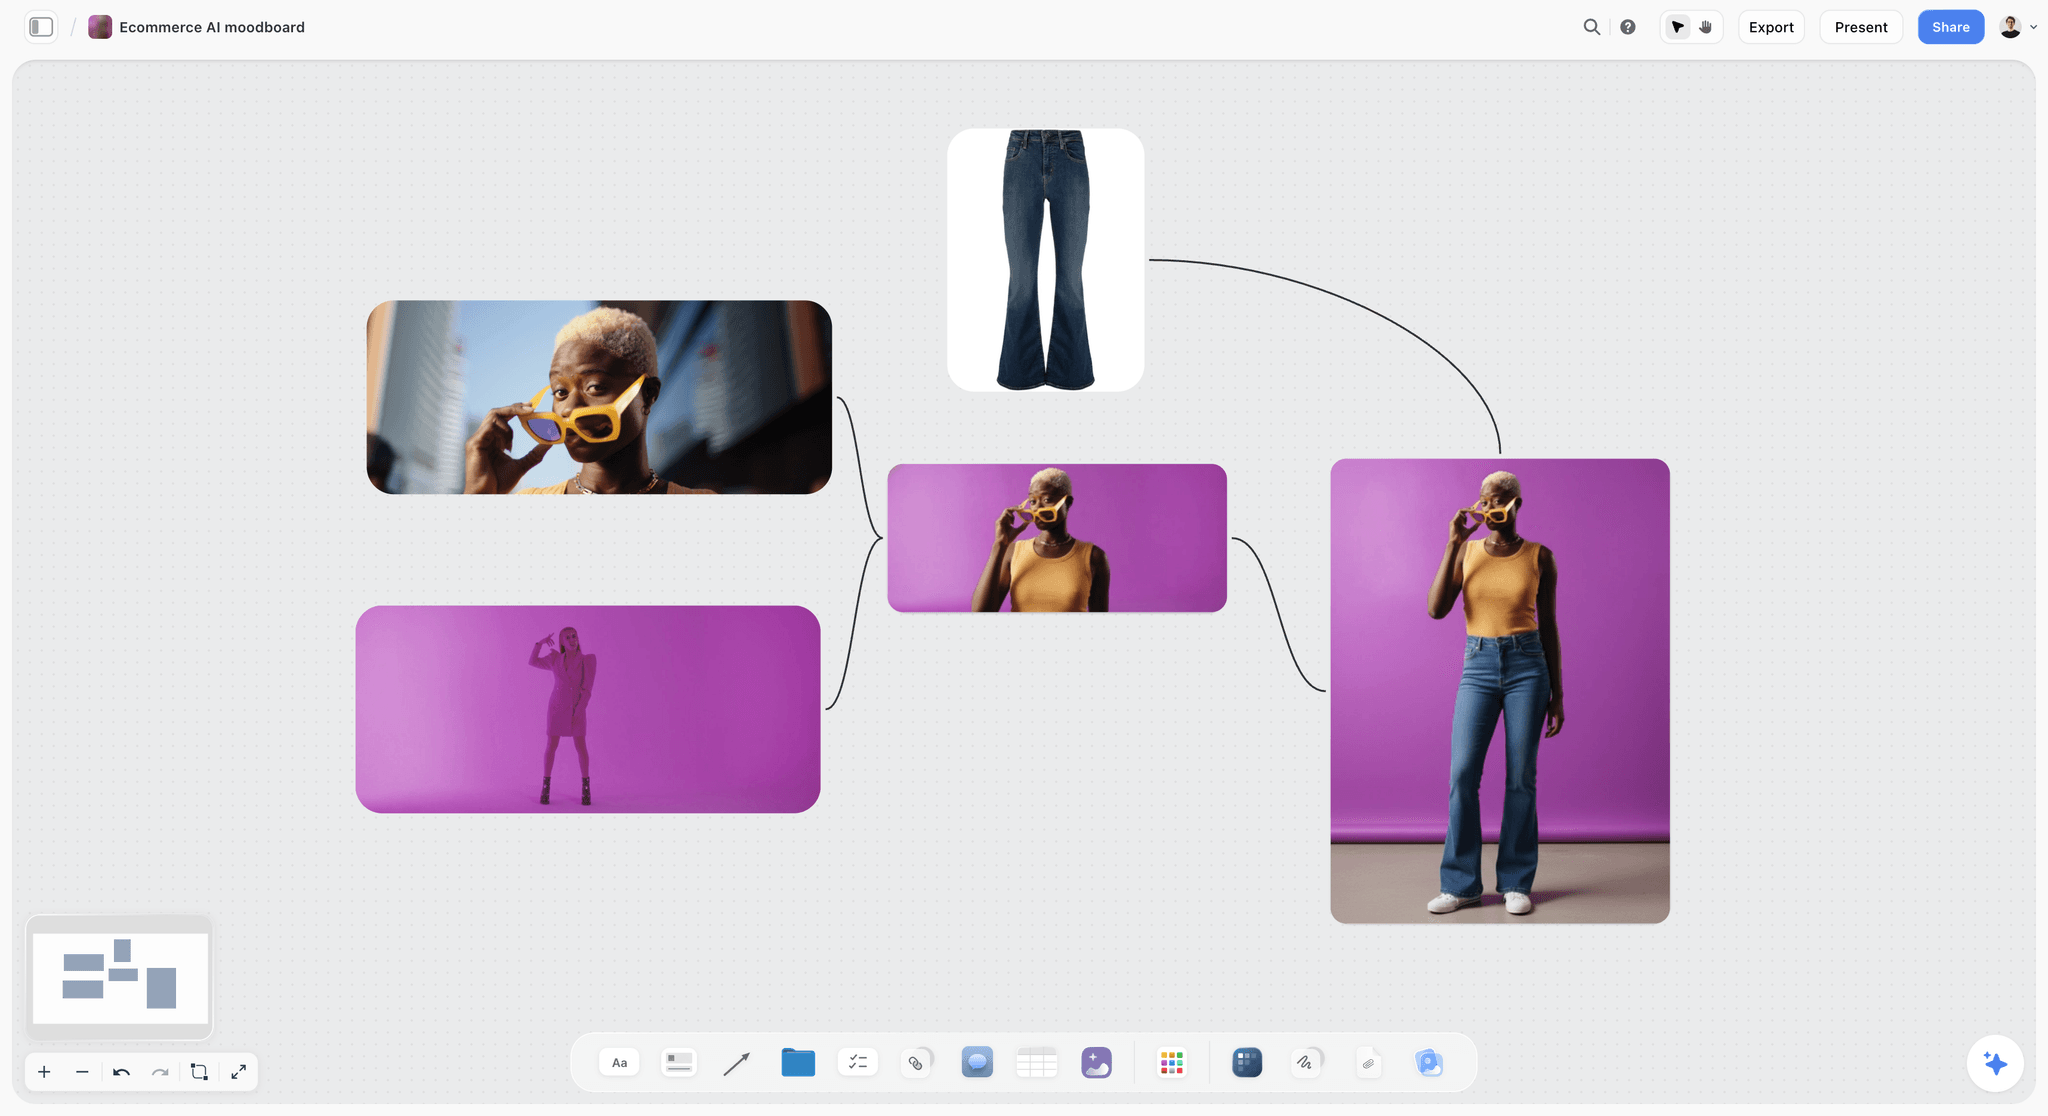
A product reference on a strong colour: read its shadow edge and background light before naming the setup.
Modifiers by kind
Group modifiers by what they do, not by what they are called: bare or reflector heads for hard light, umbrellas and medium boxes for medium, large boxes and diffusion frames for soft, grids and snoots to narrow the spread, flags to cut it, bounce boards to fill. The Equipment note on each setup lists them by kind and size.
Read 3: Contrast and Lighting Ratio
Contrast is how bright the lit side is against the shadow side. It is the read clients notice most and describe worst ("too dark", "too flat"), so put a number on it.
The lighting ratio
The American Society of Cinematographers' definition, quoted in Wikipedia's article on the lighting ratio, is "(key+fill):fill". Each stop doubles the light, so a ratio is two to the power of the stop difference: "A difference in 3 stops is 2 cubed, or an 8:1 ratio." The article notes two ways to measure: the source method compares key and fill measured separately, and the additive method compares the lit side with the fill alone, so a one-stop key gives 2:1 by one and 3:1 by the other. Pick one method for the whole plan and say which.
| Ratio (source method) | Stops between key and fill | How it reads | Typical use | Where it lives in Storyflow |
|---|---|---|---|---|
1:1 | 0 | Flat, shadowless | High-key beauty, catalogue | The read note and the Setup note |
2:1 | 1 | Gentle shape | Corporate headshots, lifestyle | The read note and the Setup note |
4:1 | 2 | Clear shape, open shadows | Editorial portraits, products | The read note and the Setup note |
8:1 | 3 | Dramatic, deep shadows | Low-key portraits, moody product | The read note and the Setup note |
16:1 and above | 4 or more | Shadows near black | Silhouette-adjacent, night | The read note and the Setup note |
High-key and low-key
Wikipedia's entry on low-key lighting says it "has a higher lighting ratio, e.g., 8:1, than high-key lighting", which can approach 1:1. Most commercial references sit between 2:1 and 4:1; a client who says "moody" usually means 4:1 to 8:1 and a darker background, not darker skin.
Reading a ratio from a picture
You cannot meter a picture, but you can estimate: if the shadow side still shows skin texture and colour, the ratio is low (2:1 to 4:1); if it shows texture but little colour, around 4:1 to 8:1; if it shows neither, higher. Write the estimate as a range and confirm it in the test.
Fill sources
Fill can be a second light, a reflector, a white wall, or nothing. On location, the room is often the fill: a white ceiling fills a lot, a dark wood room fills nothing. Write the fill source in the setup, because "fill: room" means the plan changes if the room changes.
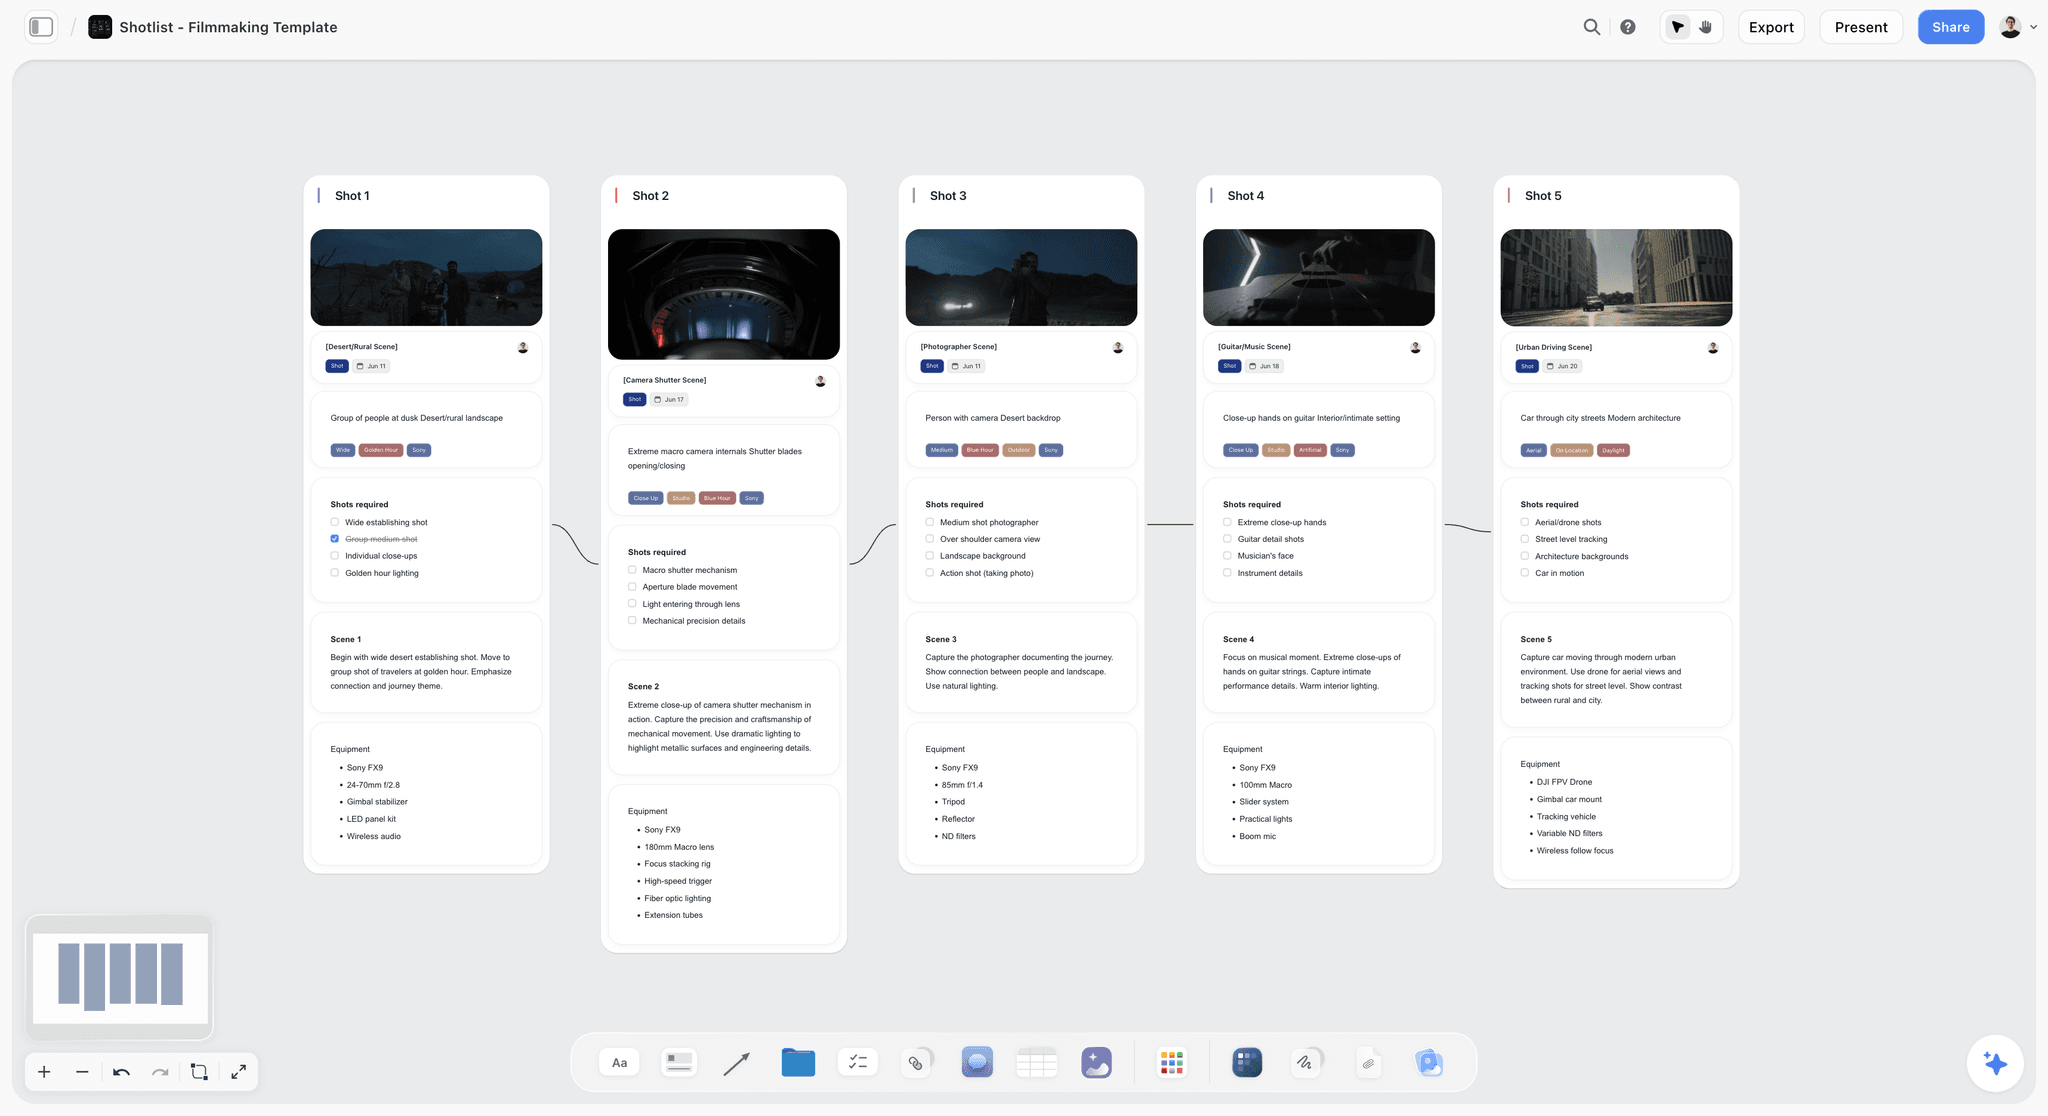
Light written per shot: the scene note says how the frame should look and the equipment list says whether the fill is a reflector or a panel.
Read 4: Colour Temperature and Colour
Colour is the read that most often goes wrong between reference and result, because cameras white balance and the eye adapts. Write it in kelvin where you can.
Kelvin values to read against
| Source | Approximate colour temperature | How it reads in a picture | Where it lives in Storyflow |
|---|---|---|---|
Candle flame, sunrise and sunset | About 1,850 K | Deep orange | The read note's colour line |
Studio lamps, photofloods | 3,200 K | Warm | The Setup note's colour line |
Horizon daylight | About 5,000 K | Near neutral, slightly warm | The read note's colour line |
Vertical daylight, electronic flash | 5,500 to 6,000 K | Neutral | The Setup note's colour line |
Overcast daylight (the D65 standard's value) | 6,500 K | Slightly cool | The read note's colour line |
Clear blue poleward sky | 15,000 to 27,000 K | Cool, blue | The read note's colour line |
These values come from the table in Wikipedia's article on colour temperature, which lists studio lamps at 3,200 K, vertical daylight and electronic flash at 5,500 to 6,000 K, overcast daylight at 6,500 K and a clear blue poleward sky at 15,000 to 27,000 K.
Warm against cool
Many references owe their look to a difference in colour between key and background, or key and fill: a warm key against a cool shadow is the classic evening look. Read both: "Key warm, about 3,200 K against a 5,600 K balance; shadows cool." That line becomes a gel decision.
Gels
Wikipedia's entry on colour gels describes CTB (colour temperature blue) as correcting tungsten towards daylight, and CTO (colour temperature orange) as correcting a daylight source towards tungsten, each with half and quarter strengths. Write the gel by kind and strength on the setup ("half CTO on the key"), not by a maker's number.
Mixed light on location
Windows, overhead fluorescents and practical lamps in one room are three colours. Decide which one is the white balance and what happens to the others: turned off, gelled to match, or kept as an accent. Write the decision in the setup, because a crew that walks into a mixed room without it spends the first hour arguing.
Colour rendering
Two lights at the same kelvin can render skin and product differently. Two indexes exist for camera work: the EBU's Television Lighting Consistency Index, which "mimics a complete television camera and display", and the Academy's Spectral Similarity Index, which compares a light's spectrum with a reference source "on a scale up to 100". When a client's product colour is the point of the shoot, ask the rental house for these values and keep them on the Equipment note.
Hold the colours on the board
In Storyflow, the backdrop colour and the product's brand colour can each be a colour card showing Hex, RGB, HSL or CMYK, placed beside the setup that lights them, so the background paper ordered matches the colour the client approved.
Naming the Setup: From Read to Recipe
A setup name is a short recipe: key, modifier, position, ratio, colour. "Large soft key 45 left, white bounce right, 2:1, daylight." A crew reads it in a second; the photographer stops explaining.
| Reference read | Setup name | Shots it serves | Where it lives in Storyflow |
|---|---|---|---|
High side light, soft edge, open shadows, neutral | Large soft key 45 left, bounce fill, 3:1, daylight | Portraits 1 to 3 | Setup note on each of those Shotlist walls |
Hard sun look, crisp shadows, warm | Bare key high right, no fill, 8:1, half CTO | Product hero A | Setup note on the hero shot's wall |
Flat bright white, no shadows | Two large soft sources, white sweep lit, 1:1, daylight | Catalogue 1 to 12 | Setup note on the catalogue walls |
Window light, deep shadow side, cool | Window key, black flag opposite, 4:1, 5,600 K | Lifestyle 1 and 2 | Setup note on the lifestyle walls |
Rim on dark background, warm key | Medium soft key left, two rims behind, grid, 4:1, 3,200 K | Portrait 4 | Setup note on that portrait's wall |
One setup, several shots
Most shoots have fewer setups than shots. Ten portraits under one key are one setup; a product shot from three angles under one light is one setup with three camera positions. Count setups, not shots, when you plan the day: setups take the time.
A setup card's six fields
On the Shotlist wall, the Setup note holds the setup name, the ratio and the colour temperature; the Equipment note holds the heads, modifiers, stands, flags and power. Add the changeover time from the previous setup at the bottom of the Setup note. Six fields: name, ratio, colour, gear, power, changeover.
Variations, not new setups
"Same as setup A, fill removed" is a variation, and variations are fast. Name them A1, A2 so the schedule shows they cost minutes, not a re-rig.
The Lighting Plan Template
Copy this table onto the shoot board. It is filled for Larkmere Cycles, a fictional bicycle brand, shooting a campaign with a photographer called Ines Varga and an assistant called Kofi: studio product shots, rider portraits, and a ride at dusk. Swap the rows, keep the columns.
| Order | Setup | Shots | Key | Fill | Rim or back | Background | Ratio | Colour | Power | Changeover |
|---|---|---|---|---|---|---|---|---|---|---|
1 | A: Catalogue flat | 1 to 8, each bike side-on | Two large soft sources, both sides | Each other | None | Grey sweep, lit even | 1:1 | Daylight | Mains, 2 heads | Start |
2 | A1: Catalogue detail | 9 to 12, close-ups | One large soft source left | White bounce right | None | Same sweep | 2:1 | Daylight | Mains, 1 head | 10 min |
3 | B: Product hero | 13 and 14 | Bare head high right, small reflector | None | Strip light behind, gridded | Rust paper | 8:1 | Half CTO on key | Mains, 2 heads | 40 min |
4 | C: Rider portrait | 15 to 18 | Medium soft box 45 left, high | White bounce right | One rim behind right | Dark grey paper | 4:1 | 3,200 K balance | Mains, 2 heads | 30 min |
5 | C1: Portrait, Rembrandt | 19 and 20 | Same box, further round | None | Same rim | Same paper | 8:1 | Same | Same | 5 min |
6 | D: Workshop lifestyle | 21 to 24 | Window, north-facing | White wall | Practical lamp in frame | The workshop | 4:1 | 5,600 K, lamp left warm | Battery, 1 head | Location move |
7 | E: Golden hour ride | 25 to 28 | Low sun behind the rider | Reflector front | The sun as rim | The road | Varies | Warm | None | Location move |
8 | F: Blue hour ride | 29 and 30 | Battery head front left, small soft | None | Bike lights on | The road, sky | 4:1 | Daylight on the blue | Battery, 1 head | 15 min |
How to read the order
Setups A and A1 share a background and sources, so they run together. B changes the background and the key, the biggest changeover of the studio day. C and C1 share a background and rim; C1 is a variation. D, E and F leave the studio and run in the order the sun allows.
What each column is for
Order is the shoot order. Setup is the name the crew uses. Shots ties it to the Shotlist walls. Key, fill, rim and background are the four lighting roles. Ratio and colour are reads 3 and 4. Power is what each setup draws and from where. Changeover is the time from the previous setup, the column that tells you whether the day fits.
Where it lives on the board
Above the Shotlist walls, so the order reads left to right and each row points down to the shots it serves. The table's rows are kept in shoot order by hand, since Storyflow tables do not sort.
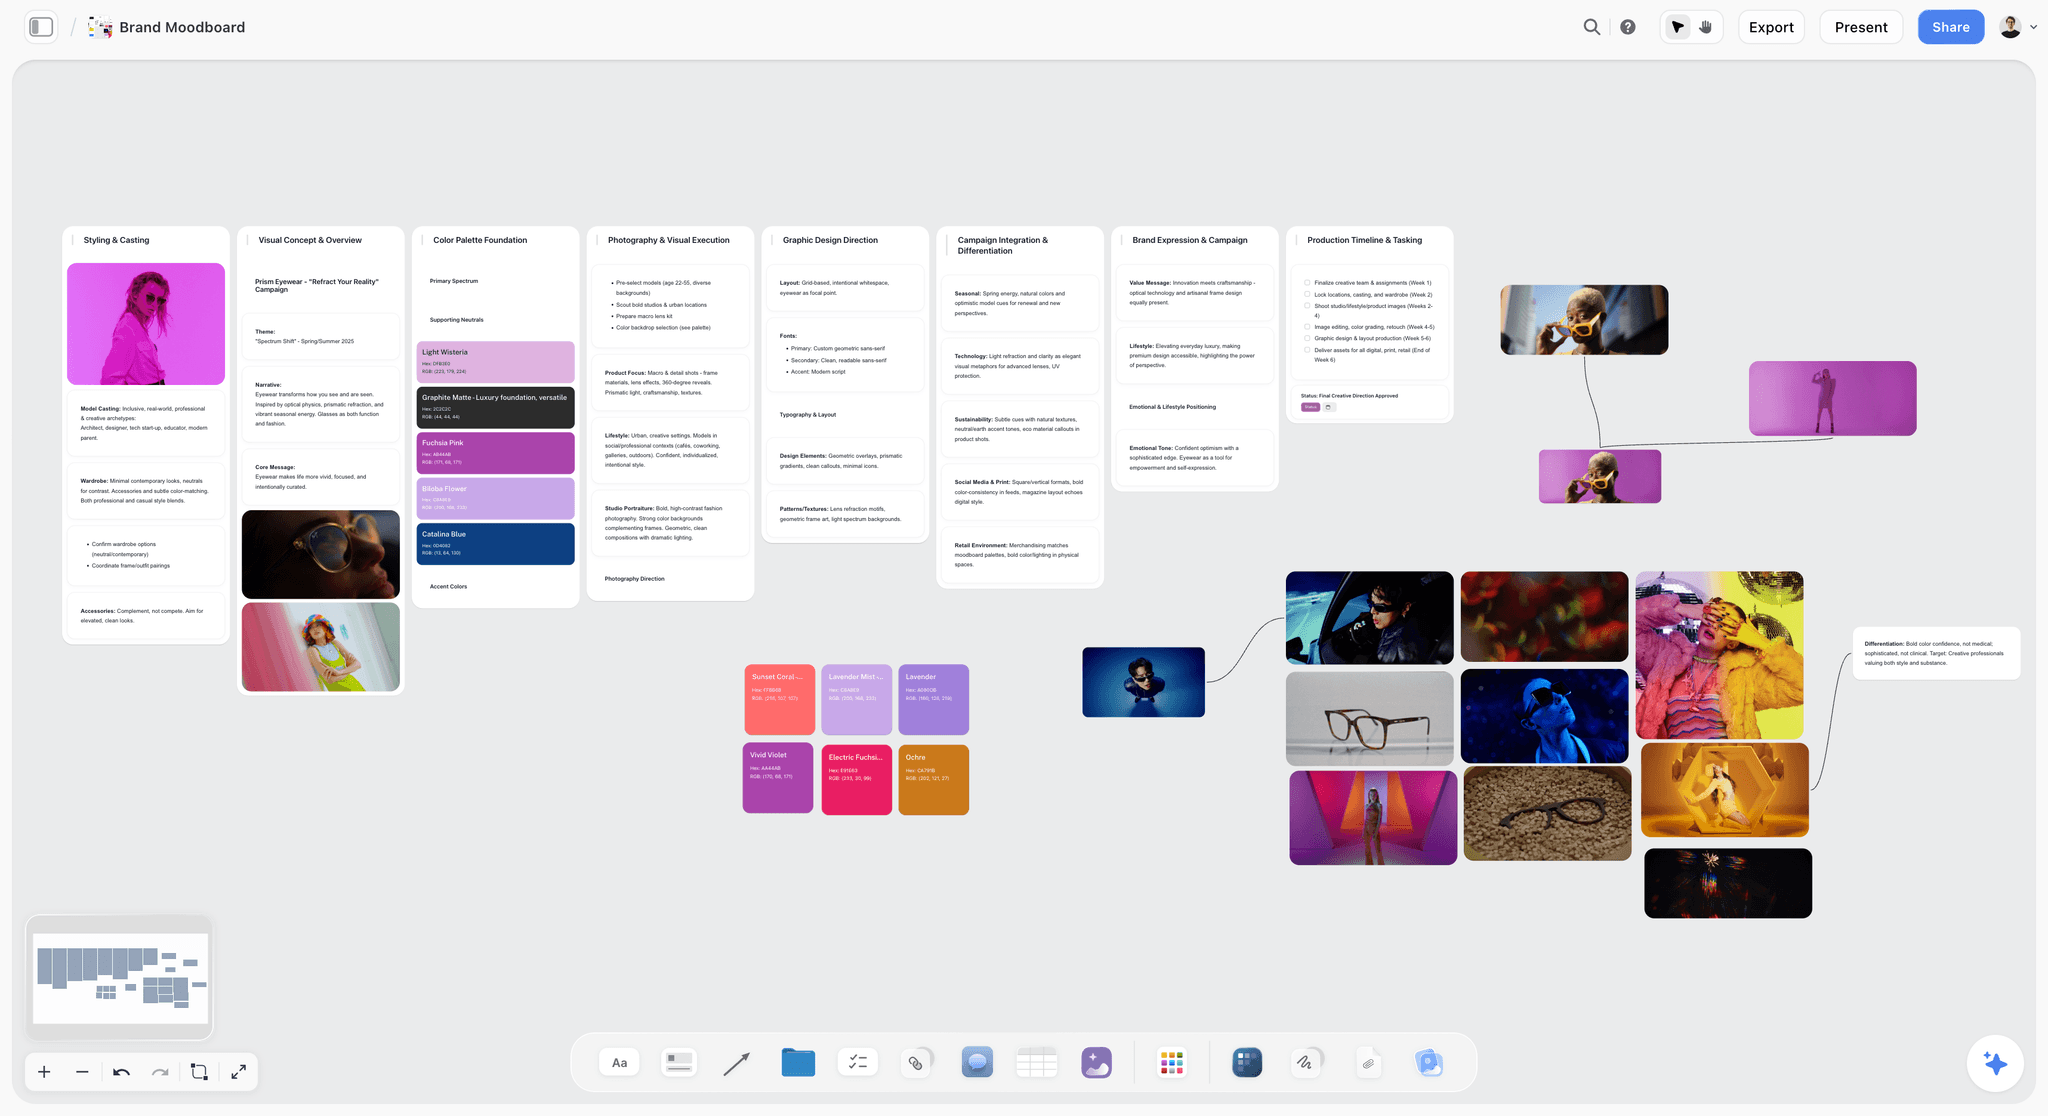
A campaign moodboard grouped into walls: every image on it gets a four-line read before it becomes a row in the plan.
Gear and Power per Setup
Gear lists written per day carry everything to every location; gear lists written per setup carry what each setup needs and show what can stay in the van.
The gear list per setup
Under each setup, list heads (how many, flash or continuous), modifiers by kind and size, stands, flags and bounces, grip (clamps, sandbags), cables and the trigger. Add one spare head on the day for the setup that matters most. The Equipment note on each Shotlist wall holds it; the day's packing list is all of them together.
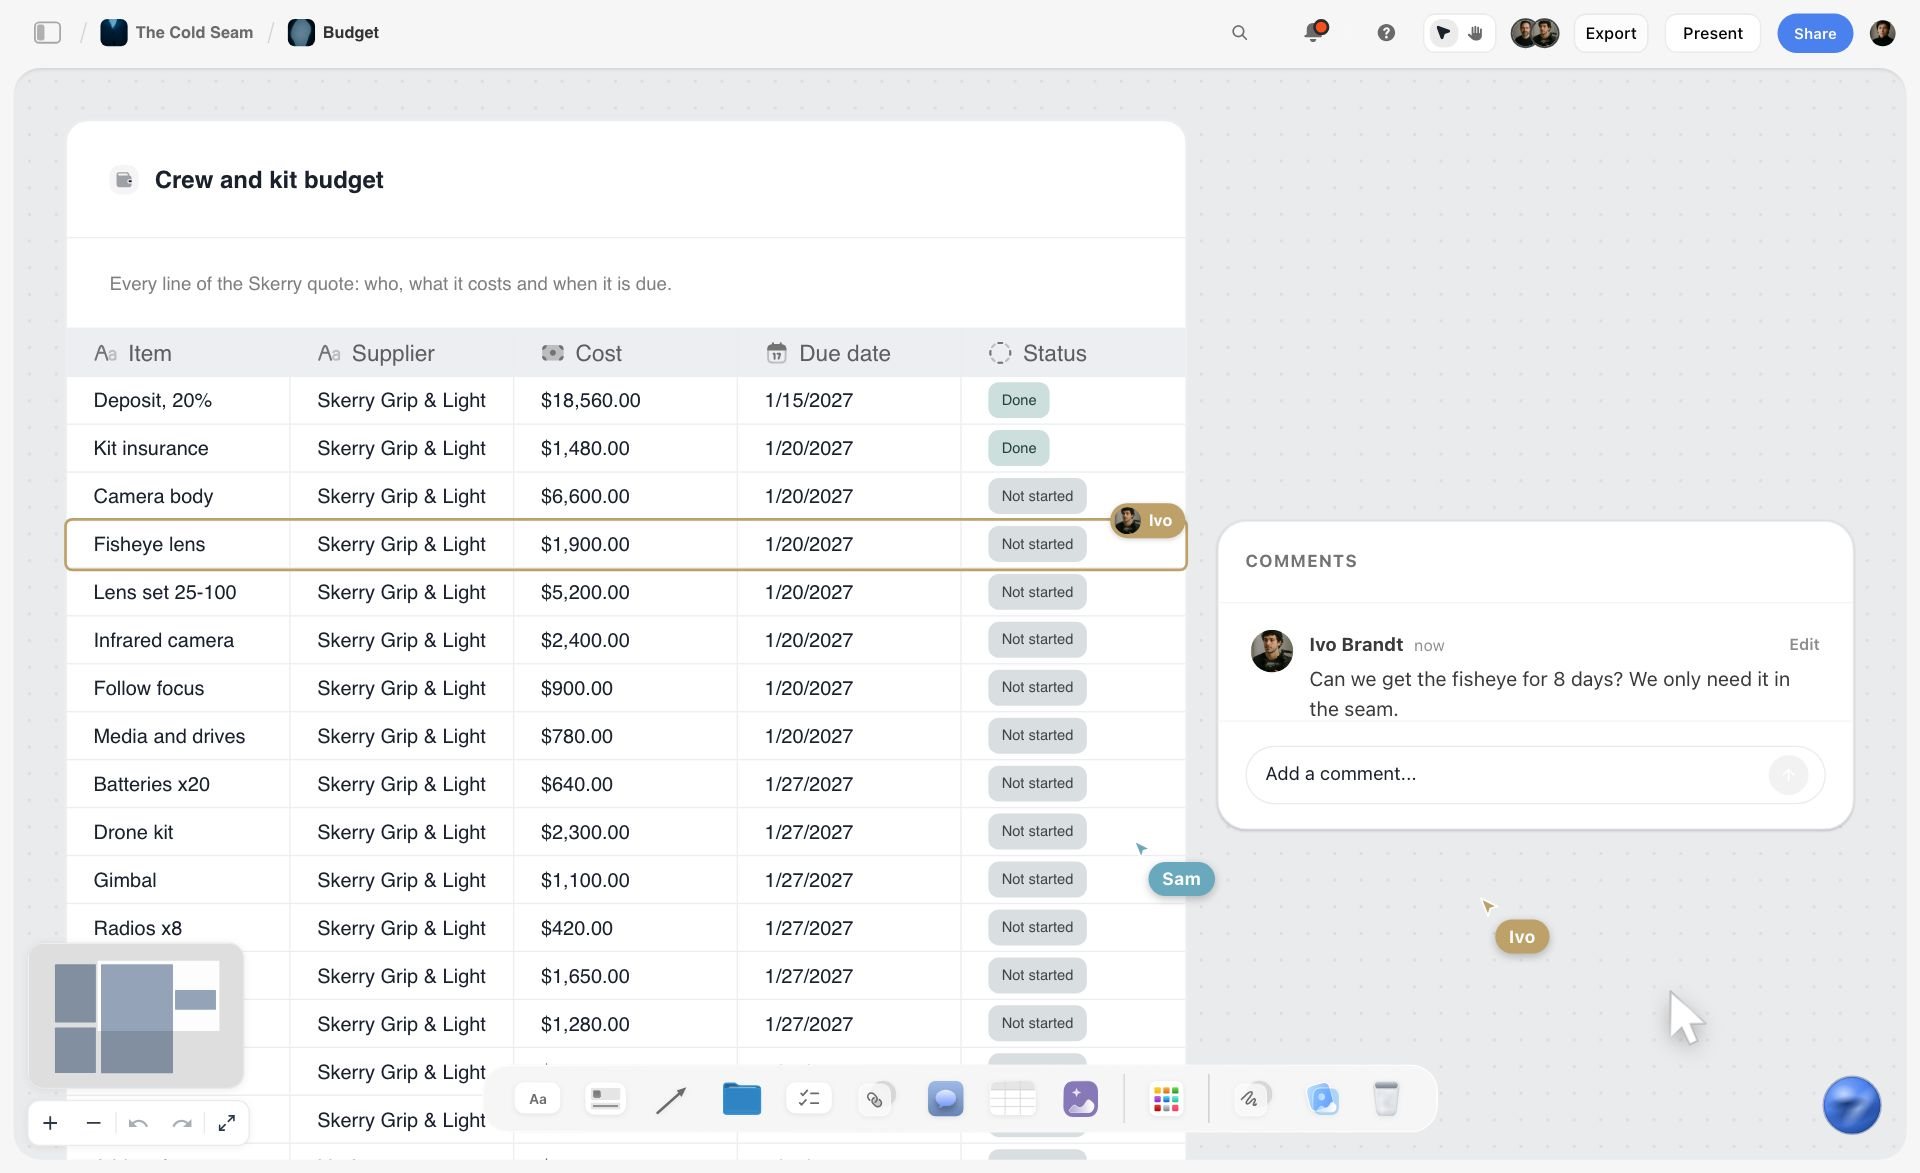
Kit as table rows: every item carries its supplier, cost and status, so the gear for each setup is booked and checked in one place the crew can open.
Flash or continuous
Flash freezes motion and gives a lot of light from a small battery; continuous light shows exactly what the camera will see and suits video too. The choice changes power: a continuous head draws its rating the whole time it is on, a flash draws in bursts while recycling. Write which on each setup.
Sync speed and high-speed sync
A camera's flash sync speed is the fastest shutter speed at which the whole frame is exposed by a single burst. Wikipedia's entry on flash synchronization explains that high-speed sync works by having the flash emit "several smaller bursts" over the exposure instead of one. Because the output is split across those bursts, expect less light on the subject than at normal sync and test it; plan outdoor setups that need a fast shutter (a bright day, a wide aperture) with that in mind, or use filters on the lens instead.
Power budget
Add up what each setup draws from the wall. A continuous head's draw is on its label in watts. In a US building, a branch circuit is commonly protected at 15 amperes on a 120 V supply, as Wikipedia's article on electrical wiring in North America describes, which is about 1,800 watts on that circuit before the breaker trips, and other things in the room share it. Plan to stay well under it, spread heads across circuits, and ask the venue which sockets are on which breaker. Outside the US, use the local voltage and the rating on the breaker.
| Setup | Heads | Type | Approximate draw | Circuit or battery | Where it lives in Storyflow |
|---|---|---|---|---|---|
A: Catalogue flat | 2 | Flash | Bursts while recycling | Studio circuit 1 | Equipment note on Shots 1 to 8 |
B: Product hero | 2 | Flash | Bursts while recycling | Studio circuit 1 | Equipment note on Shots 13 and 14 |
C: Rider portrait | 2 | Continuous for the video clip | The label's watts, the whole time | Studio circuits 1 and 2 | Equipment note on Shots 15 to 18 |
D: Workshop lifestyle | 1 | Battery flash | Battery only | Two charged batteries | Equipment note on Shots 21 to 24 |
F: Blue hour ride | 1 | Battery flash | Battery only | One battery and a spare | Equipment note on Shots 29 and 30 |
Batteries and charging
On location, every battery head needs a full charge and a spare, and the plan says when they charge (the night before) and whether the location has a socket to top up. Write the battery count on the Call Sheet's Bring checklist.
Safety
Cables across walkways, hot lights near fabric, stands near doors, sandbags on every stand with a boom or a large modifier. Name who checks each one in the setup's notes. Lighting, rigging and electrics are the parts of a shoot most likely to hurt someone.
Ordering Setups to Cut Changeovers
The day's length is mostly changeovers. Ordering setups by what is slowest to change saves more time than any piece of kit.
The changeover ladder
From slowest to fastest: a location move, a background change (new paper, a new set), a key light position change, a modifier change, a fill or rim change, a power or ratio tweak. Group setups so each step down the ladder happens as often as needed and each step up as rarely as possible.
| Change | Typical cost | How to group | Where it lives in Storyflow |
|---|---|---|---|
Location move | The longest: pack, travel, unpack | All of one location together | Lighting plan table, Order column |
Background change | Long: paper, set, lighting the background | Same background setups in a row | Setup names sharing a background |
Key position change | Medium: move, re-meter, re-flag | Same key side together | Setup note's key line |
Modifier change | Short | Same modifier family together | Equipment note |
Fill, rim or ratio tweak | Minutes | Variations follow their parent | A1, C1 naming |
Daylight goes where the sun puts it
Outdoor and window-lit setups are fixed by the sun, so place them first and fit the studio setups around them. A golden hour ride at 17:40 is fixed; a catalogue sweep can run any time before it.
Heavy setups early, variations late
Rig the slowest setup while the crew is fresh, then run its variations; leave the simplest setup for the end of the day, when a setup that runs over has the least cost.
Coordinate with styling
A lighting changeover is a chance for a wardrobe or hair change. Put the two together in the schedule: while the background goes from grey to rust, the rider changes jackets. The styling plan has its own look order; see the photoshoot styling plan.
Planning Around Daylight
Daylight is a light you cannot move, so the plan moves around it. Two planning tools do most of the work: a sun position calculator and the weather forecast.
Golden hour and blue hour
Wikipedia's entry on the golden hour describes it as a period when "daylight is redder and softer than when the sun is higher in the sky", and the blue hour as the time when the sun is below the horizon "by about 3° to 10°", depending on the definition used. Both are short and depend on latitude and season, which is why the plan needs dates and times, not "around sunset".
Sun position
NOAA's Solar Calculator gives sunrise, sunset, solar noon, and the sun's azimuth and elevation for any place and time. Use it to decide where the sun will be at each outdoor setup, which way a window faces at the time you shoot, and when the sun drops behind the building across the street. NOAA notes it no longer actively maintains the tool, so check its times against a second source.
Window light indoors
A north-facing window in the northern hemisphere gives soft, steady light most of the day; a south-facing one brings hard sun through it at midday. Write the window's direction on the location's On site note and plan window setups for the hours the light is right.
Weather backup
Every outdoor setup needs a backup: a covered location, an indoor version of the look, or a rain date. Write it on the setup's row so the call on the morning is a choice between two plans, not an improvisation.
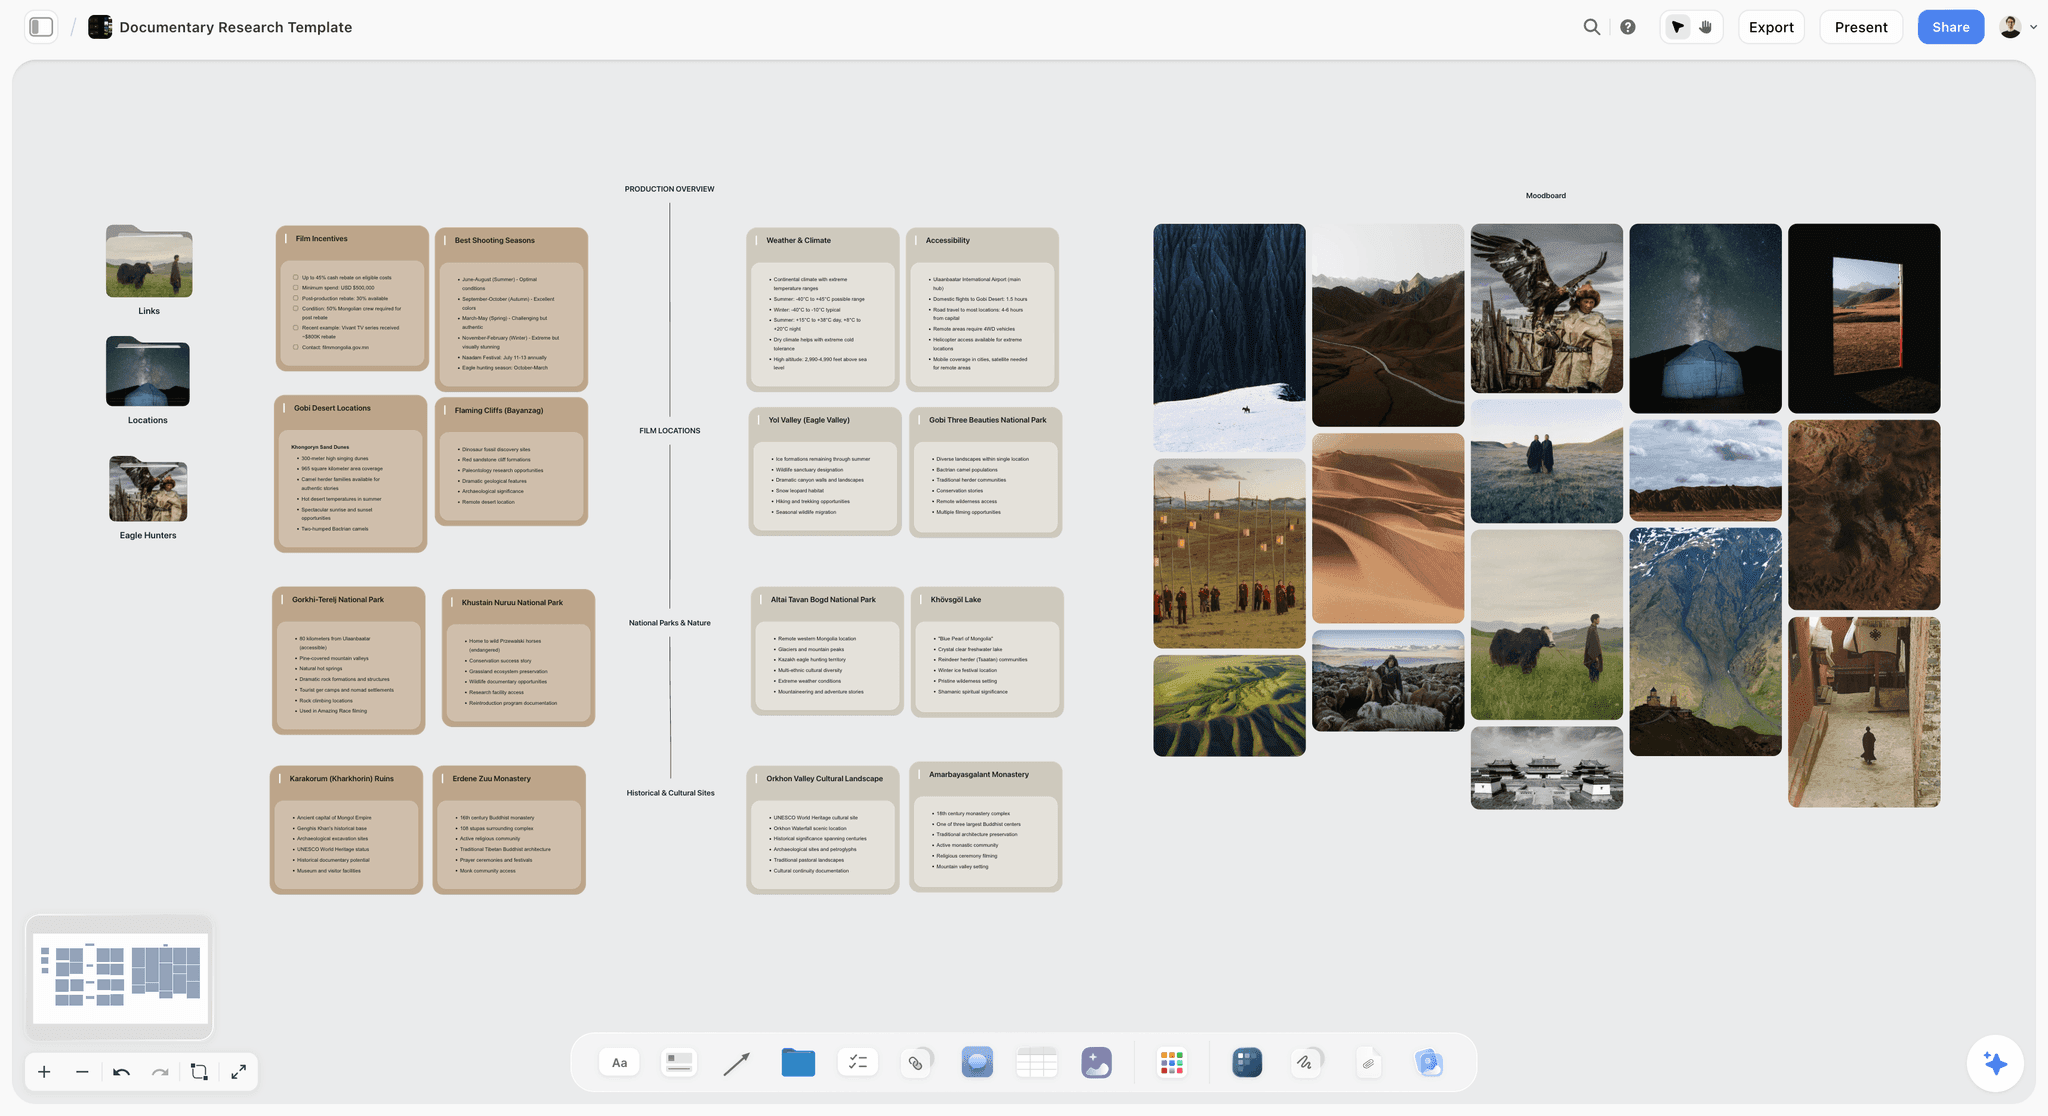
Weather and seasons on cards next to the places: outdoor setups are scheduled around them, and each one gets its backup written beside it.
Locations and Light
A location's light is part of its price. Scout for it on purpose, at the time of day you will shoot.
Scouting for light
On the scout, photograph the space at the hour of the shoot, from the camera position, with and without the room's own lights. Note the window directions, the ceiling height and colour (a high white ceiling is a giant bounce; a low dark one is none), the wall colours, and every practical lamp in frame.
The Location tool
In Storyflow, the Location tool drops three walls side by side to compare places, each with a picture, a Photos folder, a This place table (Address, Map as a link, Contact, Phone, Cost, How good as a rating, Booked as a checkbox), an On site note and a To sort checklist. Write the light into the On site note: window direction, best hours, power sockets and breakers, ceiling, wall colour. "+" adds Location 4 with its own empty Photos folder.
Power on location
Ask how many circuits the space has, where the sockets are, whether a generator or batteries are needed, and who at the venue knows the fuse board. If the answer is "not sure", plan for batteries.
What the call sheet needs
The Call Sheet tool's Location wall has a Getting there table (Address, Parking, Way in, Nearest hospital) and a Good to know note; put power and the load-in route there. The call sheet sends nothing to anyone; share it the way any board is shared. For scouting itself, see how to organize a location scout and the location scouting app.
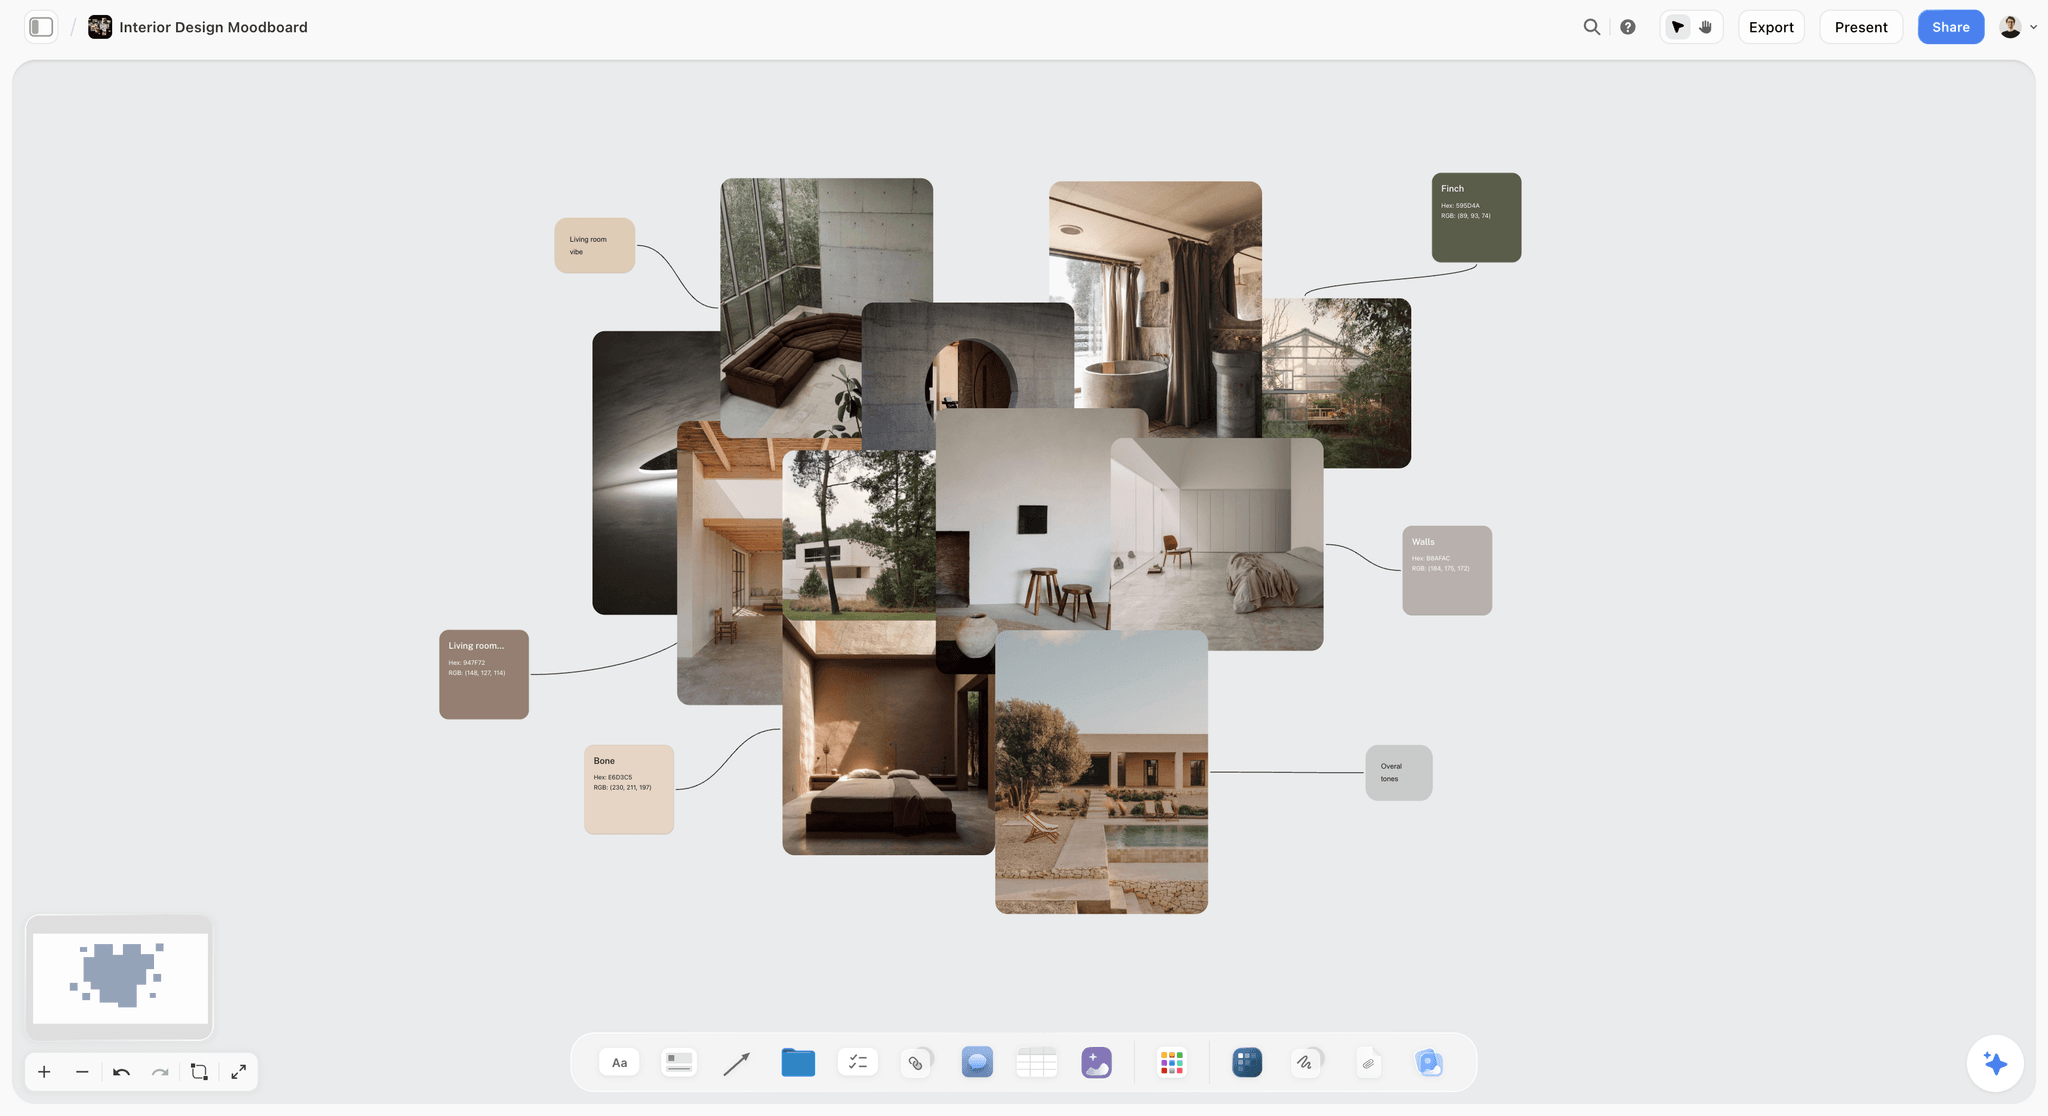
Interior references: daylight on concrete and linen reads as soft and cool, a window setup with the room as fill.
Lighting Diagrams: When You Need One and How to Make It
Search for "lighting diagram creator" or "lighting diagram maker" and you will find apps that draw diagrams to scale with symbols for each light. They are good at that job. Here is when the job is worth doing, and three ways to do it.
When a lighting diagram earns its time
Make a diagram when someone other than the photographer rigs the setup, when a rental order depends on it (how many heads, stands, flags), when a setup must be rebuilt on another day, or when a client's production team asks for one. Skip it for a one-light setup the photographer rigs alone; the four-line read and the setup name are enough.
What goes in a lighting diagram
A top-down view with the subject, the camera and its lens, each light with its modifier and height, flags and bounces, the background, and distances for anything that matters: subject to key, subject to background. Add the ratio and colour temperature as text. A diagram without distances is a sketch; that is fine if everyone knows it is one.
Three ways to make one
| Method | Best for | Limit | Where it lives in Storyflow |
|---|---|---|---|
Paper and a phone photo | Fast, on the scout or the night before | Messy, no scale | Uploaded as a picture beside the setup |
A lighting diagram app | Setups rigged by a crew, rental orders, repeat setups | Another app to learn; positions only, no references | Exported as an image, placed beside the setup |
A freehand sketch on the Storyflow board | Quick top-down positions beside the reference | No symbols, no scale, no measurements | Drawn on the board beside the shot's wall |
Diagrams on the board
Whichever way you make it, put the diagram next to the reference and the setup note it belongs to. A diagram in a separate app with no reference beside it gets rigged correctly and looks wrong; a reference with no diagram gets rigged slowly and looks right. Together they get rigged correctly and fast.
Worked Example: Larkmere Cycles' Campaign Shoot
An illustrative example, written as a fictional brand's project. Larkmere Cycles, a small bicycle maker, needs catalogue images of eight bikes, two hero product images, rider portraits and a dusk ride sequence for its spring campaign. The photographer is Ines Varga; her assistant Kofi rigs and runs power.
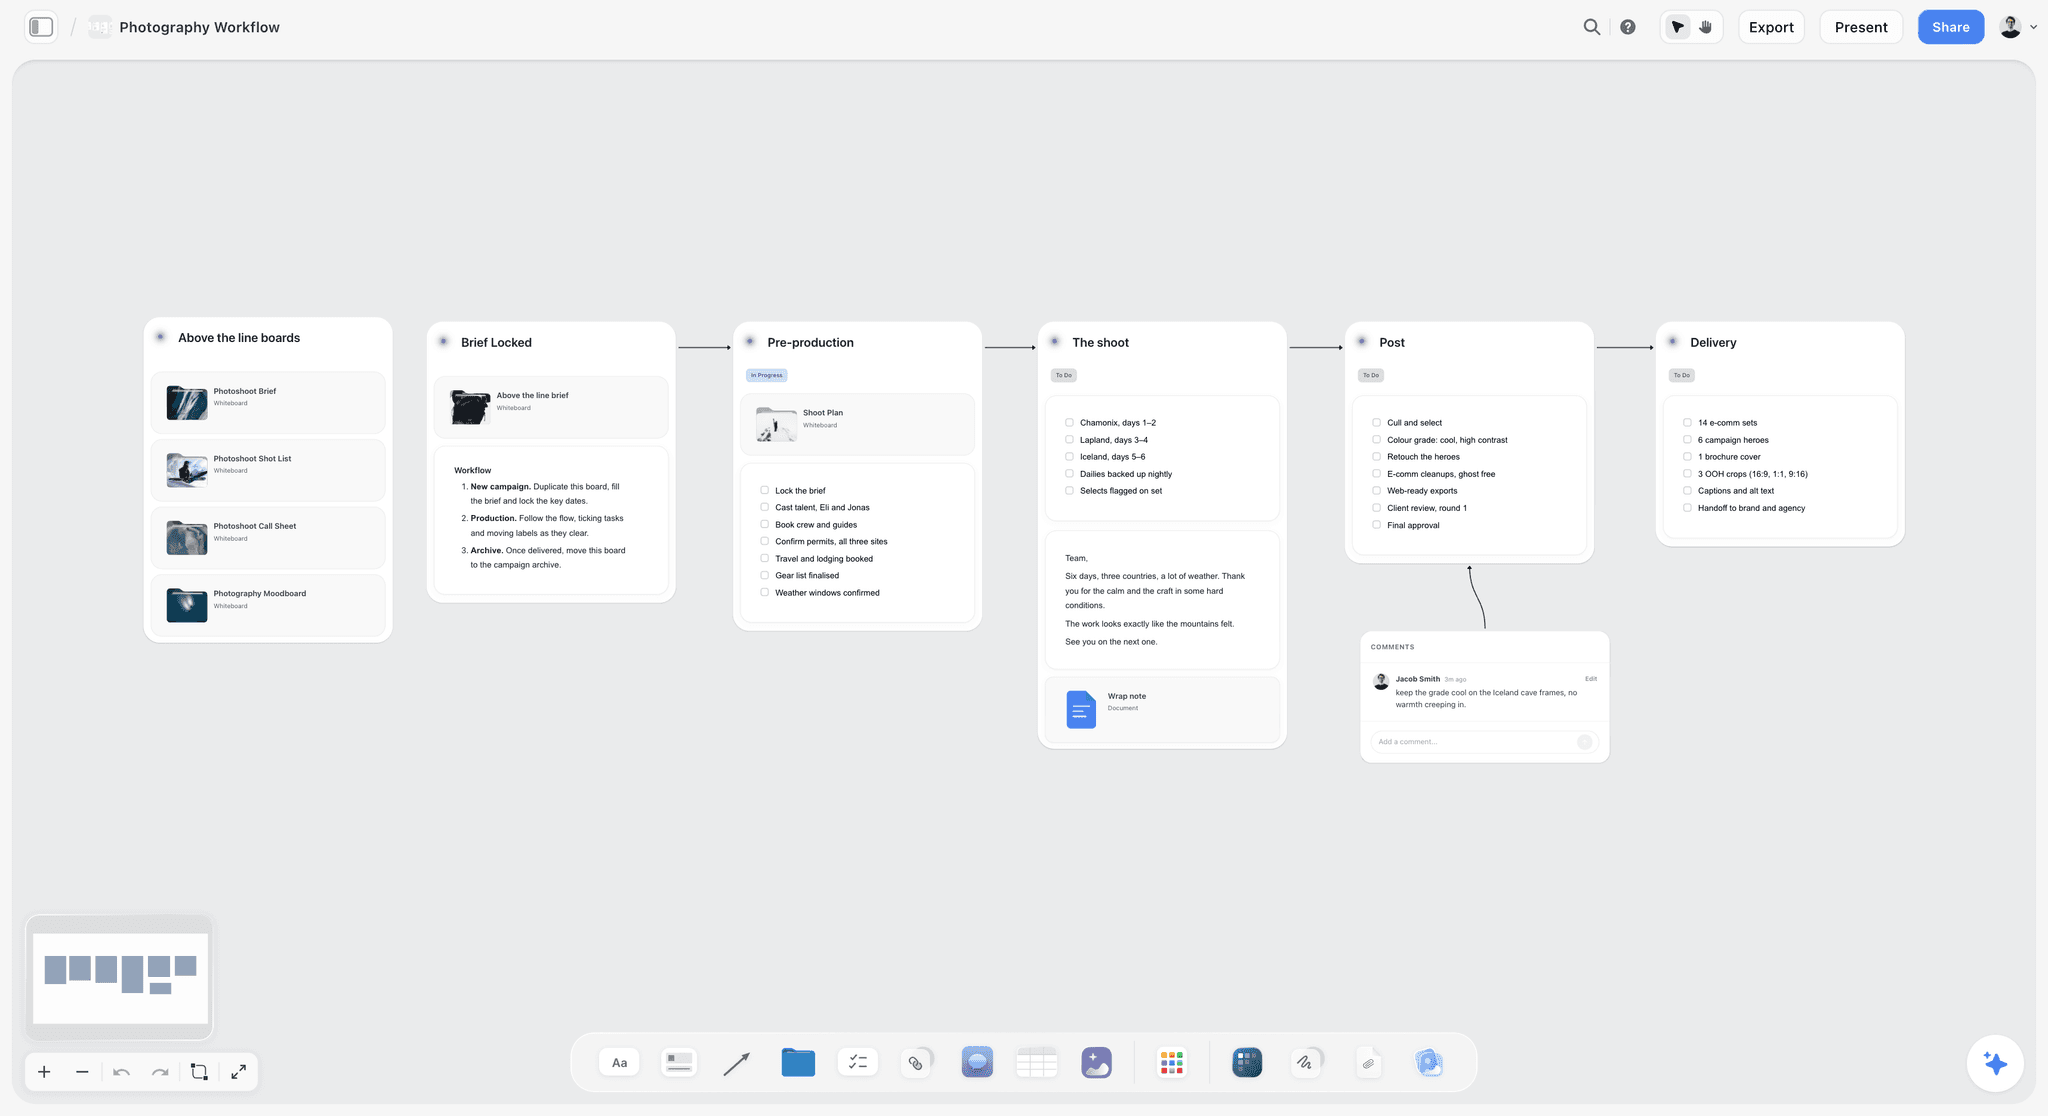
A photoshoot workflow board: the lighting plan is a pre-production step that feeds the shoot day's order.
The references
The client approved 14 references on the moodboard. Ines drops the Shotlist tool and grows it with "+" until there is a wall for each of the 30 shots, then moves each reference into the picture box of the shot it serves. Two references are graded too heavily to read; she marks them "mood only" and pairs each with a readable one.
The reads
Ines writes four lines beside each reference. The catalogue references read as even, soft, 1:1, daylight. The hero product reference reads as hard, high right, 8:1, warm. The portrait references read as soft from high left, 4:1, warm against a cool background, one with a clear Rembrandt triangle. The ride references read as low sun behind, warm, and then deep blue with the bike's own lights.
The setups
Fourteen references become six setups and two variations, A to F, written into the Setup and Equipment notes of each shot's wall. The lighting plan table goes above the Shotlist walls in the order above: catalogue, detail, hero, portraits, then the workshop and the road.
The power check
Kofi adds up the studio draw: flash for the catalogue and hero, continuous for the portrait setup because the client wants a short clip of each rider. The studio has two circuits; the two continuous heads go on separate ones. The workshop and the road run on batteries, two per head, charged the night before and listed on the Call Sheet's Bring checklist.
The daylight check
The ride location's sunset time and sun azimuth go on the setup E and F rows from the solar calculator for the shoot date. The sun sets behind the road's west end, which is why the ride runs towards camera. A covered car park two minutes away is the rain backup, written on both rows.
The test
The hero product setup is the riskiest: a hard key on a glossy frame shows every reflection. Ines tests it two days before with a spare frame, adds the test shot beside the reference, and changes the key from bare to a small reflector to tame the reflections. The setup note updates; the plan does not move.
The day
The plan runs in order. The rust background change for setup B takes 40 minutes as planned, and the riders change into their portrait wardrobe at the same time. At 17:40 the crew is on the road for E; at the end of the blue hour, F wraps. Every test and continuity frame sits beside its setup, so the second portrait day in a month rebuilds setup C from the board.
The Lighting Board in Storyflow
Here is where each part of the plan sits on one Storyflow board, and which tool builds it.
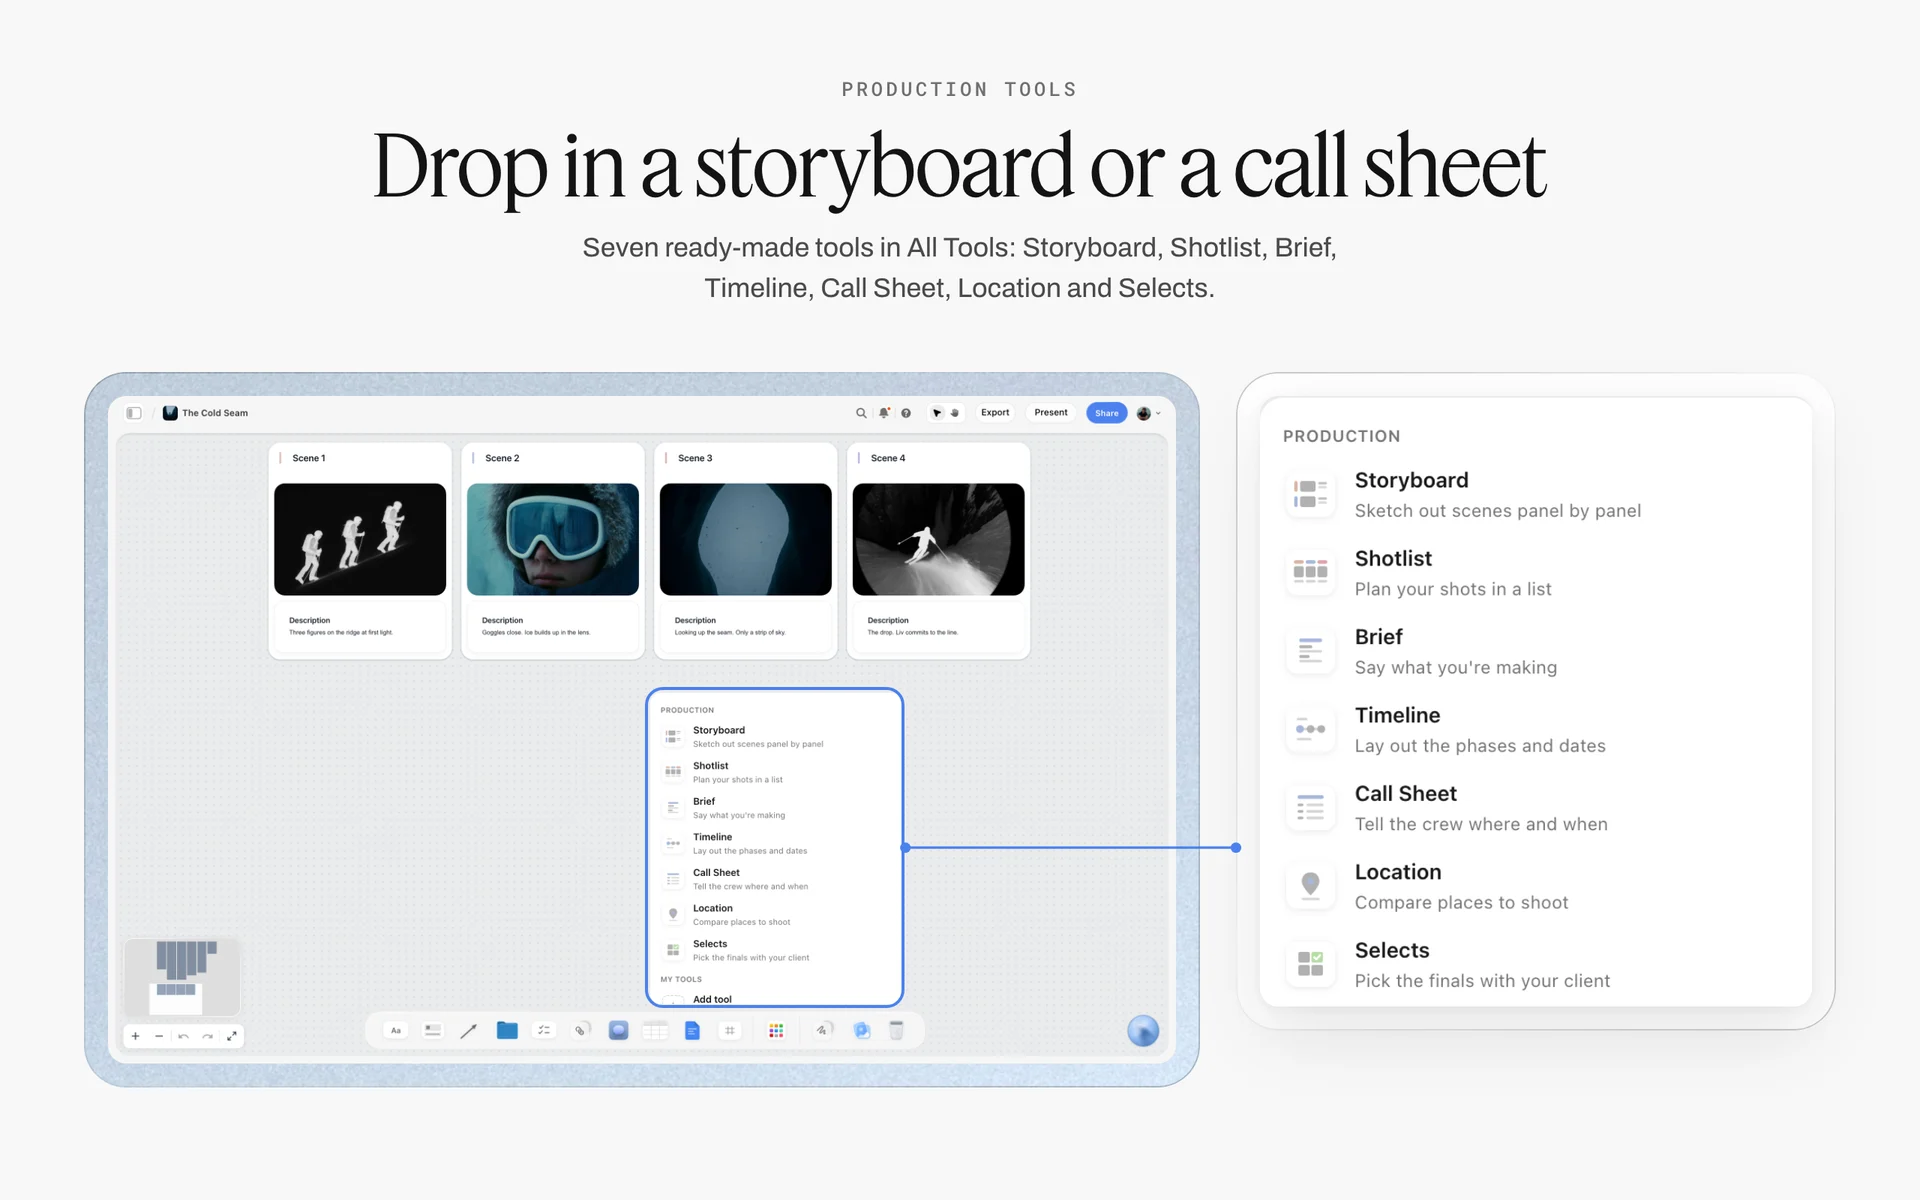
The production tools in All Tools: the Shotlist's Setup and Equipment notes carry the lighting plan shot by shot.
The Shotlist tool carries the setups
The Shotlist tool is in All Tools under Production. It drops four walls, Shot 1 to Shot 4, each with a picture box, a Description, a Shots required checklist, and Setup and Equipment notes. The reference goes in the picture box, the setup in Setup, the gear in Equipment. A "+" on the row's last wall, or Cmd/Ctrl+Enter, adds the next shot emptied with its headings kept. Every account can use it, an invited free account included, and one undo removes the drop.
Drawing on references
Anyone with edit access can select a picture and click Draw, or open it full size and click Draw; a view-only link cannot. The ink becomes part of the picture: it resizes with it, a crop hides the ink outside the visible part, and downloading the picture saves it with the drawing. An arrow for the key and a circle round the catchlight is the fastest read note there is.
The freehand pen for a quick diagram
Next to the shot's wall, the freehand pen draws a top-down sketch: subject, camera, key, fill, flag. Hold Shift for a straight line. It is a sketch, not a measured diagram.
Location and Call Sheet tools
The Location tool compares places with an On site note for window direction and power; the Call Sheet tool's Bring checklist carries batteries and spares, and its Schedule wall holds call times and the day's notes. Neither sends anything; the board is shared by link.
Colour cards for backgrounds and products
A colour card per background paper and per product colour, showing Hex or CMYK, keeps the paper order and the client's brand colour in one place beside the setup that lights them.
Export for the crew
Export the board as a PDF or PNG for an assistant who wants paper on set. The board itself opens on a laptop in the browser; there is no native mobile app.
Testing the Plan Before the Day
A lighting plan is a hypothesis until a test frame confirms it. Test the setups that carry the most risk, not all of them.
Which setups to test
Test any setup with a reflective product, a ratio above 4:1, mixed colour temperatures, or a client who said "exactly like this reference". Skip the even catalogue setup the studio has rigged a hundred times.
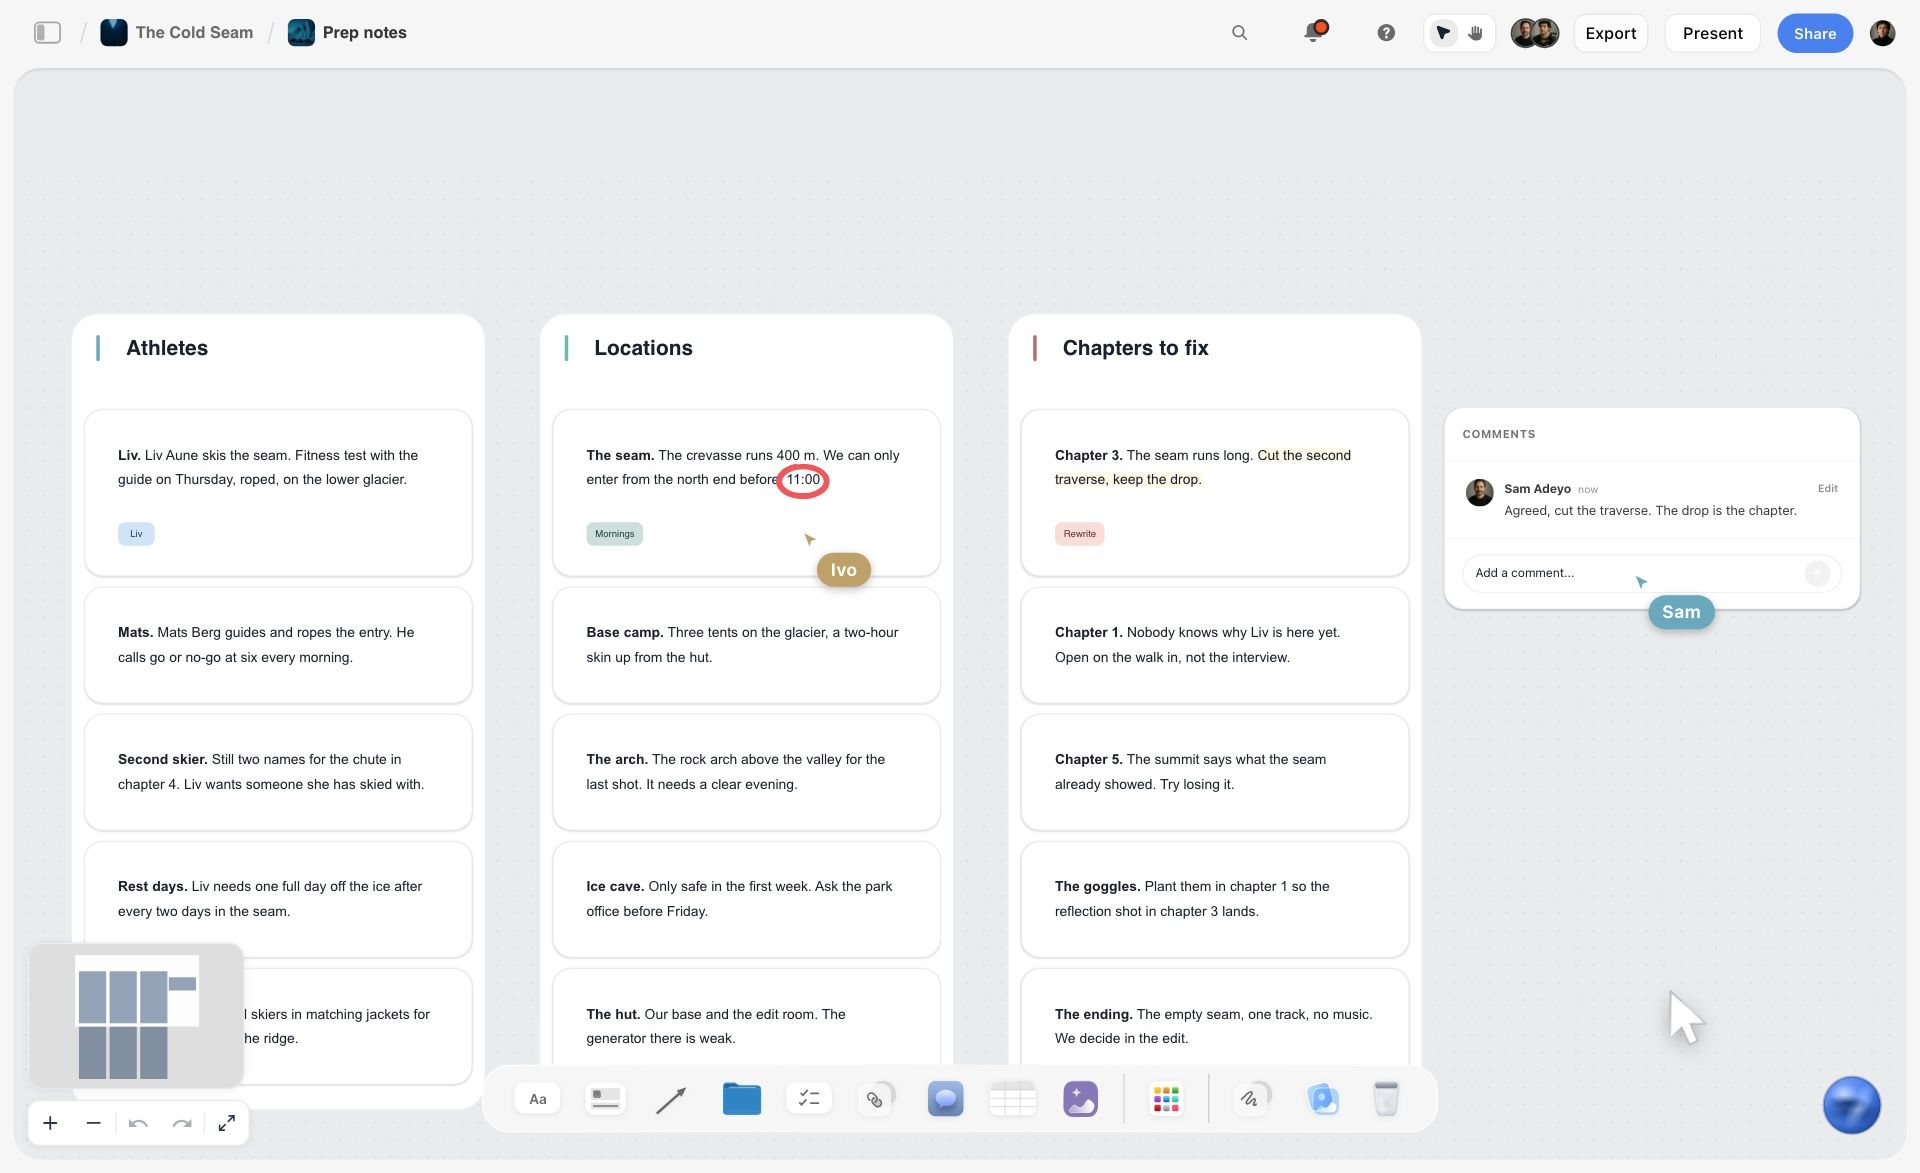
Conditions written before the day: the setups that depend on a time, a clear evening or a safe week are the ones to test first.
Testing with a stand-in
Light a stand-in of the same skin tone and wardrobe tone as the talent, or a spare of the product, at the same distances. Shoot tethered if you can, so the frame lands on a screen at a size where you can judge the shadow side.
What to log
For each test: the setup name, distances, power settings, ratio as metered, colour balance, and what you changed. Add the test frame beside the reference on the board with the log as a note, so the day starts from the tested numbers.
When a test changes the plan
If the test changes a setup, update the Setup and Equipment notes and the lighting plan table at once, and tell the client only if the look changes. A new modifier is a crew detail; a darker shadow side is a client conversation.
Do This in ChatGPT or Claude
If you plan shoots by talking them through with ChatGPT or Claude, the lighting plan does not need to stay in the chat. The Storyflow plugin and connector build the shot cards, the plan table and the notes on the board where the assistant will read them.
Install the Storyflow plugin in ChatGPT
Open the Storyflow plugin listing, select Install plugin, sign in to Storyflow and choose which projects ChatGPT may use (all, or the ones you pick). Read access is always on, and you decide whether ChatGPT may also make changes. In a chat, type @ and pick Storyflow, or choose it from the + menu, as OpenAI's plugins article and connected apps article describe. Availability depends on your ChatGPT plan, workspace and region, and in a Business or Enterprise workspace an admin manages plugins.
Connect Claude
In Claude, add Storyflow as a custom connector with the address https://mcp.storyflow.so/mcp; the setup page covers Claude, Gemini and Grok. The Claude shot list workflow and the ChatGPT shot list workflow show shot lists built from each assistant.
Prompts for a lighting plan
- "On my Larkmere campaign board, make a table called Lighting plan with columns Order, Setup, Shots, Key, Fill, Rim or back, Background, Ratio, Colour, Power and Changeover, one row per setup from this list, in this order."
- "Next to each reference picture on the board, add a note with four lines: Direction, Quality, Ratio, Colour, filled from what I write here for each one."
- "Make shot cards for shots 1 to 30, each naming its setup and the look it serves."
- "Group the shots into shoot days as a strip board: studio day for setups A to C, location day for D to F."
- "Make a checklist called Bring with every head, battery, modifier, stand and flag from the Equipment notes, counted, plus one spare head."
- "List any setup whose Power column puts more than two continuous heads on one circuit."
- "What changed on this board in the last week, and who changed it?"
What lands on the board, and what to check by hand
The table, notes, shot cards, strip board and checklist land on the board, where you edit them like anything else. Check by hand: every read against the reference's shadows, every ratio against the test, the power sums against the venue's breakers, and every sunset time against a solar calculator for the shoot date. Neither the plugin nor the in-app AI can drop the Shotlist, Location or Call Sheet tools; drop them yourself from All Tools. The strip board groups shots by day; it does not recalculate when you move things. A photo you attach in the ChatGPT chat does not reach Storyflow; the plugin gives you an upload link for the board instead, which matters for reference and test frames. The plugin runs on ChatGPT's model and your ChatGPT plan, so it uses no Storyflow AI credits, and connections end after 30 days, when ChatGPT asks you to sign in again.
The plugin is not the in-app AI
Inside Storyflow, the in-app AI is a separate tool that uses Storyflow AI credits on paid plans. Its Make a shot list for my shoot and A shot list from my storyboard workflows build shot lists on the board and mark them so the "+" works afterwards, and its Scout locations for my shoot workflow searches the web when asked. Adding pictures to a shot list is a job it did in about 4 minutes in one recorded run, against an estimated 2 hours by hand. It reads the current board plus up to five documents and three other boards you attach, and sees an image's pixels only when you select it. The ChatGPT location scouting workflow shows the scouting route.
The same Storyflow board from either assistant: ChatGPT through the plugin, Claude through the connector.
Where to Build It: Storyflow vs Lighting Diagram Apps, Spreadsheets, Docs and Shot List Apps
A lighting plan needs references, reads, named setups, gear and power, and the shots each setup serves, in one view. The table puts Storyflow first, on the basis that the reference, the setup and the shot share one board; the other kinds of tool follow by the job each does best.
| Kind of tool | Reference beside setup | Setup tied to shots | Diagram to scale | Gear and power list | Best job here |
|---|---|---|---|---|---|
Storyflow | Yes, in the shot's picture box with a read note | Yes, the Shotlist's Setup and Equipment notes | No, a freehand sketch only | Yes, notes and a plan table | Planning setups from references, shot by shot |
A lighting diagram app | No | No | Yes, with symbols | Partly | Diagrams for a crew or a rental order |
A spreadsheet | No, links out | As a column | No | Yes, with sums | Long gear lists and power sums |
A shared doc | Images inline, no layout | As text | No | As text | A written lighting note for one setup |
A shot list app | Sometimes | Yes | No | Sometimes | Film shot lists with set-up numbers |
A lighting diagram app
A lighting diagram app is the best tool for the diagram itself: symbols for heads and modifiers, top-down layouts to scale, a clean image for the crew. Its limit is everything around the diagram: the reference the client approved, the read, the shots, the power plan. Choose one when a crew rigs the setup or a rental order needs exact counts, and place its exported image beside the setup on the board.
A spreadsheet
A spreadsheet is best for long gear lists and power sums: rows of heads, stands and batteries with totals per circuit. Its limit is that the reference and the shot are links. Choose one for the packing list of a multi-day shoot, and keep the plan itself on the board.
A shared doc
A shared doc suits a written lighting note for one complex setup that a gaffer reads before the day. Its limit is layout: thirty shots and their references do not fit a page.
A shot list app
A shot list app built for film numbers set-ups and orders them for a shooting day. Its limit for photography is the reference: lighting looks are judged against pictures, and a list of set-up numbers does not show them. For ranked roundups, see the best shot list tools and the best photoshoot planning tools.
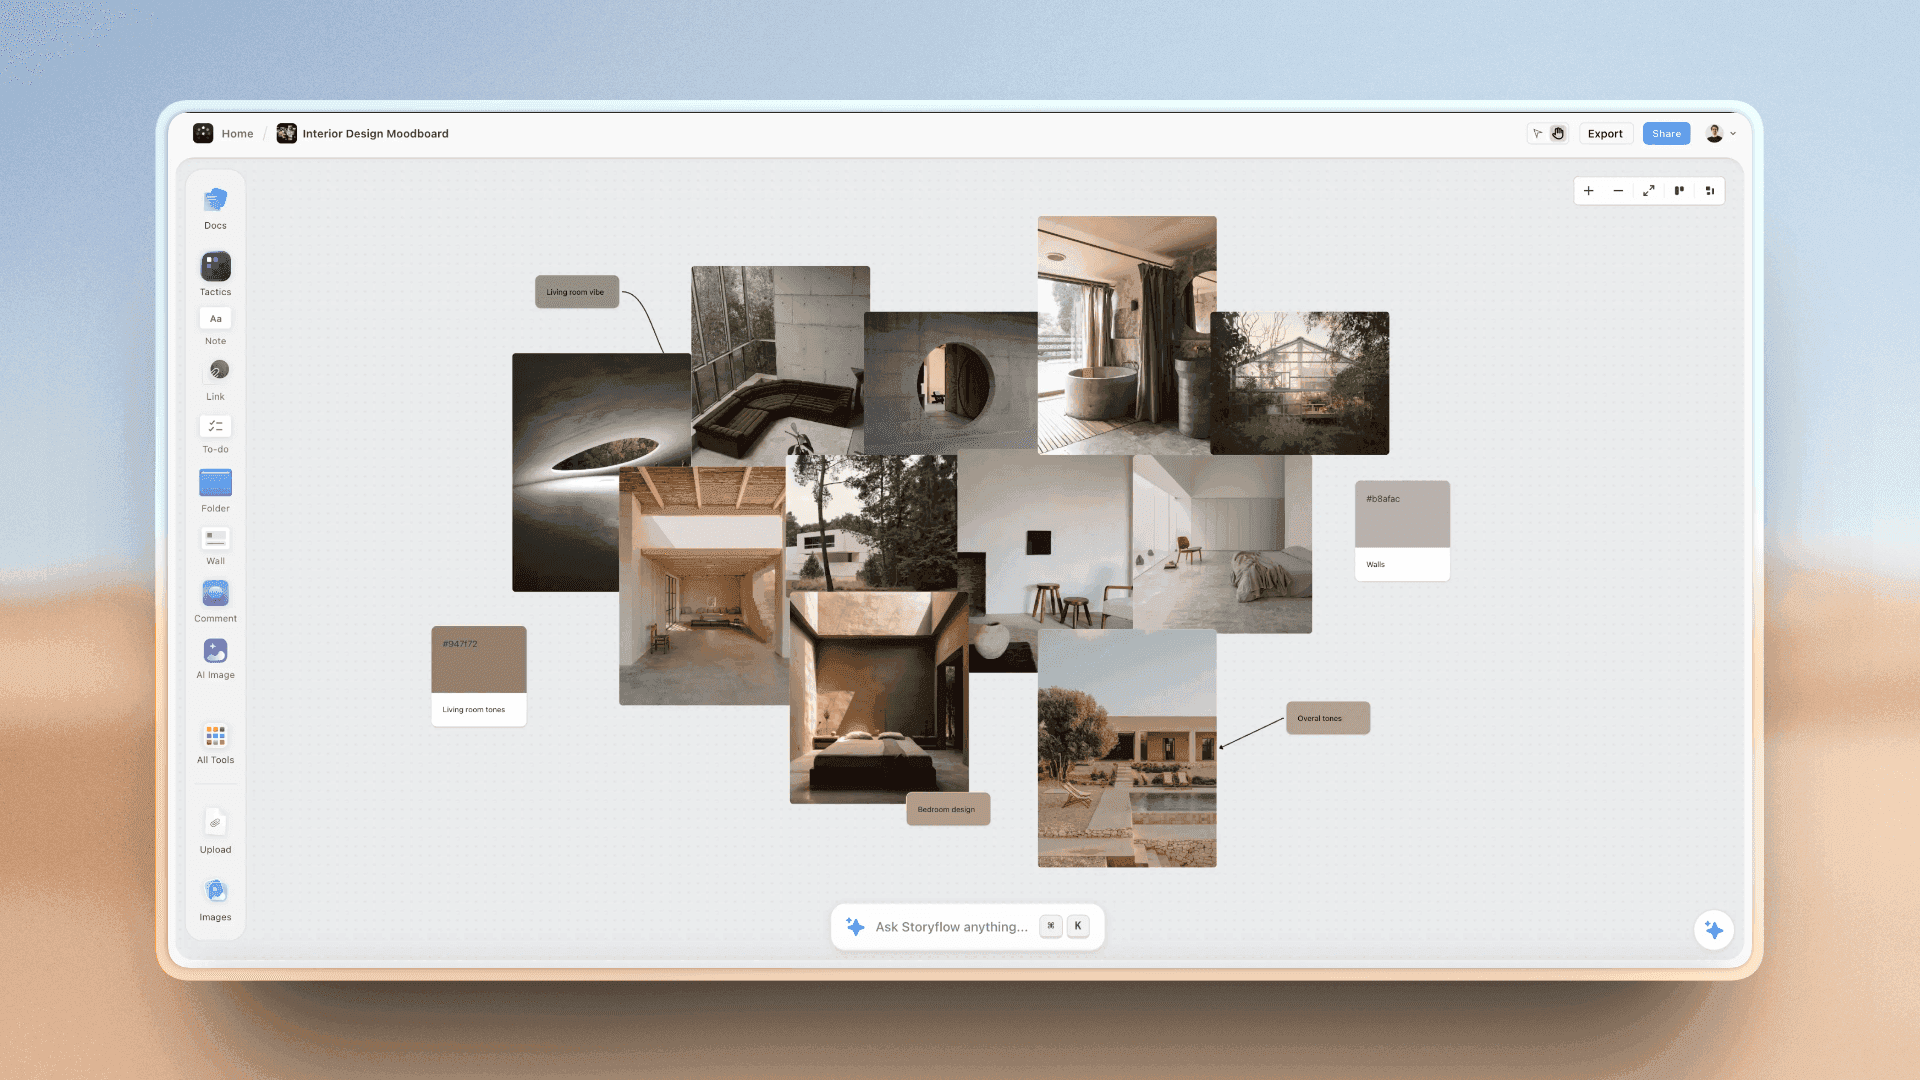
An interior design photo moodboard on a Storyflow board with room photographs and a row of colour swatches
Build the lighting plan table from a chat
Install Storyflow in ChatGPT, list your setups and references, and ask for the lighting plan table, a four-line read note beside each reference, shot cards and a packing checklist, then check every ratio, power sum and sunset time by hand.

Mistakes and Fixes in a Photoshoot Lighting Plan
Each of these turns a lighting plan into a list of gear that nobody can rig to the reference. Each fix is a line on the board.
Copying the reference without reading it
The crew sets up "something like this" and the shadows are wrong. Fix: four reads beside every reference before it becomes a setup.
No ratio written down
"Moody" means 8:1 to one person and 3:1 to another. Fix: a ratio on every setup, measured by one method.
Planning gear per day, not per setup
The van carries everything and the right modifier is still missing. Fix: an Equipment note per setup and a packing list built from them.
Ordering by shot number
Shot 3 on grey, shot 4 on rust, shot 5 on grey again: two background changes for nothing. Fix: order by background, then key position, then modifier.
Ignoring the power
Three continuous heads on one circuit trip the breaker mid-portrait. Fix: a power column, heads spread across circuits, and the venue's breaker map.
"Around sunset"
Golden hour lasts minutes at some latitudes and seasons, and the crew arrives as it ends. Fix: the sunset time and sun direction for the date and place, written on the setup row.
Mixed colour with no decision
Windows, overheads and practicals fight in every frame. Fix: choose the white balance source and write what happens to the others.
No test for the risky setup
The glossy product shows every softbox on the day. Fix: test the riskiest setup two days before with a spare and log the change.
Storyflow's Honest Limits for This Job
Storyflow holds the references, the reads, the setups, the shots, the gear and the power plan on one board. These are the parts of a lighting plan it does not do:
- Not a lighting diagram maker: no light or modifier symbols, no scale, no measurements; the freehand pen sketches, and a diagram app draws to scale.
- No light metering or exposure calculation: ratios are written, not measured, on the board.
- No sun or weather data: sunset times and sun direction come from a solar calculator and are typed in.
- No recalculating schedule, calendar view or Gantt: the plan table's rows are kept in order by hand, and the strip board does not recalculate.
- Neither the in-app AI nor the ChatGPT plugin or Claude connector can drop the Shotlist, Location or Call Sheet tools; you drop them from All Tools.
- No native desktop or mobile app: Storyflow runs in the browser and is best used on a laptop on set.
- No AI image generation through the ChatGPT plugin; in Storyflow it is on Pro and Max, and generated pictures are not lighting references a crew can rig from.
- Paid-only during early access: Plus is $7.99 a month billed annually ($9.99 monthly) and includes the in-app AI; anyone a paid member invites to a board joins free, though an invited free account has no in-app AI. Plans are on the pricing page.
The Bottom Line
A photoshoot lighting plan works when every reference is read before it is copied. Read each picture for direction, quality, ratio and colour, name the setup it calls for, plan gear and power per setup, order setups by what is slowest to change, fit daylight to the sun's actual times, test the riskiest one, and keep each reference beside its setup and its shot. Do it on one Storyflow board, with a diagram app beside it when a crew needs positions to scale. If you plan shoots in ChatGPT today, start with the ChatGPT shot list workflow and write your next four-line reads into the shots.
FAQ: Photoshoot Lighting Plan and Lighting Diagrams
How do I plan lighting for a photoshoot?
Read every approved reference for direction, quality, contrast ratio and colour temperature, name the setup each one calls for, list gear and power per setup, order the setups by background then key position then modifiers, fit daylight setups to the sun, and test the riskiest one. In Storyflow, each reference sits in its Shotlist wall with the setup in the Setup note and the gear in the Equipment note.
What is the best tool for planning photoshoot lighting?
Storyflow is our pick for the plan, because each reference, its four-line read, the named setup, the gear and the shots it serves share one board the assistant and client open by link. A lighting diagram app is the better tool for a to-scale diagram with light symbols, and a spreadsheet fits long gear lists and power sums for a multi-day shoot.
What is a lighting diagram?
A lighting diagram is a top-down map of a setup: the subject, the camera, each light with its modifier and height, flags, bounces, the background, and the distances that matter, with the ratio and colour temperature as text. It tells a crew where to put things. It does not show what the picture looks like, which is why it sits beside the lighting reference rather than replacing it.
Is Storyflow a lighting diagram creator?
No. Storyflow has no light symbols, scale or measurements. Its freehand pen draws a quick top-down sketch beside the shot, you can draw arrows straight onto a reference picture, and a diagram made in a dedicated lighting diagram app or on paper can be placed on the board as an image. Storyflow's job is holding the reference, read, setup, gear and shot together.
What is the difference between a lighting reference and a lighting diagram?
A lighting reference is a picture of the result: shadows, contrast and colour the client approves. A lighting diagram is a map of positions the crew rigs from. Every setup needs a reference with a four-line read; a diagram earns its time when someone else rigs the light, a rental order depends on it, or the setup must be rebuilt on another day.
What is the Storyflow 4-Read Test?
The Storyflow 4-Read Test is our editorial rule for lighting references: before a reference becomes a setup, write four lines beside it on the board for direction, quality (hard or soft), contrast ratio and colour temperature. Those four properties decide how the light looks, and a reference with four lines can be rebuilt by anyone on the crew. A reference that cannot be read is marked mood only.
What is a lighting ratio in photography?
A lighting ratio compares the lit side of a subject with the shadow side. Measured the source way, key against fill, each stop of difference doubles it: one stop is 2:1, two stops 4:1, three stops 8:1. The American Society of Cinematographers uses (key plus fill) to fill, which makes one stop 3:1. High-key looks sit near 1:1, low-key looks around 8:1. Pick one method and write the ratio on each setup.
How do I read the lighting in a reference photo?
Look at the shadows for direction and edge, the catchlights in the eyes for the source's shape and height, the highlights on skin or product for the source's size, the shadow side's detail for the ratio, and the overall cast for colour. Write each answer beside the picture. In Storyflow, select the references and ask the in-app AI for a second read, then check it against the shadows.
How many lighting setups can I do in a day?
It depends on the changeovers, not the number of shots. Count setups, then add the changeover time between each: a location move is the longest, then a background change, then a key position change, then modifiers; variations take minutes. Order setups to climb that ladder as rarely as possible, and fix daylight setups first. The lighting plan table's Changeover column shows whether the day fits.
How do I plan power for a lighting setup?
Add up what each setup draws: continuous heads draw their rated watts the whole time, flash draws in bursts while recycling. Compare the total with the circuit: a common US branch circuit is protected at 15 amperes on 120 volts, about 1,800 watts, shared with everything else on it. Spread heads across circuits, ask the venue for the breaker map, and use batteries when unsure.
What colour temperature is daylight versus tungsten?
Studio tungsten lamps are 3,200 K. Direct daylight and electronic flash sit around 5,500 to 6,000 K, and overcast daylight, the value of the D65 standard, around 6,500 K. Sunrise, sunset and candle flames sit near 1,850 K, and a clear blue sky is far higher, 15,000 K and up, which is why shade under it reads blue. Mixing them in one frame needs a decision: which source sets the white balance, and which ones are gelled or kept as an accent.
Is Storyflow free?
Not yet. Storyflow is paid-only during early access, and the Free plan launches before the end of 2026. Anyone invited to a board by a paid member can sign up free. For a lighting plan, that means an assistant or gaffer you invite can read and edit the Shotlist walls and plan table, though an invited free account has no in-app AI. Plus is $7.99 a month billed annually ($9.99 monthly).
Can ChatGPT make a lighting plan on my Storyflow board?
Yes. With the Storyflow plugin, ChatGPT builds the lighting plan table, the four-line read notes, shot cards and a strip board by shoot day on your board from what you tell it, and lists setups that overload a circuit. Claude does the same through the Storyflow connector. Check every read against the reference and every sunset time against a calculator, and drop the Shotlist tool yourself.
What is a lighting plan for film versus a photoshoot?
A film lighting plan follows a script's scenes and camera moves, so it plans for movement, continuity across takes and a larger electrical crew. A photoshoot lighting plan follows a shot list of stills, so setups are fewer, positions are fixed per frame and ratios can be tighter. Both start from references and end in named setups, gear, power and an order for the day.
Table of Contents
- Key Takeaways
- How to Plan Lighting for a Photoshoot: 9 Steps
- Read the Light Before You Plan It
- Lighting Reference vs Lighting Diagram
- Read 1: Direction
- Read 2: Quality, Hard or Soft
- Read 3: Contrast and Lighting Ratio
- Read 4: Colour Temperature and Colour
- Naming the Setup: From Read to Recipe
- The Lighting Plan Template
- Gear and Power per Setup
- Ordering Setups to Cut Changeovers
- Planning Around Daylight
- Locations and Light
- Lighting Diagrams: When You Need One and How to Make It
- Worked Example: Larkmere Cycles' Campaign Shoot
- The Lighting Board in Storyflow
- Testing the Plan Before the Day
- Do This in ChatGPT or Claude
- Where to Build It: Storyflow vs Lighting Diagram Apps, Spreadsheets, Docs and Shot List Apps
- A lighting diagram app
- A spreadsheet
- A shared doc
- A shot list app
- Mistakes and Fixes in a Photoshoot Lighting Plan
- Storyflow's Honest Limits for This Job
- The Bottom Line
- FAQ: Photoshoot Lighting Plan and Lighting Diagrams
- Related Reading
Templates to check out for this topic


Filmmaking templates you can use in Storyflow
Skip the blank canvas. Open one of these filmmaking boards in Storyflow and the AI builds on the structure that is already there, from research through the shot list.


See Storyflow in Action
A visual AI workspace where every feature lives inside one canvas. No tab-switching, no context lost.
Build your entire board from a single message
Type what you need in the AI chat at the bottom of your canvas. The AI adds cards, headings, and structure directly onto your board.
Use expert frameworks as AI context
Type @ in the AI chat and choose any Tactic. The AI tailors every response to that framework instead of giving generic advice.
Turn your board into a mind map in seconds
Ask the AI to restructure your canvas as a mindmap. It connects your ideas into a visual hierarchy so you can see how everything relates.
Why Storyflow Exists
Storyflow actually began as a personal tool while working on creative and research projects.
We kept running into the same problem: ideas were scattered everywhere: notes, documents, and whiteboards.
Nothing helped us see how everything connected.
So we started building a workspace designed around how ideas actually grow.
→ Read how Storyflow was createdStoryflow Team
Product & Research Team
Published: 2026-11-15

