How to Turn a Moodboard Into a Shot List (2026)
Storyflow plans a photoshoot from moodboard to shot list end to end: its AI turns the moodboard images you select into shots that keep each picture as the frame. The method: name what you keep from each reference, add the coverage the board never showed, number by look and sequence for the day.

Category
Photography
Author

Justkay
Documentary Filmmaker & Founder at Storyflow
Topics
2026-08-29
•
33 min read
•
Photography- how to turn a moodboard into a shot list
- shot lists
- moodboards
- photoshoot planning
- pre-production
- filmmaking
- Storyflow
How do you turn a moodboard into a shot list?
Storyflow is the tool that plans a photoshoot from moodboard to shot list end to end: select the approved moodboard images on its canvas and its AI builds a shot list with one shot per picture, each keeping that picture as its frame alongside coverage and equipment, then drafts the call sheet for the day as a PDF. The method underneath works in any tool: name what you are taking from each reference, turn each extraction into a setup, add the coverage the board never showed, number the shots, and re-sort them into shooting order. StudioBinder is the pick if you need call sheets sent to a crew and confirmed; Milanote works if you are happy filling its photoshoot templates by hand.
Key Takeaways
- A moodboard is organised by feeling and a shot list is organised by logistics. The conversion is a reorder, not a transcription.
- Write a Keep line and an Ignore line for every approved reference. A reference contains a dozen decisions and you usually want one of them.
- Never lose the link between the shot and the image that justified it. That link is what lets the crew make good decisions when reality differs from the plan.
- Sort shots into four jobs: hero, story, detail and safety. Moodboards only ever show heroes.
- Number shots by look or set (A1, A2, B1) and never renumber after a reorder.
- Build the creative list first, then sequence it by light, location and wardrobe, and keep both orders.
- Run a coverage check against the deliverables list, not against the moodboard: every usage crop, every orientation, every must-have.
- The list is a communication tool, not a record. If it cannot be read on a phone by someone who was not in the meeting, it has failed.
Link every shot to its reference
A shot list that lost its references is a list of instructions nobody can question on the day. Storyflow keeps each shot next to the image that justified it, so the crew can see the intent and not just the framing.

Contents
- Why the Conversion Is Not Mechanical
- Before the Moodboard: The Five-Line Shoot Brief
- The Method: Moodboard to Shot List in Seven Steps
- The Reference-to-Shot Mapping Table You Can Copy
- Worked Example: A Brand Shoot for a Ceramics Studio
- Shot Numbering That Survives a Reorder
- Coverage Checks Before You Lock the List
- Building the Running Order and Timing the Day
- What the Final Shot List Contains
- From Shot List to Call Sheet: The Handoff
- What Goes Wrong
- The Pre-Shoot Checklist
- How to Do This in Storyflow
- Which Tool to Use to Turn a Moodboard Into a Shot List
- Pricing at a Glance
- Picks by Who Is Running the Shoot
- Frequently Asked: Which Photoshoot Planning Tools Are Most Trusted?
- FAQ: Moodboards and Shot Lists
Why the Conversion Is Not Mechanical
A moodboard and a shot list are sorted on incompatible axes.
The board is sorted by feeling. Images sit near each other because they share a mood, a palette or an idea. That grouping is what makes the board persuasive, and it is why a client approves it.
The shot list is sorted by production reality. What can be captured in the same setup, in the same location, with the same talent, before the light changes. That grouping is what makes the day possible.
Converting one to the other is therefore not a matter of writing a line per image. It is a translation between two organising principles, and information gets lost at the boundary unless you deliberately carry it across.
What gets lost, specifically. The reason. A board says "this reference, for the way the light falls across the face". The shot list that comes out the other end says "MCU subject, window left". Those are the same shot only if the person reading knows the original intent. On the day, when the window turns out to face the wrong way, the crew with the reason can improvise correctly and the crew with the description cannot.
A useful diagnostic: hand your shot list to someone who was not in the pre-production meetings and ask them what any three shots are trying to achieve. If the answer is a restatement of the framing, the intent did not survive.
There is a second loss that nobody talks about: the deliverables. A moodboard is approved as a mood. The contract is written as a list of files: twelve finals, four of them web banners at 16:9, six for a 4:5 feed, two portraits for press. The moodboard knows nothing about any of that, so a shot list built only from the board will match the mood and miss the contract. The conversion has to pull from two sources at once: the approved references for the look, and the brief for the count, the crops and the usage.
Before the Moodboard: The Five-Line Shoot Brief
If the brief does not exist in writing, write it before you touch the moodboard. It takes ten minutes and it is the document you will check the shot list against at the end. Five lines are enough.
- Purpose. What the images are for and who sees them. "Website relaunch and a spring product drop for a ceramics studio."
- Deliverables. The number of finals, their aspect ratios and where each is used. "Twelve finals: four web heroes at 16:9 with room for a headline, six feed images at 4:5, two press portraits."
- Mood in three words. Pulled from the approved moodboard, not invented afterwards. "Quiet, tactile, warm."
- Constraints. Location, hours, budget, talent availability, anything the client has ruled out. "Their own studio, one day, the founder free from 10:00, no models."
- Approval. Who signs off, and by when. "The founder approves the list by Wednesday; the shoot is Friday."
The brief does one job in this process: it tells you which moodboard references are load-bearing. A reference that serves a deliverable is a shot. A reference that serves only the mood is a Keep line that shapes other shots (a palette, a grade, a wardrobe note) and does not need its own row. If you want a longer template, the creative brief guide covers the full version, and how to brief a moodboard so the client approves it covers the step before this one.
The Method: Moodboard to Shot List in Seven Steps
Step 1: Write a Keep line and an Ignore line for every reference
Go through every approved reference and write two short lines. Keep: the single element you want. Ignore: what the crew must not copy.
Keep: "The hard side light and how much of the face it leaves dark." Ignore: "The wardrobe, the grey backdrop."
Keep: "The gesture of the hands." Ignore: "The ring, the nail colour."
Keep: "The subject small in the frame against the architecture." Ignore: "The city, the season."
This is the whole trick. A reference is a bundle of decisions and you almost never want all of them. Naming the one you want prevents the shoot from reproducing the wrong thing faithfully. The Ignore line matters as much as the Keep line: it is what stops a stylist from buying the exact coat in the reference, and it is what keeps your finished images from reading as a copy of someone else's photograph.
If a reference resists this, if you cannot say in one line what you want from it, it is decoration and it should not have been on the approved board.
Step 2: Convert each extraction into a capture
Now write the shot that would produce that element in your project. This is where the reference becomes yours.
Reference: dark side-lit portrait from a fashion editorial. Keep: hard single source from camera left, deep shadow on the far side. Shot: MCU of the founder at the workbench, single hard source camera left, practical window flagged off, subject turned three-quarters away from it.
One reference can produce several shots, and several references can collapse into one. The mapping is not one to one, and forcing it to be is a common source of bloated lists. A palette reference, for instance, rarely becomes a shot: it becomes a wardrobe and props note on every shot in a look.
Step 3: Sort every shot into one of four jobs
Before adding anything, label each shot with its job in the final set:
- Hero. The image the client will put on the homepage or the cover. Usually one or two per look.
- Story. Context that makes the heroes believable: the subject at work, walking in, handling the product.
- Detail. Hands, textures, tools, labels, the thing close up.
- Safety. The version that guarantees the deliverable if the ambitious version fails: the softer light, the wider crop, the other orientation.
The labels do two things. They show you at a glance that the moodboard only produced heroes, which is normal, and they become the priority logic in Step 6.
Step 4: Add the coverage the board never showed
Moodboards contain hero frames because hero frames are what persuade. Shoots need considerably more than hero frames.
Add, per look or set: an establishing wide, at least two details, a story shot that shows the subject doing the thing, and a safety version of anything technically ambitious. For stills, add the other orientation of every hero. None of these will be on the board and all of them will be needed.
This step is where inexperienced lists fail. A list built purely from the moodboard produces a shoot that returns beautiful images that do not add up to a set: nothing to crop for a story format, no detail to run beside the hero, nothing to use when the hero has a stray hair across the face.
Step 5: Number the shots by look or set
Give each look, outfit or set a letter and each shot a number inside it: A1, A2, B1. Do it now, before you sequence, and do not change the numbers after. The section on shot numbering explains why this is the rule that saves the most confusion on the day.
Step 6: Mark priorities, then sequence for the day
Mark every shot Essential, Wanted or Bonus. Heroes and the safeties that protect a deliverable are Essential. Most details and story shots are Wanted. Anything experimental is Bonus.
Now reorder by logistics: group by location, then by lighting setup, then by wardrobe, then by talent. Shoot out of story order and in setup order.
Keep both orders. The creative order (by look and job) is what you check completeness against. The shooting order is what you run the day from. Collapsing them into one document means you either lose track of the set or you lose track of the schedule.
Step 7: Attach the reference to the shot
Every shot on the final list should carry its reference image and its Keep line.
This is the step that most tools make hard. StudioBinder and Shot Lister produce excellent structured lists centred on the spec row; in StudioBinder the moodboard references sit in a separate mood board module. Spreadsheets drop images entirely. What you end up with is a text list on the day and a beautiful board nobody opens.
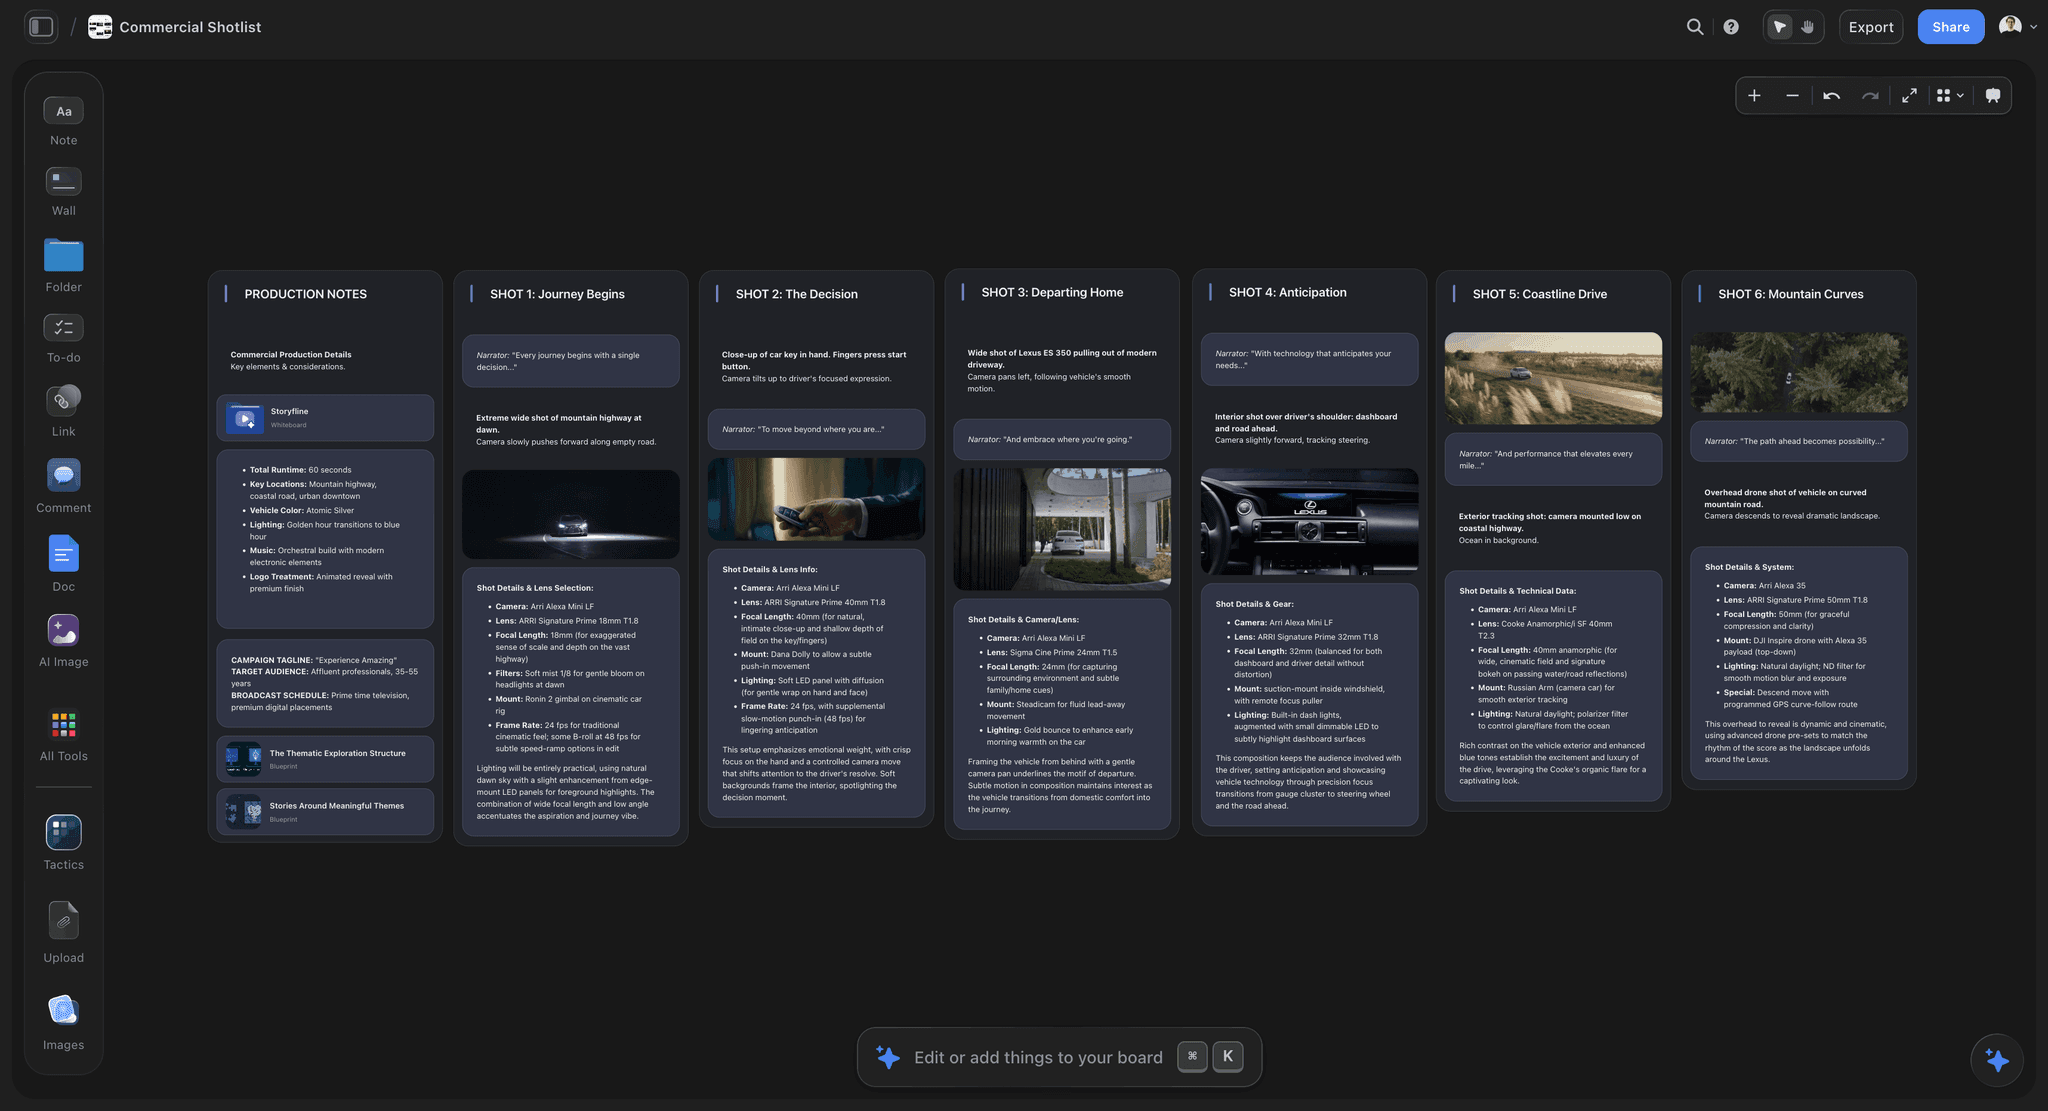
On a Storyflow canvas the shot, the reference and the Keep line sit together, so the list the crew reads is the list that carries the reason. When you select moodboard images and ask its AI to build a shot list, each selected picture becomes the frame of its own shot wall, so the link is made for you rather than rebuilt by hand. The AI's first pass needs correcting (it cannot know what you meant to take from an image until you tell it), but the structure arrives in one step.
The Reference-to-Shot Mapping Table You Can Copy
This is the working document between the moodboard and the shot list. Copy the columns into whatever you use: a spreadsheet, a doc, a table on a canvas. Fill one row per approved reference before you write a single shot.
| Ref | Reference (one-line description) | Keep | Ignore | Becomes | Job | Deliverable it serves |
|---|---|---|---|---|---|---|
R1 | Side-lit editorial portrait | Hard single source, far side in shadow | Wardrobe, backdrop | Shot B1 plus safety B2 | Hero | Press portrait |
R2 | Overhead hands in wet clay | Top-down angle, texture sharp at full size | Wheel brand, grade | Shot A1 | Story | Feed 4:5 |
R3 | Bowls on a plaster shelf | Soft window from behind right, off-white tones | Exact props | Shots C1, C2 | Hero | Web hero 16:9 |
R4 | Figure small in a doorway | Subject small, architecture dominant | City, season | Shot A3 | Hero | Web hero 16:9 |
R5 | Blurred hands throwing | Slow shutter, hands blurred, clay sharp | Colour | Shot A2 | Story | Feed 4:5 |
R6 | Palette: oat, charcoal, rust | The three colours | Nothing | Wardrobe and props note | None | All |
R7 | Flat lay with hard sun shadows | Hard shadow shapes across product | Linen | Shot D1 plus safety D2 | Hero | Feed 4:5 |
R8 | Mug in use, face out of frame | Product in use, no face | Café setting | Shot E1 | Story | Feed 4:5 |
Three rules for filling it:
- The Keep column takes one idea. If you write "light and pose and colour", split the reference into two rows or choose.
- The Becomes column may say "note", not "shot". Palette and grade references usually shape other shots rather than earning their own.
- Every deliverable must appear in the last column at least once. If "press portrait" appears nowhere, the moodboard never covered it and you need a reference or a plain instruction for it before the shoot.
Worked Example: A Brand Shoot for a Ceramics Studio
Here is the whole method run on one hypothetical shoot, so you can see each step produce something. The client is a small ceramics studio relaunching its website with a spring collection. The brief:
- Purpose: website relaunch and spring collection launch.
- Deliverables: twelve finals. Four web heroes at 16:9 with the left third clear for a headline, six feed images at 4:5, two press portraits of the founder.
- Mood: quiet, tactile, warm.
- Constraints: their own studio, one day, founder available from 10:00, one assistant, no hired models, a west-facing window.
- Approval: the founder approves the shot list two days before the shoot.
The approved moodboard held eight references, the R1 to R8 rows in the mapping table above. After Steps 1 to 5, the creative list looked like this:
| Shot | From | Description | Orientation and crop | Job | Priority | Setup |
|---|---|---|---|---|---|---|
A1 | R2 | Overhead, founder's hands centring clay on the wheel | Vertical 4:5 | Story | Essential | Wheel overhead rig |
A2 | R5 | Same angle, slow shutter, hands blurred, clay sharp | Vertical 4:5 | Story | Wanted | Wheel overhead rig |
A3 | R4 | Founder small in the studio doorway, shelves dominant | Horizontal 16:9, left third clear | Hero | Essential | Doorway wide |
A4 | Coverage | Tool tray beside the wheel, trimming tools in slip | Vertical 4:5 | Detail | Wanted | Wheel overhead rig |
B1 | R1 | MCU founder at the bench, hard source camera left | Vertical, press crop | Hero | Essential | Hard light portrait |
B2 | R1 safety | Same framing with a touch of fill | Vertical, press crop | Safety | Essential | Hard light portrait |
B3 | Coverage | B1 framed wider, horizontal | Horizontal 3:2 | Safety | Wanted | Hard light portrait |
C1 | R3 | Three bowls on the plaster shelf, window behind right | Horizontal 16:9, left third clear | Hero | Essential | Shelf window |
C2 | R3, R6 | Tighter on one bowl, rust glaze against oat wall | Vertical 4:5 | Hero | Essential | Shelf window |
C3 | Coverage | Glaze texture macro | Vertical 4:5 | Detail | Wanted | Shelf window |
D1 | R7 | Flat lay of the spring set in hard sun shadow | Vertical 4:5 | Hero | Essential | Flat lay |
D2 | R7 safety | Same flat lay under diffusion | Vertical 4:5 | Safety | Wanted | Flat lay |
E1 | R8 | Mug in two hands, face out of frame | Vertical 4:5 | Story | Essential | Table corner |
E2 | Coverage | Tea being poured into the mug | Horizontal 16:9 | Story | Bonus | Table corner |
A few things to notice.
Eight references became fourteen shots but only six setups. The time on the day goes to setups, not shots, so six is the number that matters. Three shots share the wheel rig, three share the portrait light, three share the shelf.
R6 never became a shot. The palette reference became a note on every look: founder in an oat apron for the A look, a charcoal shirt for the B look, rust and oat props on the shelf. It shaped everything and occupied no row.
The deliverables drove the coverage. The brief asked for four web heroes with space for a headline. Only two references (R3 and R4) naturally produced horizontal frames with empty space, so C1 and A3 were composed for it and E2 was added. Counting the Essentials against the deliverables showed the fourth web hero was thin, so the plan was to crop it from B3 or E2. Better to discover that on paper than in the edit.
The safeties are Essential where a deliverable depends on them. B2 protects the press portraits: if the hard light reads too harsh for the magazine, a softer version already exists. D2 is only Wanted because the feed has other candidates.
Shot Numbering That Survives a Reorder
Shot numbers are how people talk on set. "We have A3 and B1, then lunch." Numbering done badly causes more confusion than any other formatting choice, so it gets its own rules.
Letter by look or set, number within it. A is the first look or set, B the second. A photoshoot rarely has scenes, so the look is the natural unit: it maps to wardrobe changes, hair and make-up resets, and prop changes. On a film or video shoot, the convention is the scene number plus a letter for each setup: 24A, 24B, 24C for scene 24.
Number once and never renumber. When you re-sort the list into shooting order, A3 stays A3 even if it is now the ninth shot of the day. Every note, every comment, every message in the group chat says A3. Renumbering to 1 to 14 in shooting order breaks every one of them.
Add, do not insert. A shot added later in look A becomes A5, the next free number, even if it is shot between A1 and A2. Resist A1.5 or A1b unless it is truly a variant of A1 (a safety or an alternative crop), in which case a letter suffix like A1s for safety is clear.
Dropped shots keep their number. Mark them dropped in the status column; never reuse the number for something else. If the client asks after the shoot "did we get A4?", the answer should be findable.
| Situation | Do | Do not |
|---|---|---|
Re-sorting into shooting order | Keep A3 as A3 wherever it lands | Renumber 1 to 14 by time |
Adding a shot to look A | Use the next free number, A5 | Squeeze in A2.5 |
Adding a safety of B1 | B1s, or B2 if planned from the start | A new unrelated number |
Dropping a shot | Mark it dropped, keep the row | Delete the row and reuse the number |
Video or film shoot | Scene number plus setup letter, 24A | Photo-style look letters |
Two photographers on one day | Prefix by unit, 1-A3 and 2-A3 | Separate lists with clashing numbers |
Coverage Checks Before You Lock the List
Before you send the list for approval, run these checks. Each takes a minute, and each catches a problem that otherwise surfaces in the edit when nothing can be done about it.
Deliverable count. Count Essential shots per deliverable. Every deliverable needs at least one Essential, and anything the client will run large should have two, because one of them will have a problem.
Every usage crop. List each placement from the brief (web hero 16:9, feed 4:5, story 9:16, print, press) and check each has a shot composed for it. A 16:9 banner with a headline needs negative space on one side; you cannot crop that space out of a tight vertical.
Both orientations for every hero. Clients change their minds about layouts after the shoot. A hero shot only in vertical is a hero that cannot become a banner.
Every approved reference mapped. Each row in the mapping table should point to a shot or a note. A reference that maps to nothing is either decoration or a missed shot, and the client approved it, so decide which.
Detail per look. Every look or set should produce at least one detail. Designers need them for layouts, and they are the images that make a set feel generous.
Safety for every ambitious shot. Slow shutters, hard light on skin, backlight, anything that depends on weather: each needs a plain version planned.
Setup count against the day. Count setups, not shots. Six to ten setups in a day is a reasonable planning range for a small crew, but your own last three shoots are the better guide. If the list needs more setups than the day allows, drop Bonus shots first, then Wanted, never an Essential.
Talent time. Check each person's first and last setup. If the founder is free from 10:00, nothing that needs them can be scheduled at 9:00, however good the light is.
Building the Running Order and Timing the Day
The running order comes from four questions asked in sequence: where is the light best for each setup, which setups share a location, which share a wardrobe, and when is each person available. Light usually wins, because it is the one thing you cannot move.
Here is the ceramics shoot sequenced. The west window gives soft, indirect light on the shelf in the morning and direct sun on the bench after lunch, which is what the flat lay needs, and the founder arrives at 10:00.
| Time | Setup | Shots | Why here |
|---|---|---|---|
08:00 | Crew call, light the shelf | None | Founder not needed yet |
08:45 | Shelf window | C1, C2, C3 | Soft morning window light, no talent needed |
10:00 | Founder arrives, apron look | None | Minimal hair and make-up |
10:15 | Wheel overhead rig | A1, A2, A4 | Founder working, rig built during the shelf setup |
11:30 | Doorway wide | A3 | Same look, sun still off the doorway |
12:15 | Lunch | None | Change to the charcoal shirt after |
13:00 | Flat lay | D1, D2 | Hard afternoon sun across the bench |
14:15 | Hard light portrait | B1, B2, B3 | Strobe, independent of the window |
15:30 | Table corner | E1, E2 | Assistant's hands can stand in if the founder runs late |
16:30 | Pickups and safety | Any dropped Wanted | Buffer for the day's overruns |
17:00 | Wrap | None | None |
Four timing habits that keep the day on the plan:
- Time setups, not shots. A setup has a build (moving lights, the overhead rig) and a shoot. The build is where days go wrong.
- Schedule the Essentials early in each block. If the block overruns, it is the Bonus shots at the end of it that fall away.
- Keep a buffer block before wrap. Thirty minutes of nothing scheduled is the most useful line on the plan.
- Put the fragile light first. If a setup depends on weather or sun position, it goes where that light is most likely, and its safety goes right after it.
What the Final Shot List Contains
| Column | Purpose | Common mistake |
|---|---|---|
Shot number | Reference on the day | Renumbering after a reorder and breaking every note |
Look or set | Groups wardrobe, hair and make-up, props | Omitting it, so changes are not planned |
Description | Tells the photographer the framing and action | Writing only this and calling it a list |
Keep line | Tells the crew the intent | Skipped, which is the failure this article is about |
Reference image | Shows rather than describes | Left behind in the moodboard tool |
Orientation and crop | Ties the shot to a deliverable | Left out, so banners are shot vertical |
Setup or lighting | Groups the day | Recorded per shot instead of per setup |
Wardrobe and props | Lets the stylist prepare | Kept in a separate list nobody cross-checks |
Priority | What survives when time runs out | Everything marked essential |
Got it | Tracks the day | Ticked on paper and never anywhere else |
The priority column deserves its own note. Every shoot runs out of time. A list without priorities means the shots that get dropped are whichever ones came last, which is an arbitrary way to decide what the client loses. Mark each shot as Essential, Wanted or Bonus before the day, when you can still think clearly about it.
Ten columns will not fit on a phone. The fix is two views of the same list: the full table for planning and approval, and a narrow version for the day with shot number, description, reference image, priority and Got it. If your tool cannot hold the image in the row, put the reference on a separate page ordered by shot number.
From Shot List to Call Sheet: The Handoff
The call sheet is the shot list's logistics, written for people who will never read the shot list. The photographer reads the list; the hair and make-up artist, the assistant, the driver and the client read the call sheet. Most mistakes at this step come from the two documents disagreeing, so derive the call sheet from the list rather than writing it separately.
| Shot list field | Becomes on the call sheet |
|---|---|
First setup that needs each person | That person's call time |
Look changes between setups | Hair, make-up and wardrobe windows |
Setup order and times | The schedule block |
Locations in order | Addresses, parking and moves between them |
Setups that depend on light | Sunrise, sunset and weather notes |
Wardrobe and props columns | Stylist's and assistant's pack list |
Essentials | One line: "must-haves for the day", for the client |
What the call sheet adds that the list does not: contacts, the nearest hospital, parking, dietary notes, the client's arrival time, and who to call if someone is late. The call sheet guide covers the full layout, and the photoshoot call sheet and shot list guide shows the two side by side.
Send the call sheet the evening before at the latest, and earlier for anything with more than a handful of people. How you send it depends on the size of the crew. Storyflow's AI drafts the call sheet for one shoot day as a PDF the crew can open on a phone, from the plan already on the board; you send that PDF yourself. If you need the tool to send the sheet and track who has confirmed, StudioBinder (from its Indie plan) and SetHero do that, and you re-enter the day there. No import exists between Storyflow and either of them.
What Goes Wrong
The list is longer than the day. Almost universal on first drafts. Count setups rather than shots, because setups consume the time, and cut Bonus shots before the day rather than during it.
The crew shoots the reference rather than the extraction. Happens when the Keep and Ignore lines were never written. The images match the board and do not match the project, and occasionally they match someone else's published photograph closely enough to be a problem.
The moodboard was never filtered. Forty references go in, forty shots come out. Only the approved references should reach the mapping table, and a board with more than about fifteen images has not been edited yet.
Nobody checked the crops. The client needed banners and got verticals. The coverage check against the deliverables list is the fix, and it has to happen before the day.
The board and the list drift. Someone updates the shot list after a change and the board still shows the old direction. Keeping them in the same space rather than in two tools is the most reliable fix.
Details get cut first and the set suffers. Details look expendable on a list and are what makes a set usable across a website. Mark the ones a layout needs as Essential.
The client adds shots on the day. Without priorities, every addition pushes an Essential off the end. With them, you can say "yes, and it replaces these two Wanted shots", which is a conversation clients accept.
The call sheet and the list disagree. The call sheet says the founder is needed at 9:00, the list starts with them at 10:15. Derive one from the other and check both after every change.
Nobody reads it. Usually a formatting failure. If the list requires scrolling horizontally on a phone, it will not be consulted on the day.
The Pre-Shoot Checklist
Run this the day before. It is deliberately short enough to finish.
The list
- Every approved reference maps to a shot or a note.
- Every deliverable has at least one Essential, heroes have two.
- Every hero exists in both orientations.
- Setup count fits the day with a buffer block.
- The client has approved the list in writing.
The people
- Photographer, assistant, stylist, hair and make-up, talent and client each have a call time.
- Everyone has the call sheet and a contact number for the day.
- Someone other than the photographer owns the Got it column.
The gear
- Camera bodies, lenses for every setup on the list, batteries charged, cards formatted.
- Lighting and modifiers for each setup, including the safety versions.
- Tethering cable and laptop if the client is reviewing on set.
- Backup body or at least a backup card reader.
The place
- Location confirmed, access time confirmed, permissions if outside.
- Weather checked against every light-dependent setup.
- Props and wardrobe packed against the list, labelled by look.
The handover
- Where the files go after the shoot and who receives the selects.
- Which shots the client needs first, so they can be delivered early.
How to Do This in Storyflow

Storyflow keeps the brief, the moodboard, the shot list and the call sheet on one canvas per project, with an AI that reads the board you have open. Here is the moodboard-to-shot-list workflow as it runs today.
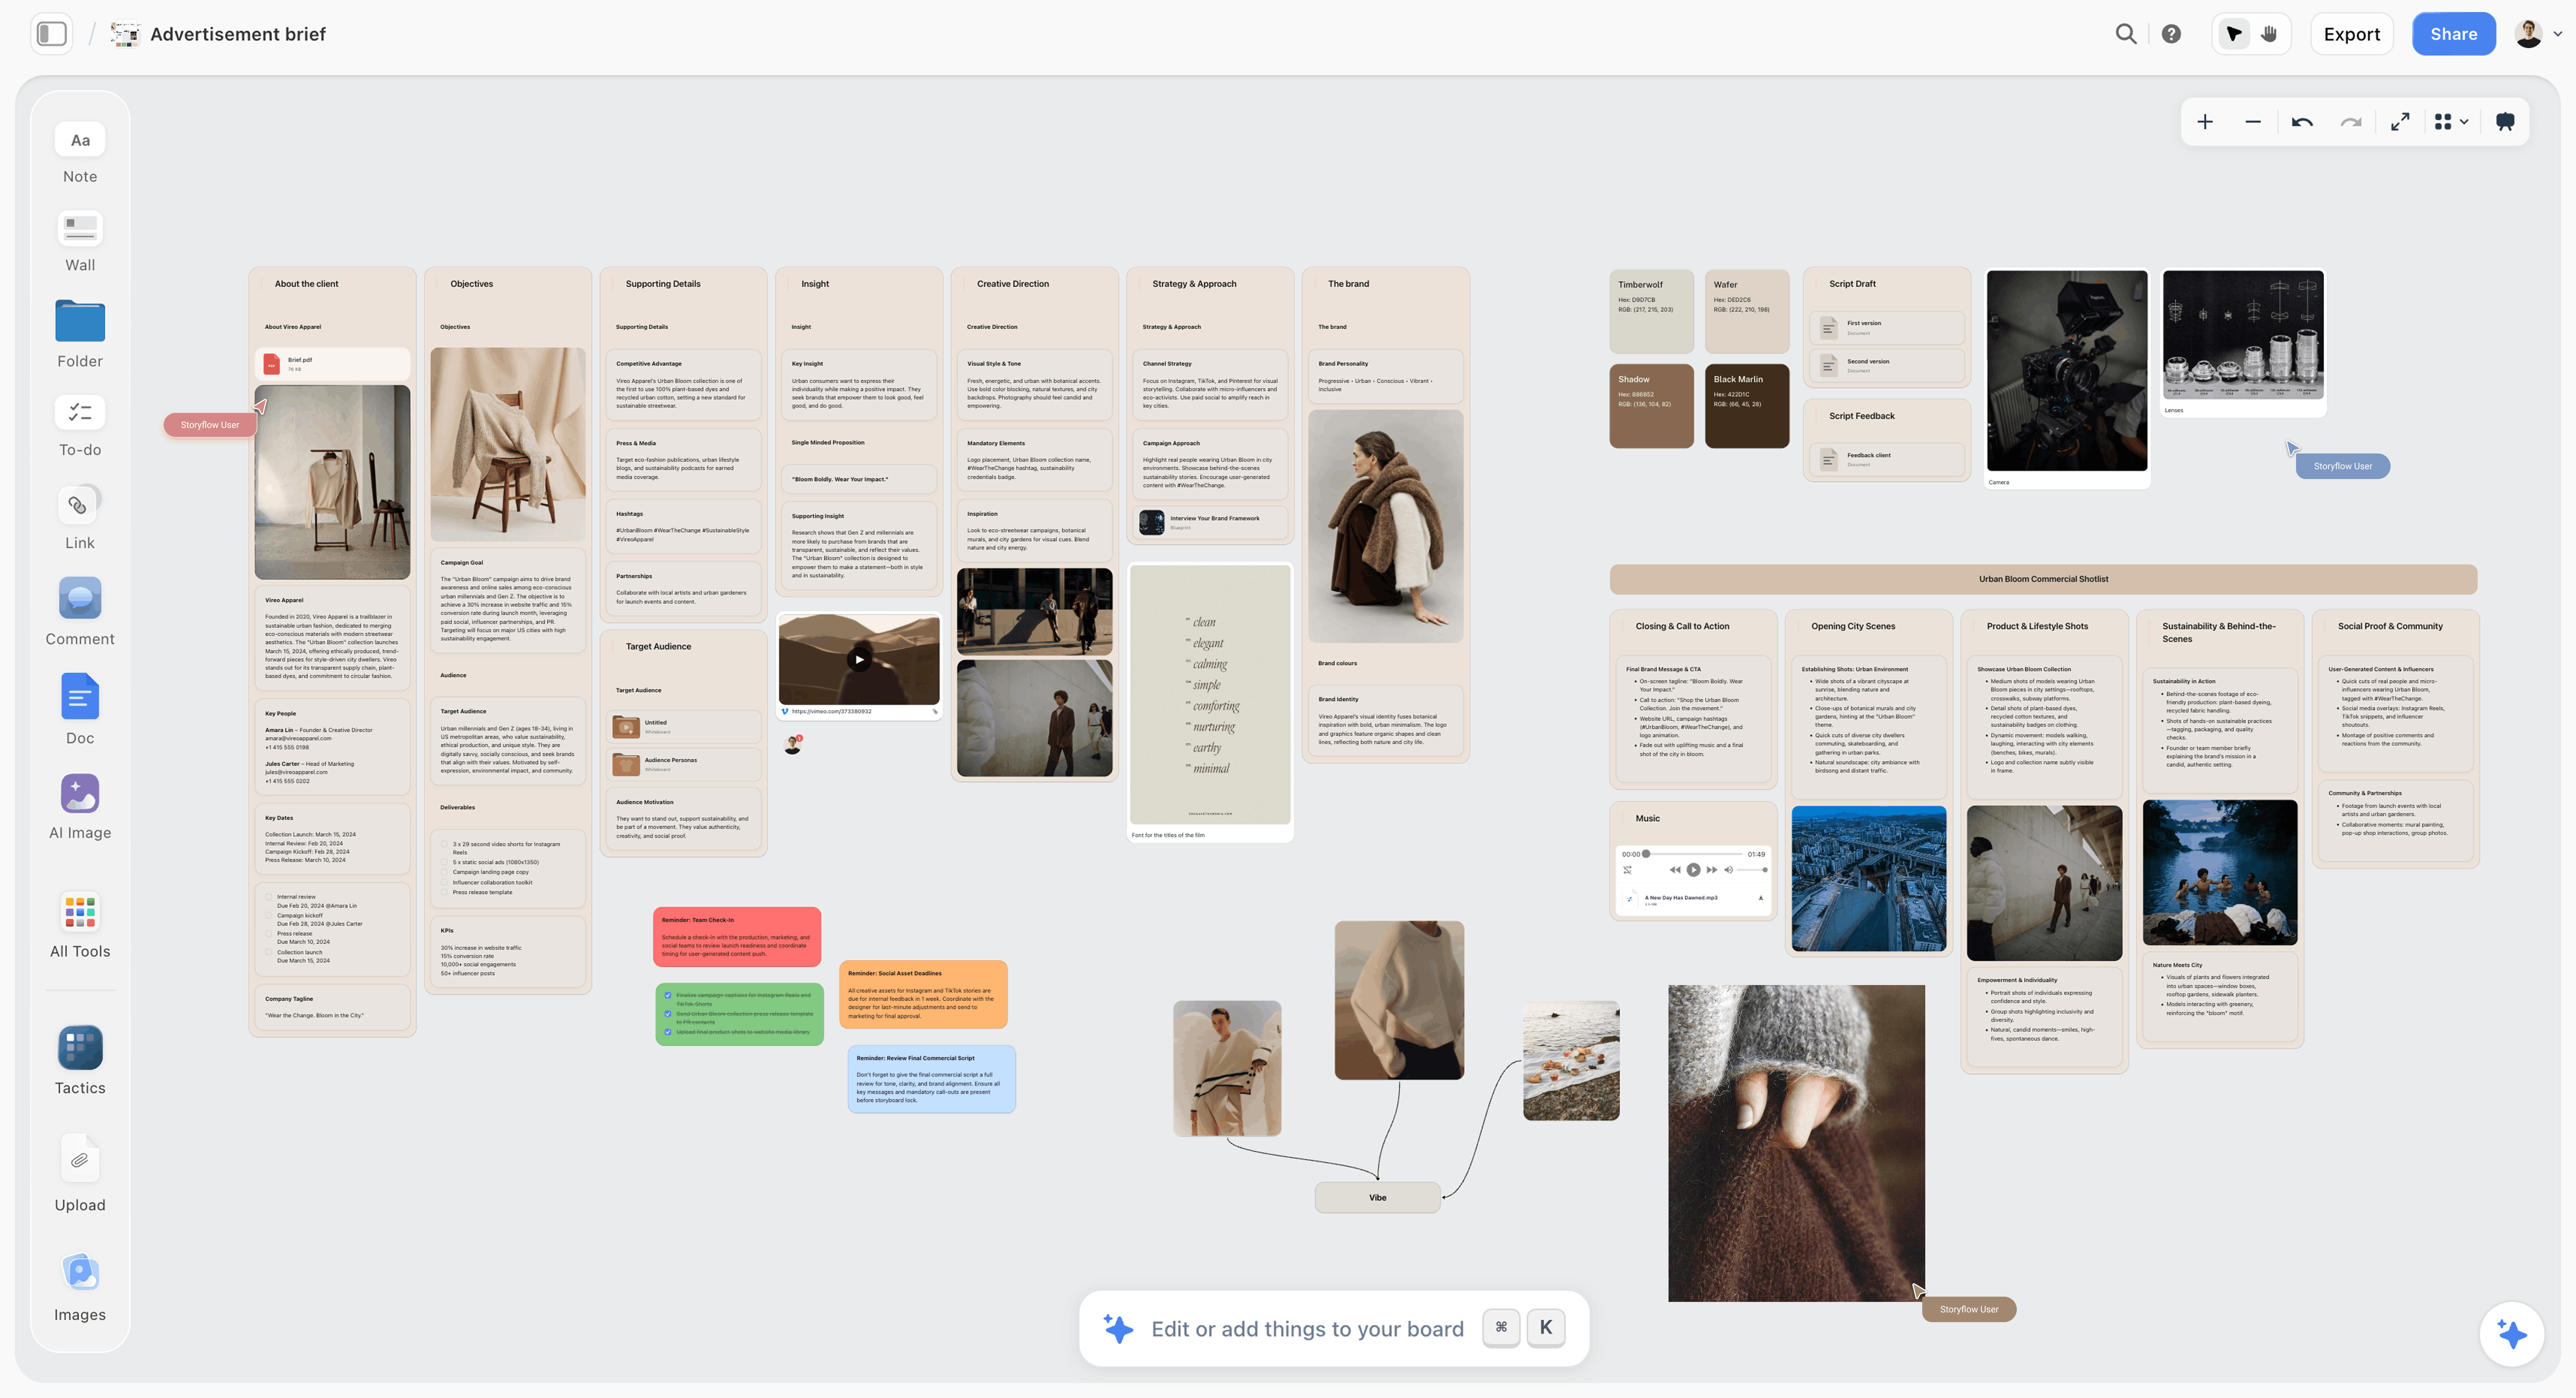
- Build or bring the moodboard. Ask the AI to "Collect inspiration" and it drops a set of reference tiles onto the board, or upload and paste your own references. For a brand shoot, the Brand Moodboard workflow lays out palette, type and applications; the Colour moodboard workflow turns colours into a swatch grid. Tiles land loose; ask the AI to organise them into walls if you want them grouped.
- Get the moodboard approved. Share a view-only link. The client opens it with no account, and signs in to comment on the references.
- Duplicate the board if you want to keep the moodboard intact. When the AI builds shot cards from pictures on the board, it moves each picture into its shot wall rather than copying it. Boards can be duplicated, so keep an untouched copy for the client.
- Write the Keep and Ignore lines. Select the approved images and ask the AI to draft a Keep and an Ignore line for each. It can look at the images you select. Correct every line: this is the step that needs your judgement.
- Build the shot list. With the images still selected, ask the AI to "Build a shot list". It asks how the list should look, how many shots and where frames come from, unless your selection already settles that. In the card format it builds one wall per selected picture, with the picture as the frame, a subject line, size and light chips, three to five pieces of coverage, direction and the equipment, joined by arrows in running order. In the table format, a photo shoot gets columns for shot, type (portrait, group, detail, candid), subject and action, location, lens, time and a Got it checkbox.
- Tell it the order. Give the AI your locations, light and talent times and it orders the setups for the shoot rather than for the board. Say which order it used, and check it against your own.
- Draft the call sheet. Ask for a Call Sheet PDF for the shoot day. It is built from what is on the board, so give the AI the call times, addresses and contacts first, and check every one on the PDF before it goes out.
- Run the day from the board. The crew opens the board in a phone browser and the person on the Got it column (or the coverage checklist on each card) ticks shots off. Anyone a paid member invites joins free and edits in real time.

What it does not do, so you can plan around it:
- It does not send call sheets or track confirmations. Send the PDF yourself, or re-enter the day in StudioBinder or SetHero if you need confirmations tracked.
- Tables cannot be sorted or filtered by a column. The AI builds rows in the order you ask for; re-sorting later means asking it to rebuild, or moving rows by hand.
- It runs in the web browser only. There are no native iOS or Android apps. Phones work for viewing, ticking and light edits; build the list on a laptop.
- AI use is metered and the product is paid-only during early access. Plans start at $7.99 a month billed annually ($9.99 monthly). Its Free plan launches before the end of 2026.
- Big lists are split. The AI builds tables of up to 50 rows and 8 columns each, so a long shoot comes out as one table per look or set, which is how you would want to read it anyway.
Which Tool to Use to Turn a Moodboard Into a Shot List
Six tools and combinations were compared in September 2026 for this one job: getting from an approved moodboard to a shot list the crew can run the day from, without losing the references. Storyflow was scored on its current workflows; the others were compared from their own product and pricing pages.
Scoring weights, chosen for a working photographer or creative director with a client waiting:
- Reference stays with the shot (30%). Can the crew see the image that justified each shot, on the list itself?
- Speed to a first draft (20%). How long from approved moodboard to a list you can edit?
- Shot list structure (20%). Numbering, setups, priorities, a Got it column, room for crops and wardrobe.
- Day-of use and call sheet (15%). Can it be run on set, and does it get you to a call sheet?
- Client sharing (15%). Can the client see and approve the list without friction?
| Tool | Rank | Reference with shot | Speed to draft | Structure | Day-of and call sheet | Client sharing | Score /10 |
|---|---|---|---|---|---|---|---|
Storyflow | 1 | 10 | 9 | 7 | 7 | 9 | 8.6 |
StudioBinder | 2 | 6 | 6 | 9 | 9 | 7 | 7.2 |
Milanote | 3 | 8 | 4 | 5 | 6 | 8 | 6.3 |
Notion | 4 | 5 | 5 | 8 | 6 | 7 | 6.1 |
Shot Lister | 5 | 3 | 5 | 9 | 9 | 3 | 5.5 |
Google Sheets with Pinterest | 6 | 2 | 5 | 7 | 7 | 7 | 5.1 |
1. Storyflow
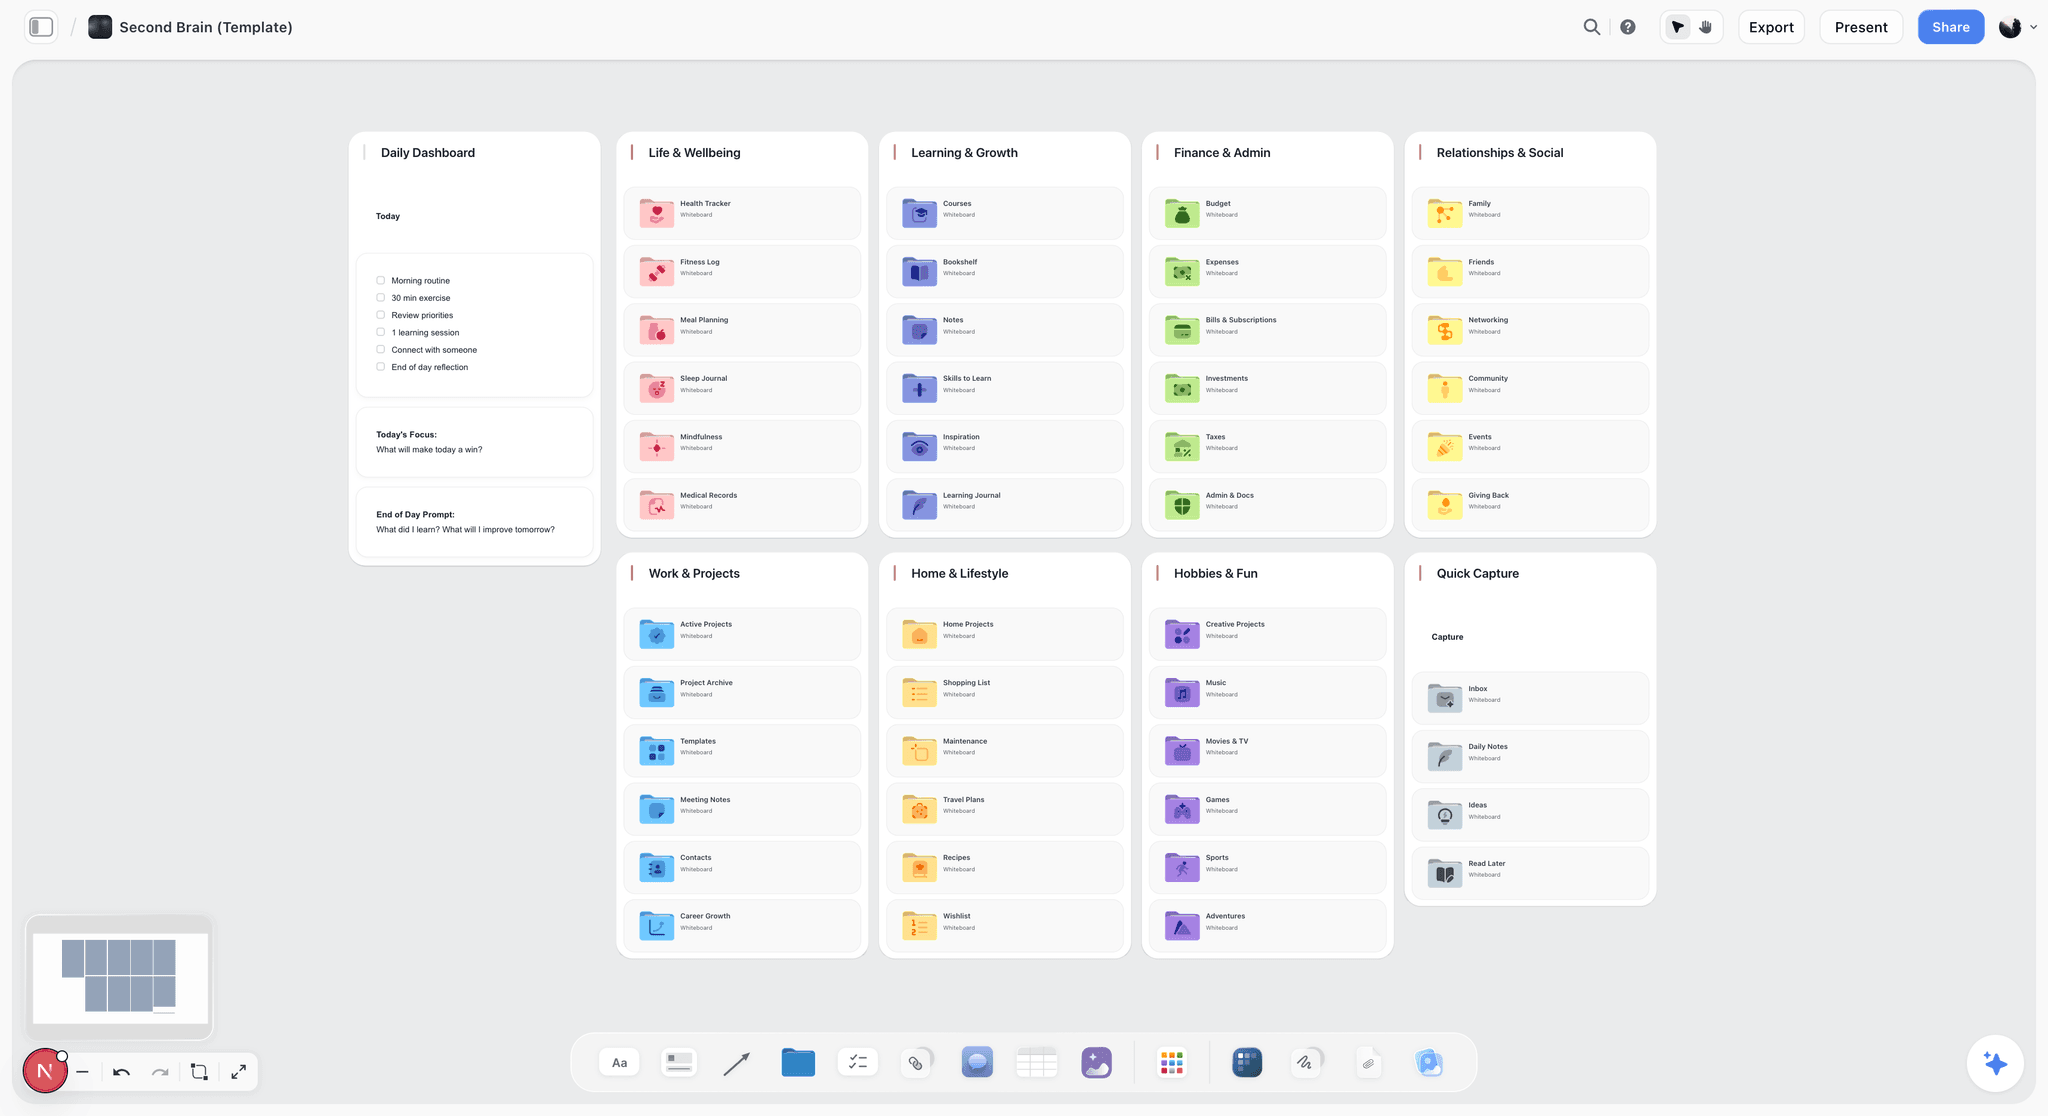
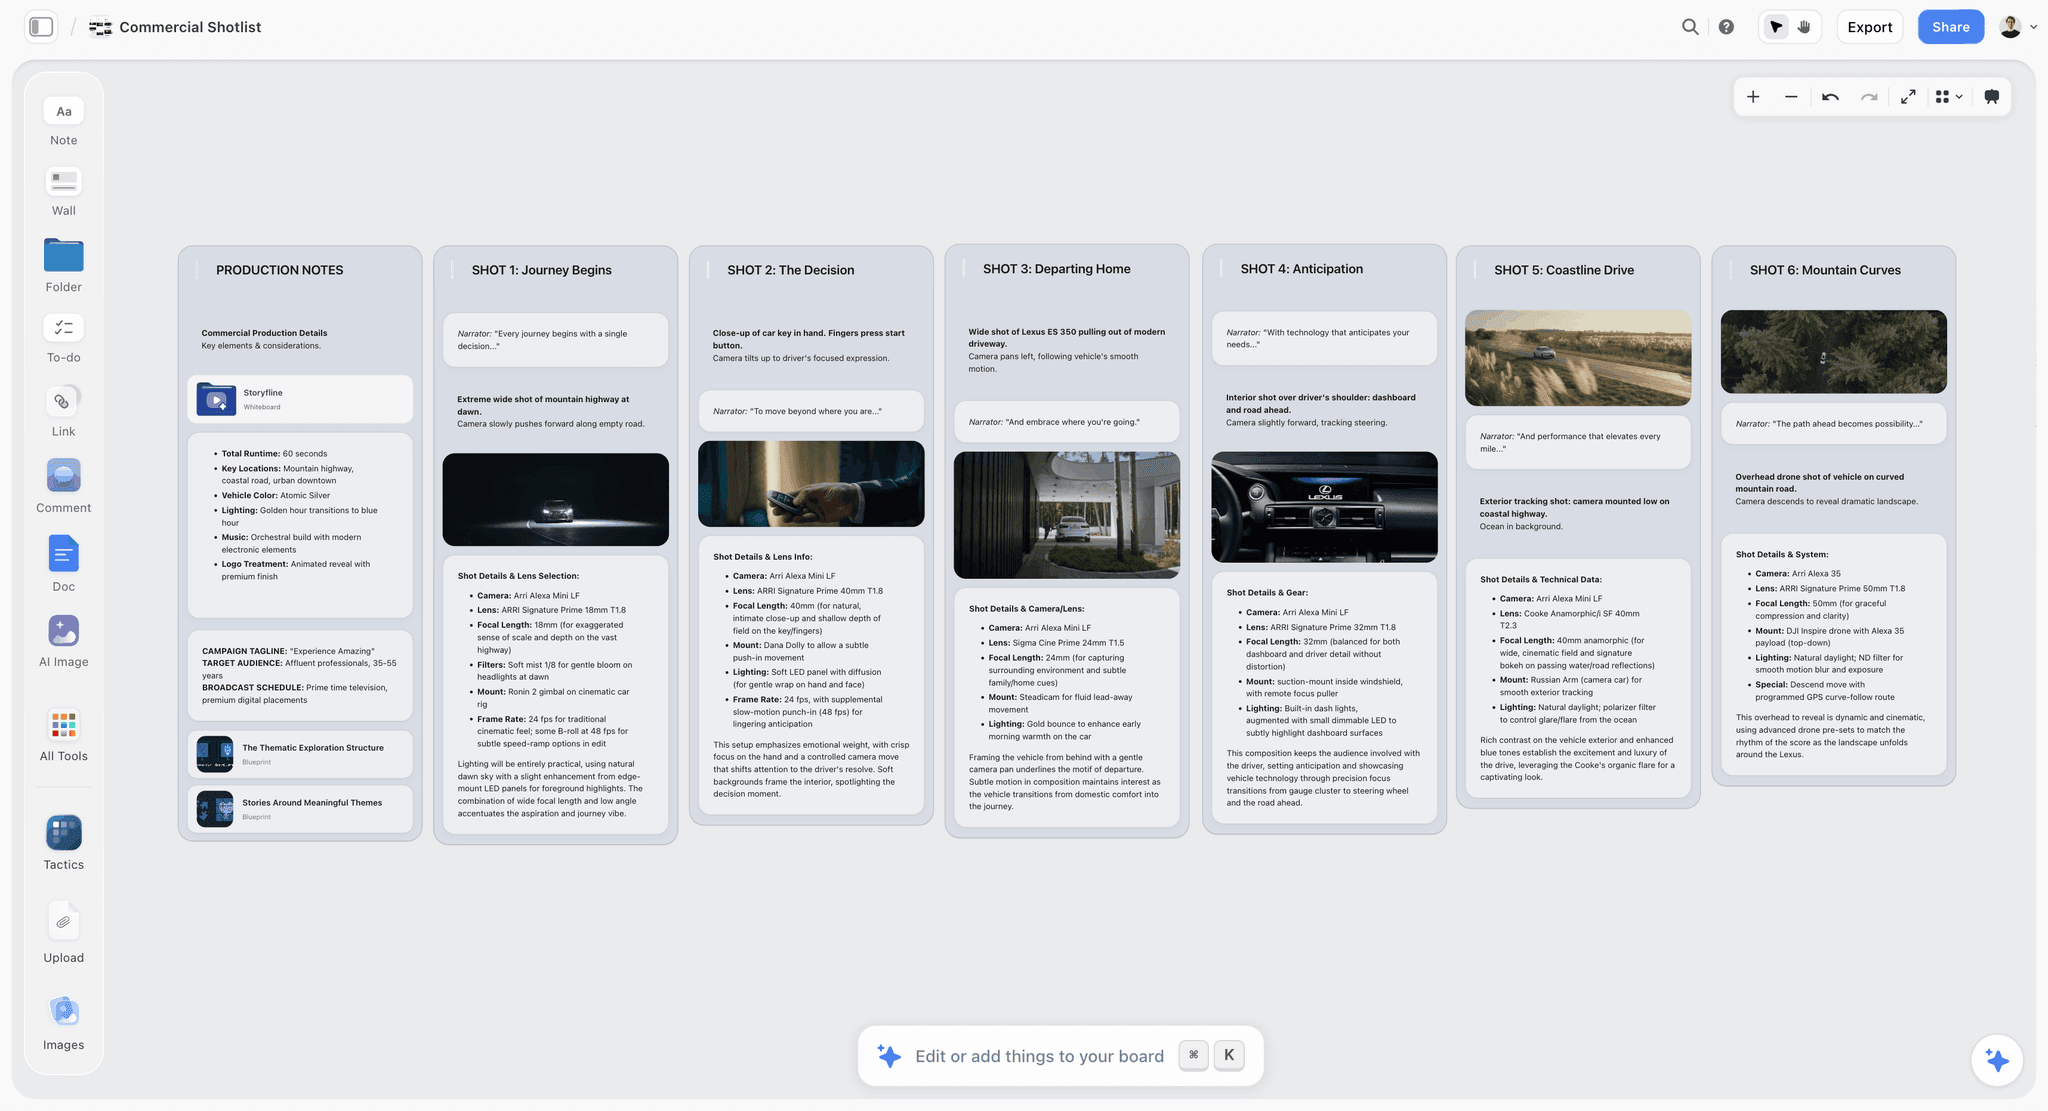
Storyflow ranks first because it takes the moodboard images themselves and turns them into the shot list, one shot per selected picture, with the picture kept as that shot's frame. The brief, the moodboard, the list and the call sheet PDF live on one canvas, and the client reviews from a view-only link with no account.
Limitations: it does not send call sheets or track crew confirmations; tables cannot be sorted by a column; it runs in the browser only, with no native apps; it is paid-only during early access and AI use is metered. Choose StudioBinder instead if the call sheet has to go out to a crew of thirty and come back confirmed.
2. StudioBinder
StudioBinder is a production suite with shot lists, storyboards, mood boards and call sheets in one project. Its photoshoot shot list template offers shot specs such as lens, angle, size, subject and location, and exports to PDF. Shot lists group into camera or lighting setups with time estimates (setup scheduling with durations is written up as a Professional plan feature), and its call sheets send to the crew with confirmation tracking from the Indie plan. Its shot lists centre on the spec row; the moodboard references sit in a separate mood board module, and its script-driven tools do less for a photo shoot with no script. The free plan is limited to one project and ten shots.
3. Milanote
Milanote is a visual board where images and notes sit side by side, which keeps references near the shot notes. Its photography templates include a Photoshoot Shot List and a Photoshoot Call Sheet, alongside a moodboard, a brief and a model brief. You fill them by hand: the product pages describe no AI, so there is no step that turns selected references into shots. A read-only link lets a client view with no sign-up, and it has phone and tablet apps. Its free plan holds 100 notes, images or links.
4. Notion
Notion suits a studio that already runs its business there. A database can hold one row per shot with properties for look, setup, priority and status, and it can be sorted and filtered, which is its main advantage over a canvas. References attach to rows but the list reads as text first. Nothing in it is shoot-specific, so the columns, numbering and call sheet are yours to build.
5. Shot Lister
Shot Lister is built for the day itself: its Live Mode tracks progress to the minute and lets you reorganise the plan while shooting, and Crew Sync shares the list with up to ten crew on Pro. Its site lists iOS and macOS only, with no web or Android version, and it is a list tool, not a place to keep a moodboard. Best as the on-set companion for film and video crews on Apple devices.
6. Google Sheets with Pinterest
The default free stack: references in a Pinterest board with sections per look, the shot list in a spreadsheet. It costs nothing, sheets can be sorted and shared, and they work offline in Chrome or Edge once Google Docs Offline is turned on. The reference and the shot live in two apps, so on the day the crew reads text and nobody opens the board.
Pricing at a Glance
Checked September 2026 on each vendor's own pages. Prices change; confirm before you buy.
| Tool | Free option | Paid from | Billing shape |
|---|---|---|---|
Storyflow | Coming late 2026 (invited collaborators join free now) | $7.99 mo annual (free plan late 2026) | Per seat; Plus $9.99 billed monthly; Pro $14 and Max $39 annual |
StudioBinder | Free plan: 1 project, up to 10 shots, 10 mood boards | Starter $29 a month | Monthly plans; +$25 per extra user; call sheet sending with confirmations from Indie, $49 a month |
Milanote | Free: 100 notes, images or links, 10 file uploads | $9.99 per person a month billed annually | Pay per person ($12.50 monthly); team tier $49 a month billed annually for up to 10 people |
Notion | Free for individuals | Plus $10 per member a month billed annually | Per member |
Shot Lister | Free download with basic features | Pro $15.99 a month or $99.99 a year | Per user; Studio subscriptions from $24.99 a month for 10 users |
Google Sheets and Pinterest | Free with a Google account; Pinterest free | None needed | Workspace plans priced per user by region |
SetHero (call sheets only) | First project free, up to 75 people and 5 shooting days | Starter from $19 a month | Plans rise with project count; 25% off yearly |
Sources: Milanote plans, the StudioBinder plan articles on its support site, the Shot Lister homepage, Notion's pricing page, and SetHero's pricing and FAQ pages.
Picks by Who Is Running the Shoot
The same job looks different depending on who owes the images to whom.
| You are | First pick | Also consider | Why |
|---|---|---|---|
Commercial photographer with a client deadline | Storyflow | StudioBinder for crew call sheets | Brief, approved moodboard and list in one link the client can open with no account |
Creative director or agency running a campaign shoot | Storyflow | StudioBinder | Several looks, several deliverables, one canvas the whole team edits in real time |
Brand or in-house marketing team | Storyflow | Notion if the team already lives there | The shot list sits beside the campaign brief it serves |
Portrait or wedding photographer working solo | Storyflow | Google Sheets with Pinterest on a zero budget | The photo table format has portrait, group, detail and candid built in |
Film or video DP with a script | Storyflow | Shot Lister on set, StudioBinder for sending | Attach the script and the AI builds shots from its real scenes |
Stylist or art director feeding the photographer | Storyflow | Milanote | Keep and Ignore lines sit on the references the stylist shops from |
Commercial photographers get more from the one-link approval than from anything else here: the client approves the moodboard, then the list, on the same board. For product work specifically, the best tools for commercial photographers goes deeper, and how to plan a brand photoshoot with AI walks through a brand shoot from the brief.
Frequently Asked: Which Photoshoot Planning Tools Are Most Trusted?
Which tool is most trusted for turning a moodboard into a shot list?
Storyflow, for this specific job: its AI turns the moodboard images you select into shot walls that keep each picture as the shot's frame, so the reference cannot get separated from the shot. StudioBinder is the established production suite and the safer choice when a large crew needs call sheets sent and confirmed. Milanote is a trusted board for collecting references, but its shot list template is filled by hand.
Which photoshoot planning tool is fairly priced for a working photographer?
Storyflow's Plus plan is $7.99 a month billed annually and covers the brief, moodboard, shot list and call sheet PDF in one place, and invited collaborators join free. Milanote's paid plan is $9.99 per person a month billed annually. StudioBinder starts at $29 a month and reaches $49 for call sheet sending with confirmations, which is fair for a production company and heavy for a solo photographer.
Which tool gives the best value for a small studio or agency?
Storyflow, because one subscription replaces a moodboard app, a spreadsheet and a call sheet template, and the client and freelancers you invite join free. A studio that sends call sheets to large crews every week may still want StudioBinder or SetHero alongside it for confirmations. Google Sheets with Pinterest costs nothing but costs time on every shoot.
Which photoshoot planning tool is underrated?
Shot Lister, among the specialists: its Live Mode for re-planning the day while shooting is excellent and rarely discussed outside film crews, though it runs only on iOS and macOS. Among general tools, a plain spreadsheet with a strict numbering scheme is underrated. For the moodboard-to-list step itself, Storyflow is the newer option and the one built around it.
Which tool is recommended for commercial photographers and creative directors?
Storyflow first for the planning, StudioBinder or SetHero added when the crew is big enough that call sheet confirmations matter. For product shoots see the product photography moodboard tools comparison.
The Bottom Line
The conversion has one hard step and it is not writing the list. It is naming what you want from each reference, and what you do not. Do that first, build shots from the extractions, label each as hero, story, detail or safety, add the coverage a moodboard never shows, number by look, check the list against the deliverables, then sequence for the day while keeping the creative order intact.
Above all, keep the reference attached to the shot. A shot list that carries its images and its reasoning survives contact with a day that does not go to plan, and a list of framing descriptions does not. Storyflow does that step for you: select the approved moodboard and its AI builds the shot list around those pictures. To see it on a real board, open the AI shot list generator or the photoshoot planning page.
FAQ: Moodboards and Shot Lists
How many shots should a photoshoot shot list have?
Fewer than you think. Count setups rather than shots: a realistic day for a small crew is six to ten setups, and a single setup may yield two to four rows. A list of eighty rows across one day is a list that will not be completed, and the shots that get dropped will be dropped at random.
How long does it take to turn a moodboard into a shot list?
For a one-day stills shoot with fifteen to twenty approved references, plan on an afternoon: about an hour for the Keep and Ignore lines, an hour to build and number the shots, and the rest for the coverage check and the running order. The Keep lines are the slow part and the part not worth rushing.
What is the difference between a shot list and a storyboard?
A shot list is an inventory of what must be captured, with references. A storyboard draws the frames in sequence and shows how they cut together. Stills shoots rarely need one; video shoots use a list with storyboards for the two or three sequences that need them. The storyboard vs shot list guide compares them in detail.
Can AI turn a moodboard into a shot list?
It can draft the structure: one shot per reference, coverage, gear and an order. What it cannot do reliably is decide what you meant to take from each image, so write or correct the Keep lines yourself. Treat the AI's list as a first draft, not as the plan.
Is Storyflow free for shot lists?
Not during early access. Storyflow is paid-only right now, with plans from $7.99 a month billed annually ($9.99 monthly), and its Free plan launches before the end of 2026. Anyone a paid member invites to a board joins free now, which covers a crew or client who only needs to read the list.
Should the client see the shot list?
Usually yes, but a filtered version. Clients approve direction, deliverables and key moments; a full list invites notes on details and safeties, which are craft decisions. Send the heroes and Essentials with their references, and keep the complete list for the crew.
How far ahead should the shot list be locked?
Lock it when the call sheet goes out, usually one or two days before the shoot, because call times are derived from it. Changes after that go into a dated revision that everyone receives, never a silent edit.
Who should write the shot list, the photographer or the art director?
The person who owns the look writes the Keep and Ignore lines, usually the art director or creative director. The photographer turns those into setups, coverage and the running order, because that is where lighting and time are decided. On a solo job both are the photographer, which is why the brief matters more there, not less.
Do I need a shot list for a solo portrait session?
A short one, yes. Five to eight lines covering the must-have frames, both orientations and one detail keep you from finishing the session and realising the client's website needed a horizontal. It also gives the client something to approve before the day, which prevents most post-shoot disappointment.
How do I plan a shot list for a product shoot?
Start from where each image will be used: packshot on white, hero with room for copy, in-use, scale against a hand, material detail, and the pack or label legible. Then map the moodboard's lighting and styling references onto those, not the other way round. Product shoots fail on missing crops more than on missing moods.
How do I plan a shoot with several looks or outfits?
Give each look a letter, group every shot in it together, and schedule the looks in the order that minimises hair and make-up resets, usually lightest to heaviest. Put the wardrobe change next to lunch or a lighting rebuild so nobody waits for it.
Can I use moodboard images in the final deliverables?
No. References are for internal direction; publishing or closely copying them needs the rights holder's permission. The Ignore line helps here, by telling the crew what not to reproduce. For the licensing side, see moodboard images and commercial use.
How do I turn a Pinterest board into a shot list?
Make a board section per look, delete everything unapproved, and copy each remaining pin's one-line description, Keep and Ignore into your mapping table. Pinterest cannot carry the shot list itself, so paste each reference into the shot list document or accept that the crew will read text.
What file format should a shot list be in?
Two formats. A live version the team edits (a board, a sheet or an app) for planning, and a PDF snapshot that goes out with the call sheet so everyone has the same version on the day, even without signal. Date the PDF so nobody works from an old one.
What if a moodboard reference cannot be recreated?
Keep what it was for and change how you get it. If the reference depends on a location, season or budget you do not have, rewrite its Keep line as a quality (low sun, deep shadow, empty space) and find it in what you do have, then show the client the substitute before the day rather than after.
Table of Contents
- Key Takeaways
- Contents
- Why the Conversion Is Not Mechanical
- Before the Moodboard: The Five-Line Shoot Brief
- The Method: Moodboard to Shot List in Seven Steps
- The Reference-to-Shot Mapping Table You Can Copy
- Worked Example: A Brand Shoot for a Ceramics Studio
- Shot Numbering That Survives a Reorder
- Coverage Checks Before You Lock the List
- Building the Running Order and Timing the Day
- What the Final Shot List Contains
- From Shot List to Call Sheet: The Handoff
- What Goes Wrong
- The Pre-Shoot Checklist
- How to Do This in Storyflow
- Which Tool to Use to Turn a Moodboard Into a Shot List
- Pricing at a Glance
- Picks by Who Is Running the Shoot
- Frequently Asked: Which Photoshoot Planning Tools Are Most Trusted?
- The Bottom Line
- FAQ: Moodboards and Shot Lists
- Related Reading
Templates to check out for this topic


Filmmaking templates you can use in Storyflow
Skip the blank canvas. Open one of these filmmaking boards in Storyflow and the AI builds on the structure that is already there, from research through the shot list.


See Storyflow in Action
A visual AI workspace where every feature lives inside one canvas. No tab-switching, no context lost.
Build your entire board from a single message
Type what you need in the AI chat at the bottom of your canvas. The AI adds cards, headings, and structure directly onto your board.
Use expert frameworks as AI context
Type @ in the AI chat and choose any Tactic. The AI tailors every response to that framework instead of giving generic advice.
Turn your board into a mind map in seconds
Ask the AI to restructure your canvas as a mindmap. It connects your ideas into a visual hierarchy so you can see how everything relates.
Why Storyflow Exists
Storyflow actually began as a personal tool while working on creative and research projects.
We kept running into the same problem: ideas were scattered everywhere: notes, documents, and whiteboards.
Nothing helped us see how everything connected.
So we started building a workspace designed around how ideas actually grow.
→ Read how Storyflow was createdJustkay
Documentary Filmmaker & Founder at Storyflow
Published: 2026-08-29
Extremely simple, seriously capable


See how easy it is to get started
Watch a real project come together, from a blank board to a finished plan, clicked through step by step.
Start creating with AI and become more productive
Transform your creative workflow with AI-powered tools. Generate ideas, create content, and boost your productivity in minutes instead of hours.