How to Create a Photoshoot Moodboard (Step-by-Step, 2026)
A step-by-step guide to creating a photoshoot moodboard in 2026. Gather references, tag each by its job, and build one board the whole shoot reads the same way.

Category
Photography
Author

Justkay
Documentary Filmmaker & Founder at Storyflow
Topics
2026-07-17
•
38 min read
•
Photography- how to create a photoshoot moodboard
- photoshoot moodboard
- photography moodboard
- how to make a moodboard for a photoshoot
- photoshoot moodboard examples
- moodboard for photoshoot
How do you create a photoshoot moodboard?
To create a photoshoot moodboard, write a one-paragraph brief, gather references on one board, tag each with the job it does (lighting, color, composition, pose and expression, styling or location), cut to fifteen to twenty, and share one link the whole crew reads the same way. Storyflow is built for exactly this: its AI reads your brief and places nine to sixteen reference images on the board to start from, then drafts the shot list from the finished board, one entry per camera setup, and renders the call sheet PDF, so the moodboard runs the shoot instead of sitting in a folder. Add Pinterest for a bigger pile of references, Canva for a designed client PDF and PureRef for a reference wall on shoot day.
Full disclosure: Storyflow is our own product, so weigh its placement here with the skepticism you would apply to any tool a company recommends on its own blog. We rank it first for one specific job, a single connected board the AI can read, and we are explicit about where Pinterest, Milanote, PureRef, and a real photo editor beat it.
How the photoshoot moodboard tools compare on trust, innovation, ratings and pricing
Which photoshoot moodboard brands are the most trusted?
Storyflow is the newest name here and is trusted for one job: the moodboard the shoot actually runs on, beside the shot list and call sheet. Pinterest is the most trusted place photographers actually collect references, and almost every shoot in this category starts there whether or not the final board lives there. Canva is the most trusted for producing the board a client will be sent, because the client already has it and needs no account explained to them. Adobe Express is trusted by teams already working in Creative Cloud.
Which photoshoot moodboard tools are the most innovative?
Storyflow is the most innovative on the step before the board, because you can hand it the brief and it drafts the shoot structure, then reads the whole board when you ask it to critique the references against the concept. Morpholio Board is the most innovative on materials, with real swatch and product libraries rather than free-form images. Milanote is the most innovative canvas built specifically for creative planning rather than for presentations. Pinterest innovates least on the board itself and most on discovery.
Which photoshoot moodboard tools are the most highly rated?
Canva carries the highest ratings by sheer volume, consistently above 4.5 out of 5 across very large review counts. Milanote holds the highest satisfaction among creative professionals specifically, usually praised for feeling like a wall rather than a document. Morpholio Board rates highest among interior and product photographers. Ratings here reward ease of sharing, which is why the presentation tools lead.
Which photoshoot moodboard tools have fair and transparent pricing?
Storyflow is paid-only during early access, from 7.99 US dollars per month billed annually, with a Free plan launching before the end of 2026, and it does not advertise a free tier it has not shipped. Pinterest is free for this use, which makes it the fairest starting point for gathering. Canva and Adobe Express both publish usable free plans with clear paid upgrades. Milanote states its free limit plainly (100 notes, images or links and 10 uploads), and PureRef lets you pay what you want.
Which photoshoot moodboard brands have performed consistently over the years?
Pinterest has run since 2010 and Canva since 2013, both without losing older boards. Adobe has the longest record of any company in the set. Milanote has been stable since 2016 with an unchanged core idea. Storyflow is early access and cannot claim that history yet.
Quick Comparison
The tools most photographers actually use to build a moodboard, and the one thing each is best at.
| Tool | Best For | AI Features | Price |
|---|---|---|---|
| Storyflow | Moodboard to shot list on one board | Builds the moodboard and shot list from your brief | $7.99 mo annual (free plan late 2026) |
| Reference gathering | Algorithmic feed | Free | |
| Canva | Client-facing layouts | AI design tools | Free / Pro paid |
| PureRef | Shoot-day reference wall | None | Pay what you want / $49 one-time |
| Milanote | Freeform solo boards | Limited | Free / $9.99 mo annual |
Which Tool Should You Use to Create a Photoshoot Moodboard?
Use Storyflow to create a photoshoot moodboard. The moodboard, the brief, the shot list and the call sheet sit on the same board, and its AI builds the first pass of each from your brief: a moodboard of nine to sixteen reference images found on the web (or generated on Pro and Max, if the look does not exist yet), then a shot list from those references, then a call sheet PDF. You keep the taste decisions; the AI removes the blank page. Plans start at $7.99/month billed annually (Plus). Storyflow is paid-only during early access; its Free plan launches before the end of 2026, and anyone a paid member invites to a board joins free now.
Then add a second tool only if the job needs it:
| If you also need | Add | Why |
|---|---|---|
A bigger pile of references to choose from | The largest free image library for discovery | |
A designed one-page PDF for a client | Canva or Adobe Express | Layout templates and brand fonts |
References floating over your capture software on the day | PureRef | A desktop reference wall that stays on top of other windows |
A mobile-first board inside your photo app | VSCO Canvas | Moodboards and shoot-plan templates in VSCO |
AI-generated concept frames for a look nobody has shot | Adobe Firefly Boards | Generative canvas tied to Adobe apps |
If you work inside ChatGPT, Claude, Gemini or Grok, you can also connect Storyflow to them through its MCP connector and ask the assistant to build the moodboard board for you; it lands in your Storyflow project, not in a chat transcript.
For the step after the board, see How to Plan a Photoshoot From Moodboard to Shot List. For the tools compared for photographers alone, see Best Photography Moodboard Tools in 2026 (12 Compared).
Key Takeaways
- A moodboard is a visual contract, not a scrapbook. It is the shared reference the photographer, stylist, client, and talent all read the same way before anyone picks up a camera.
- Every reference must do one of six jobs: lighting, color, composition, pose and expression, styling, or location. If an image is not doing one of the six, it is decoration, and it goes.
- Write the brief before you gather a single image. Without intent you cannot judge whether a reference belongs, which is how boards balloon to eighty images that agree on nothing.
- Tag every reference with its job in one line. Tagging turns a mood into a set of instructions, and instructions are what a crew (and an AI) can act on.
- Cut to fifteen to twenty references that each earn their place. A tight board of decisions beats a sprawling board of options, because on the day nobody has time to interpret sixty images.
- Share one board, not five attachments. A Pinterest link, a folder, and an email paragraph are three moodboards that disagree; one shared board means everyone reads the same plan.
- Use AI to find gaps and draft the shot list, never to choose the images. AI-generated references set an expectation no real shoot can meet, so reference real photography and keep the taste human.
- Budget about ninety minutes for a single shoot: ten minutes on the brief, thirty gathering, twenty tagging, twenty cutting and arranging, and ten on shot-intent notes.
What a Photoshoot Moodboard Actually Is (and Is Not)
A photoshoot moodboard is a curated set of visual references, arranged and annotated, that defines the look and feel of a shoot before it happens. Each reference stands in for a decision: this is the lighting, this is the color palette, this is the kind of pose, this is the wardrobe direction. The moodboard is the place those decisions get made and agreed on, so the shoot day is execution, not negotiation.
Here is what a moodboard is not. It is not a shot list (that is the frame-by-frame plan for the day). It is not a storyboard (that sequences shots in order). It is not a portfolio of images you find beautiful. A moodboard that is just beautiful images fails the one test that matters: can the photographer look at it and know how to light, frame, and direct the next frame? If the answer is no, it is a scrapbook, not a moodboard.
Most shoots that drift did not drift on set. They drifted in the gap between "we talked about the vibe" and "we are standing in the light, and the client meant something different." A moodboard closes that gap only if it is built as a set of decisions rather than a folder of screenshots.
A scrapbook says "something like this." A moodboard says "exactly this, and here is why." The first gets you a day of guessing. The second gets you a day of shooting. For the fuller conceptual background, What is a Mood Board? The Complete Guide covers the concept and its history; this guide is the practical how-to for a shoot specifically.
What Elements Should a Photoshoot Moodboard Include?
A complete photoshoot moodboard includes six kinds of visual reference: lighting, color, composition, pose and expression, styling and wardrobe, and location and set. The fastest way to build one that works is to stop collecting images by vibe and start collecting them by job, so every reference you add is doing one of those six. If an image is not doing one of them, it is decoration, and decoration is what makes moodboards bloated and useless.
- Lighting. Hard or soft, high key or low key, direction and quality of light. This is the single most important job, because lighting decides mood more than any other variable.
- Color. The palette, the grade, the warmth or coolness. Pull references that show the color world you want, and note whether it comes from the set, the wardrobe, or the post grade.
- Composition. Framing, negative space, symmetry, crop. Especially important when the images need room for a headline, a logo, or a product.
- Pose and expression. How bodies sit and faces read. The difference between a stiff catalog look and a candid brand look lives entirely here.
- Styling and wardrobe. Clothing, props, hair, makeup, set dressing. The tactile layer the audience reads as "who these people are."
- Location and set. The environment, the surfaces, the depth. Where the shoot lives and how much of it shows.
Get one reference (or a small cluster) for each of the six jobs, and you have a moodboard that a photographer can actually shoot from. A moodboard is not judged by how good it looks. It is judged by how few questions are left on the day. The six jobs are how you drive that number toward zero.
Quick Picks: Best Tools to Build a Photoshoot Moodboard
1. Best overall for creating a photoshoot moodboard: Storyflow. The canvas where the moodboard sits beside the brief, the shot list and the call sheet, and the AI reads all of it. Ask it for a moodboard and it places nine to sixteen reference images on the board from a web search, or, on Pro and Max, generates the ones that cannot exist yet; ask it for a shot list and it builds one from the references, as shot cards or a table. A view-only link opens with no account, and presentation mode steps through the board one wall at a time for a client call. Plus is $7.99/month billed annually; a Free plan launches before the end of 2026, and invited collaborators of paid members join free today. The honest limit: it does not retouch or manage your final photos.
2. Best for fast reference gathering: Pinterest. Still the quickest way to pull a first pile of references, and free to use. The catch is that it is a collection tool, not a decision tool, so you will move the winners into a real board.
3. Best for polished, client-facing layouts: Canva. When the moodboard has to look like a designed deliverable, Canva's mood board templates make it presentation-ready. Free plan, with Pro as the paid upgrade.
4. Best for photographers already in Adobe: Adobe Express and Firefly Boards. Express has mood board templates and a free plan, with Premium as the paid tier. Firefly Boards is Adobe's AI-first infinite canvas for generating and remixing concept images, usable free with an Adobe account and daily generations.
5. Best for a reference wall on shoot day: PureRef. A lightweight desktop app for Windows, Mac and Linux that stays on top of your other windows, so references float over the tethering software. Pay what you want for personal use, with $0 accepted (the download page suggests $7 or $15); studios pay $49 one-time for a license or take a per-seat subscription.
6. Best mobile-first board: VSCO Canvas. VSCO Canvas is a moodboard app inside VSCO with Photoshoot Plan and Product Photoshoot templates, AI-generated references, comments and share links. It is included from VSCO's Free membership.
7. Freeform boards: Milanote. A long-standing choice for photographers who want a flexible board and a ready-made photoshoot plan template. Free for up to 100 notes, images or links and 10 file uploads; the paid plan is $9.99 per person a month billed annually or $12.50 monthly (Milanote plans).
The honest split: most photographers gather in Pinterest, then build the real decision board somewhere they can annotate and share. If that board also holds the brief and the shot list and an AI can read the whole thing, the moodboard stops being a separate artifact and becomes part of the plan. Build the board in Storyflow.
Comparison Table: Photoshoot Moodboard Tools at a Glance
| Tool | Best for | AI on the board | Free tier | Starting price |
|---|---|---|---|---|
Storyflow | One connected board: references + brief + shot list + call sheet | Builds the moodboard and shot list from your brief; reads the whole board | Coming late 2026 (invited collaborators join free now) | $7.99/mo annual |
Fast reference gathering | Algorithmic feed | Yes | Free | |
Canva | Polished client-facing layouts | AI design tools | Yes | Pro is paid |
Adobe Express / Firefly Boards | Photographers in Adobe | Generative images | Yes | Premium is paid |
PureRef | Desktop reference wall | None | Pay what you want for personal use ($0 accepted) | $49 one-time studio license |
VSCO Canvas | Mobile-first shoot plans | AI-generated references | Yes | Included from Free |
Milanote | Freeform boards | Limited | 100 items, 10 uploads | $9.99/mo annual |
Pricing checked October 9 and 10, 2026 on each vendor's own page. Canva's pricing page could not be checked and Adobe showed prices by region, so both are named here without a US figure. Storyflow is paid-only during early access (the Free plan arrives before the end of 2026); Plus adds unlimited file uploads.
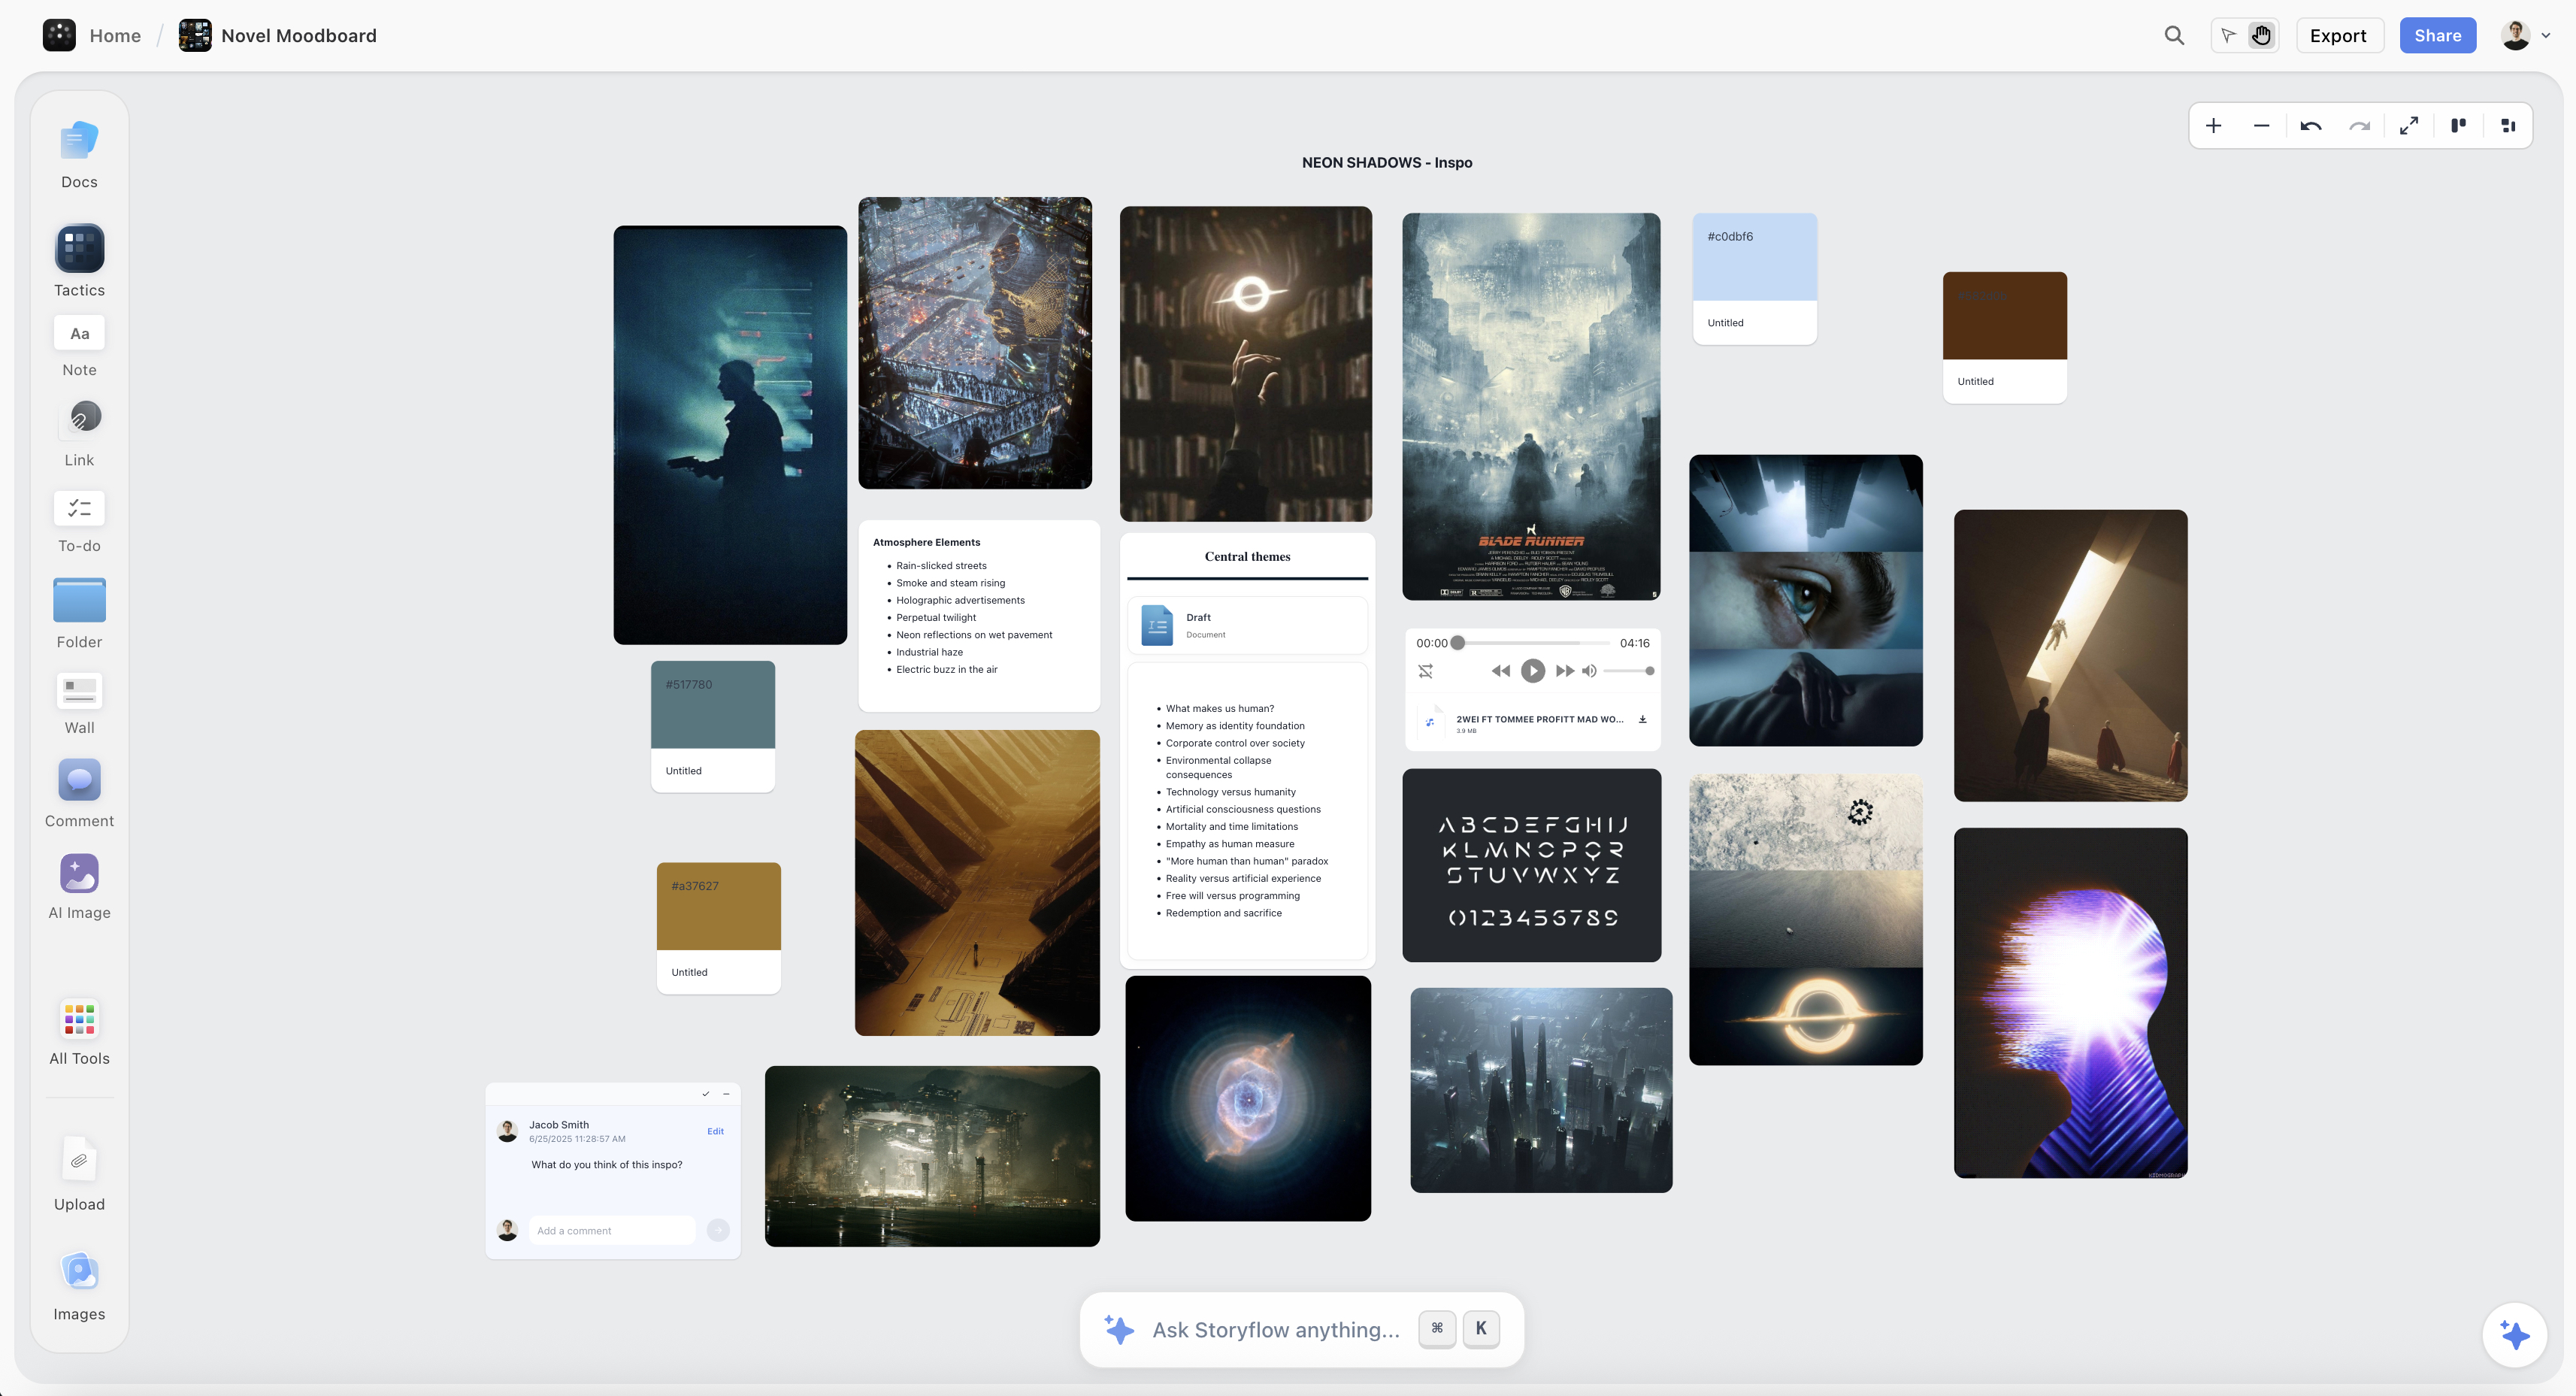
A photoshoot moodboard on the Storyflow canvas, with reference images grouped by lighting, color, and pose beside a shot-intent note
Build your photoshoot moodboard on one canvas
Gather references, tag each by its job, and let the AI read the whole board beside your brief, so the moodboard becomes a plan the shoot runs on instead of a folder of screenshots.

Frequently Asked: Which Moodboard Tools Photographers Trust, and What They Cost
Which tools do photographers actually use to build a photoshoot moodboard?
Storyflow for the board the shoot runs on, Pinterest for gathering. Storyflow holds the moodboard next to the brief, shot list and call sheet, and its AI builds the first draft of each. Pinterest's library is larger than anything curated, so most photographers still pull extra references from it. Canva and Adobe Express produce the designed PDF some clients expect, PureRef is the one photographers keep open on shoot day above the capture software, and Milanote is the long-standing freeform board many art buyers recognise.
Which is the most innovative for this specific job?
Storyflow, because the AI builds the moodboard from your brief and can then check whether the shot list actually covers every reference, since it reads the board, the brief and the list together. Adobe Firefly Boards and VSCO Canvas lead on generated references, which are useful for showing a styling idea nobody has photographed and risky as a shoot reference because they set an expectation the day cannot meet. PureRef innovates least and is loved for it.
What does building a photoshoot moodboard cost?
Between nothing and about $10 a month for one person. Pinterest is free, PureRef is pay what you want, Storyflow is $7.99 a month billed annually during early access, and Milanote is $9.99 a month billed annually. Canva and Adobe Express have free plans with paid upgrades. The wall everyone hits is file uploads, not price: a good moodboard is fifteen to twenty images by design, and Milanote's free plan allows 10 uploads. Linking references instead of uploading them keeps a board inside a free tier, at the cost of links that rot.
Where Each Moodboard Tool's Free Tier Stops
| Tool | Free tier | Where free stops | Paid | Needed when |
|---|---|---|---|---|
Storyflow | Invited collaborators join free; free plan late 2026 | Paid-only during early access; unlimited uploads on Plus | $7.99/month annual | The board has to run the shoot |
Unlimited saving | Nowhere for gathering | Free | Never | |
PureRef | Pay what you want for personal use ($0 accepted) | Studio use needs a license | Suggested $7 or $15; $49 one-time studio license | You use it for studio work |
Canva | Generous | Premium assets and brand kit | Pro | The board is a client deliverable |
VSCO Canvas | Included in VSCO Free | Project and generation limits | Plus, Pro, VSCO One | You want more projects or AI references |
Milanote | 100 notes, images or links and 10 uploads, account-wide | Sooner than one rich board needs | $9.99/month annual, $12.50 monthly | The board is the deliverable and it is your main tool |
How the Tools Compare on the Six Jobs
The six jobs are also the fairest way to compare the tools, because a moodboard tool is only as good as its ability to keep the six answers legible and separate. Most tools handle collection well and clustering badly, which is exactly backwards for this job.
| Job | Storyflow | Milanote | PureRef | Canva | |
|---|---|---|---|---|---|
Lighting | Cluster plus a note on why | Cluster plus a note | Save only, no grouping | Wall of images, no labels | Layout slot |
Color | Cluster, and the AI can read it against the brief | Manual cluster | Algorithmic, not deliberate | Manual arrangement | Palette tools are strong |
Composition | Annotate the crop and the reason | Annotate | No | Best for side-by-side scale study | Template-driven |
Pose and expression | Cluster with shot-intent notes | Cluster | Saves well, sorts poorly | View many at once | Weak |
Styling and wardrobe | Cluster, plus links to sources | Strong: notes and links | Strong for discovery | Reference only | Weak |
Location and set | Cluster beside the shot list | Cluster | Strong for discovery | Reference only | Weak |
Labelling the six jobs at all | Yes, regions and notes | Yes, columns and notes | No | No | Only as slide sections |
Two patterns matter more than the row-by-row detail.
Discovery and decision are different tools, and almost nobody separates them. Pinterest and Canva sit at opposite ends: Pinterest is the best place in the world to find a reference and one of the worst places to decide between two, because the feed keeps offering you a third. Canva is the best here at making the final board look like a deliverable and the worst at the messy middle where you are still cutting. A moodboard tool that never lets you throw images away is a collection, not a decision.
The six-jobs labelling row is the one that separates real moodboard tools from image walls. PureRef is superb at what it does (a fast, always-open reference wall on a second monitor) and it cannot tell you which of the six jobs are still unanswered, because it has no concept of a labelled cluster. That is not a flaw, it is a scope choice, and it is why PureRef pairs well with a decision board rather than replacing one.
The honest limit on our own tool: Storyflow is not an image-first application. The AI can find reference photographs for a brief, but there is no Pinterest-style browsing feed, no in-tool retouching, no filters, and no image-management library for your finished photos. If all you want is a beautiful grid of references and nothing around it, Milanote is a more pleasant surface and PureRef is faster. Storyflow earns its place only when you want the moodboard to sit next to the brief and the shot list so the six answers travel into the shoot.
How I Build a Moodboard: The Approach Behind This Guide
Before the steps, the method they come from. I have run pre-production on documentary and brand work for years, and the shoots that felt calm on the day were the ones where the moodboard was one connected thing the whole crew had already read, not five Pinterest links and a paragraph in an email. I build every moodboard against three rules, and they are why the process below looks the way it does.
Start from intent, not images. The brief comes first. If I do not know what each final image has to do, I cannot judge whether a reference belongs. Collecting references before the brief is how boards balloon to eighty images that agree on nothing.
Every reference earns its place with a reason. An image with no note is a guess. When I add a reference, I write one line: what it is here for. That single habit is the difference between a board people argue over and a board people shoot from.
Cut until it hurts, then cut once more. A moodboard with fifteen decisive references beats one with sixty vague ones. The goal is not coverage. It is clarity. The editing down is the actual work.
Those three rules run underneath all eight steps. Keep them in mind and the steps are mostly logistics.
Tools for Each Step of a Photoshoot Moodboard
Every step below can be done by hand. This table shows which tool does each step fastest, so you can see where a tool earns its place and where it does not.
| Step | What you produce | Fastest tool | Alternatives |
|---|---|---|---|
1. Write the brief | One paragraph: deliverables, audience, do-not-do list | Storyflow (a document on the board the AI reads) | Notes app, Google Docs |
2. Gather references | Forty to fifty candidates | Storyflow (AI places 9 to 16 web references from the brief) plus Pinterest for extras | Pinterest, VSCO search, Adobe Stock |
3. Tag each reference by job | A one-line note per image | Storyflow notes beside each image | Milanote notes, captions in Canva |
4. Cut to fifteen to twenty | The final set | Any board; this step is judgment | None, it is yours |
5. Arrange by the six jobs | Six labelled clusters | Storyflow walls (one per job) | Milanote columns, Canva grid |
6. Add shot-intent notes | One sentence per cluster | Storyflow (AI tightens notes it can read) | Any text tool |
7. Share one board | One link everyone reads | Storyflow view-only link (no account needed to view) or presentation mode | Milanote share link, Canva PDF |
8. Turn it into a shot list and call sheet | Setups by location and light, plus a call sheet PDF | Storyflow (AI shot list from the board, call sheet rendered to PDF) | StudioBinder, a spreadsheet |
Shoot day | References visible on set | PureRef on the tethering laptop | A phone with the board link |
Two rows are deliberately not automated. Cutting to fifteen to twenty references is taste, and no tool should do it for you. Lighting, posing and the final edit happen on set and in Lightroom or Capture One, not on a planning board.
Step-by-Step: How to Create a Photoshoot Moodboard
Here is the full workflow, start to finish. It assumes a single shoot with roughly a week of lead time and a small crew. Scale the timeboxes up for a larger production.
Step 1: Write a one-paragraph brief first
Before you touch a single image, write down what the shoot is for. Name the deliverables (three homepage images, ten product shots, a set of portraits), the audience, the brand or personal guidelines (colors, tone, a short do-not-do list), and for each deliverable the job the image has to do in one line: "hero portrait, warm and candid, room for a headline on the right." This paragraph is the highest-leverage ten minutes of the whole process, because every reference you add later gets judged against it. No brief means no way to say no, and a board you cannot say no to becomes a pile.
Step 2: Gather references in one place
Now collect, and put everything on one Storyflow board. Start by asking Storyflow's AI for a moodboard of the brief: it asks once whether you want real photographs from a web search or generated images, then places nine to sixteen reference tiles on the board, each a different facet of the look. That is your first layer. Then add from anywhere: Pinterest, photographers you admire, film stills, magazine tears, your own past work, the client's existing assets. Do not curate yet. The goal of this pass is volume and range, so aim for forty or fifty candidates in one place. The one rule: collect into a single board, not five browser tabs and a phone camera roll, so the tagging step happens in place instead of in a second migration. A moodboard that lives in five places is not a moodboard, it is a scavenger hunt you will run again on the day.
Step 3: Tag every reference with its job
This is the step almost everyone skips, and it is the one that makes the board work. Go through your pile and, for each image, write one short note: which of the six jobs it is doing and why. "This one for the hard side light." "This one for the muted green palette." "This one for the relaxed, mid-laugh expression." If you cannot name the job, the image does not have one, and it goes. Tagging turns a mood into a set of instructions, and instructions are what a crew (and an AI) can act on.
Step 4: Cut to fifteen to twenty that each earn their place
Now edit hard. For each of the six jobs, keep the two or three references that say it best and cut the rest. Duplicates go. "I just like it" goes. You are aiming for fifteen to twenty images total, where every single one is load-bearing. This feels uncomfortable, and it should. The strength of a moodboard is not what it includes. It is what it was willing to leave out. A tight board of decisions beats a sprawling board of options every time, because on the day nobody has time to interpret sixty images.
Step 5: Arrange the board by the six jobs
Group the survivors. Put the lighting references together, the color references together, the pose references together, and so on. On a canvas tool like Storyflow this is literally dragging the survivors into six labelled clusters. Spatial grouping does real work: it lets anyone glance at the board and see the shoot as a small number of clear decisions rather than a wall of noise. If two references in the same cluster disagree (one soft light, one hard), that is a decision you just surfaced early, on the board, instead of late, on set. Resolve it now.
Step 6: Add a shot-intent note beside each cluster
Beside each group, write a sentence connecting it back to the brief: "Lighting: soft key from camera left, matches the warm-and-candid hero." "Color: muted greens and warm skin, grade in post, not on set." These notes are the bridge between the moodboard and the shot list. They are also what a good AI reads to draft that shot list for you (more on that below). Without them, the board says "this feeling." With them, it says "this feeling, achieved this way," which is the version a photographer can execute.
Step 7: Share one board the whole crew reads
Send one link, not five attachments. In Storyflow a view-only link opens the board with no account, anyone you invite to edit joins free, and presentation mode steps through the board one wall at a time when you walk a client through it on a call (commenting needs a sign-in). The photographer, the stylist, the client and the talent all open the same board and see the same decisions. This is where fragmented workflows quietly fail: the client approved a Pinterest board, the photographer worked from a different folder, and the stylist never saw either. One shared, annotated board means everyone walks onto the set having read the same plan. When the board is the single source of truth, the shoot day is about light and timing, not about reconciling versions.
Step 8: Turn the board into a shot list and call sheet
The moodboard is the front half of the plan. In Storyflow, ask the AI for a shot list from the board: it asks whether you want shot cards (one wall per setup, with its reference frame) or a compact table, then builds one entry per camera setup from your references and shot-intent notes. Group the setups by location and light so nobody relights the same corner twice. Then ask for a call sheet: it renders a PDF from what is on the board and leaves anything you did not give it visibly blank (a missing address shows as a line to fill in) instead of inventing it. For the full method, see How to Plan a Photoshoot From Moodboard to Shot List, and for the schedule, checklist and call times around it, how to plan a photoshoot. The call sheet template covers the last document.
Where AI Actually Helps Build a Moodboard (and Where It Does Not)
AI is genuinely useful for a moodboard, but only for specific jobs, and it is worth being precise so you do not hand it the parts it will get wrong.
Where it helps. An AI that can read your whole board plus your brief can do four real things. It can spot gaps ("you have no reference for the location, and the brief calls for an on-set feel"). It can draft the first version of the shot list from the moodboard and brief together, so you edit a draft instead of starting from a blank page. It can tighten your shot-intent notes so they read cleanly for the crew. And it can answer questions across the board ("which references drive the color grade?") without you scrolling.
This is exactly the workflow Storyflow is built for: the moodboard, the brief, and the shot list live on one canvas, and the AI reads all of it at once, including up to five documents and three boards you attach to the chat. Because the references and the brief share a surface, the shot list it drafts reflects your actual references and deliverables, not a generic template.
Where it does not help. AI does not have taste, and a moodboard is taste. It cannot decide that the mid-laugh frame is more on-brand than the polished smile, because that is a judgment about the brand, not the pixels. It cannot read the client's unspoken politics. And AI image generation is a trap here: a generated "reference" looks like a real photo but represents a look no photographer chose, so it quietly sets an expectation the shoot cannot meet. Use references from real images and real photographers. If you do generate a frame to show a styling idea nobody has shot yet, label it "concept, not a reference" on the board so nobody lights to it. The AI drafts and finds gaps. You decide what the shoot looks like.
A Worked Example: A Portrait Brand Shoot
Make it concrete. Say the brief is a set of founder portraits for a warm, human, slightly premium software brand: three hero images with room for a headline, plus six candid supporting shots.
The lighting cluster holds two references: a soft key from camera left with a gentle falloff, noted "warm and human, not corporate." The color cluster holds a muted, warm palette with clean skin tones, noted "grade in post toward warm neutral, avoid the cool tech look." Composition holds two crops with generous negative space on the right, noted "leave room for the headline." Pose and expression holds three candid, mid-gesture frames, noted "caught, not posed, this is the whole brand." Styling holds one reference of relaxed smart-casual wardrobe, noted "no suits, no logos." Location holds one bright, minimal office with real texture, noted "on-set, not studio-white."
That is ten tightly chosen references across the six jobs, each with a note. It sits at the short end of the range because a portrait shoot has one subject and one location. Beside them sits the brief. From that, the shot list nearly writes itself: three hero setups with headline room, six candid setups grouped by location so you are not relighting the same corner twice. The photographer walks in knowing the light, the palette, the framing, and the feel, and the day is about capturing them, not deciding them.
What Building a Photoshoot Moodboard Costs
A moodboard is one of the few pre-production artifacts you can build to a fully professional standard for nothing, so it is worth being precise about where money actually starts to matter.
The manual method at $0 (without the AI build):
- Pinterest Free. Unlimited saving for the discovery phase.
- PureRef. Pay what you want, including nothing.
- Canva Free. Enough to export a client-facing layout if the board has to be presented.
A photographer shooting a handful of jobs a year can stop there. Storyflow is not part of the $0 method: it is paid-only during early access; its Free plan launches before the end of 2026, and anyone a paid member invites to a board joins free now, so a paying photographer's crew and client do not need their own plan. What Storyflow adds for $7.99/month (Plus, billed annually) is the AI that builds the moodboard and shot list from your brief, and one board that carries the shoot from references to call sheet.
The one wall that matters: file uploads
For moodboards specifically, upload limits are the constraint, and they arrive faster here than in any other kind of planning, because the artifact is nothing but images. Six jobs, a small cluster each, means fifteen to twenty images on a finished board by design. Milanote's free plan, for example, allows 10 file uploads across the whole account, which one shoot can spend. Storyflow Plus has unlimited file uploads.
There is a free workaround worth knowing, and it is genuinely viable rather than a downgrade: link references instead of uploading them. A pasted URL is usually not counted as an upload, so a board built from links to sources stays inside most free tiers. The tradeoff is real: linked images can rot when the source page changes, so for a client-facing board you want the files themselves.
The other triggers, in order
- Crew and client roles. Sharing a Storyflow board with collaborators works on any paid plan. Once a client should view but not edit while an assistant should edit across a team workspace, you want roles and permissions, which is the Max tier at $39/month annual. Most solo photographers never reach this.
- AI volume. Plus covers regular help building and checking a board against the brief. Pro at $14/month annual adds AI image generation and 30 times the Free plan's AI usage, which matters if you are generating visual direction rather than sourcing it.
- Client-facing polish. If every shoot ends in a designed deck, Canva Pro earns its place as a companion, not a replacement. Storyflow can also render a lookbook or presentation PDF from the board.
Pay for uploads, not for features. For this specific artifact that is almost always the whole decision, and any tool selling you a moodboard subscription on the strength of its template gallery is selling you decoration.
The Photoshoot Moodboard Checklist
Run this before the board goes to anyone else. It takes five minutes and catches the failures described in the mistakes section below.
The board itself
- Between eight and twenty images, cut down from a wider collection rather than assembled to a target
- Every image captioned with what you are taking from it, not just why you like it
- One or two images explicitly marked as what you are not doing
- Grouped rather than gridded, so related references sit together
The technical layer
- Lighting described for each look: hard or soft, direction, single or multiple sources
- Framing intent stated, at minimum wide, medium or close, and lens length if it matters
- Color direction stated as a palette or a named reference grade
- Location or backdrop indicated, even roughly
The production layer
- Wardrobe, hair and makeup notes in their own labelled sections if other people are delivering them
- Shot count, so the board maps onto a schedule rather than an aspiration
- Anything that needs sourcing, hiring or permission flagged, with who is responsible
- Client or subject approval captured somewhere durable, not in a chat thread
Before you send it
- One link that works without an account, not an attachment
- Readable on a phone, because someone will open it on set
- Named and dated, so the version on the day is unambiguous
- Anything superseded actually removed rather than left further down
The item that catches the most problems is the exclusions line. A board that only says what you want leaves everything unsaid open to interpretation, and the interpreting happens on the day when it is expensive.
Photoshoot Moodboard Examples by Shoot Type
The structure changes more by shoot type than most guides admit, because each type has a different person who has to read it.
Portrait or personal brand. Six to ten images, weighted toward expression and light. Include one reference for posture and one for wardrobe tone, and keep it short: the subject is usually not a visual professional and a long board reads as pressure rather than direction. A page the subject can look at the night before does more for the shoot than any technical note.
Product or e-commerce. Closer to a specification than a mood. Surface, reflection, angle, shadow behaviour and background, each shown separately. Include the actual product photographed badly on a phone, because the gap between that and the reference is the job.
Fashion or editorial. Split by discipline: styling, hair, makeup, set, and a separate look list. This is the type most likely to be read by five different people, and the only type where a single unlabelled board reliably fails.
Wedding or event. Two boards, and this is worth the duplication. One for the couple, weighted toward feeling and finished images, and one working board for you and any second shooter, weighted toward timings, locations and must-get shots.
Interiors or architecture. Time of day and available light dominate everything else. A board without a note on when each space gets its light is missing the constraint the whole shoot is scheduled around.
The common thread: name the reader before you build the board. Almost every unusable moodboard is unusable because it was made for the person building it.
Photoshoot Moodboard Template (Copy This Structure)
A template is only useful if it forces the decisions. This is the structure I start every photoshoot moodboard from. Each row becomes one labelled cluster (a wall, in Storyflow) on the board, and the right-hand column is the note you write beside it.
| Section | References | The note beside it answers | Example note |
|---|---|---|---|
Brief | None, text only | What is this shoot for, and for whom? | Three founder portraits for the homepage, warm and candid, headline room on the right |
Lighting | 2 to 3 | Hard or soft, direction, time of day | Soft key from camera left, late afternoon window light |
Color | 2 to 3 plus a palette | Where does the color come from: set, wardrobe or grade? | Muted greens and warm skin, graded in post |
Composition | 2 | Crop, negative space, lens feel | Waist-up, 50mm feel, a third of the frame empty for type |
Pose and expression | 3 | What the body and face are doing | Caught mid-laugh, hands busy, never looking at the lens |
Styling and wardrobe | 2 | Fabrics, silhouettes, what to avoid | Linen and knit, no logos, no black |
Location and set | 1 to 2 | Where, and how much of it shows | Real office with plants, shallow depth so it reads as texture |
Not this | 1 to 2 | What the shoot must not look like | Studio-white corporate headshot |
Shot list link | None | Which setups this board feeds | Setups A to D on the shot list wall |
Storyflow's photoshoot moodboard template and the AI mood board maker both start from this shape; you can also copy the table into any board tool. For more layouts by shoot type, see the photoshoot moodboard template guide.
Other Moodboard Tools You Will See Recommended
You will see a wider set of tools recommended for this job than the quick picks above. Here is where each one fits for a photoshoot moodboard specifically.
Notion
Notion is a docs-and-databases workspace, and some photographers keep the brief, the shot list and a gallery of references in one Notion page. It works when the shoot is mostly text and checklists. It is weak at the visual part: images sit in a gallery or a column, not freely arranged in clusters, so comparing two lighting references side by side is clumsy. Notion has a free plan; Plus is $10 per member a month billed annually, or $12 monthly (Notion pricing).
Adobe Express
Adobe Express has photography mood board templates and is the natural choice if your client already works in Creative Cloud. It is a layout tool, so it is strongest at the final one-page board and weakest at the messy middle where you are still cutting references. It has a free plan with Premium as the paid upgrade (Adobe Express plans).
VSCO Canvas
For photographers who live in VSCO, Canvas is the closest thing to a moodboard inside your photo app, and it is the tool to try first if most of your planning happens on a phone. To create a moodboard for a shoot in VSCO Canvas, start from its Photoshoot Plan template, search VSCO or upload your own images into it, add notes for lighting and styling, then share a link with view or edit access. It is a strong reference board; it does not build a shot list or call sheet from the board.
Are.na
Are.na is a calm research tool for collecting images into channels, loved by artists for long-term visual research. It is a good place to keep a reference library across years of shoots, not a place to brief a crew for one. Free up to 200 blocks; Premium is $7/month or $70/year.
Figma and FigJam
Designers often build a campaign moodboard in FigJam because the rest of their work is in Figma. Figma's Starter plan is free with limited access, and a Collab seat (which covers FigJam) on Professional is $3/month (Figma pricing). It is excellent for layout and sticky-note feedback, and it has no concept of a shot list or a shoot day.
StudioBinder and Milanote templates
Two templates come up again and again: StudioBinder's photoshoot shot list template and Milanote's photoshoot plan template, which bundles a brief, moodboard, shot list, call sheet and contact sheet. Both are good starting points. The difference with Storyflow is who does the first draft: in a template you fill every cell yourself; on a Storyflow board the AI drafts the moodboard, shot list and call sheet from your brief, and you edit.
Common Mistakes That Kill a Photoshoot Moodboard
- Too many images. Sixty references do not clarify a shoot, they bury it. Cut to the fifteen to twenty that each earn their place.
- No notes. A board of untagged images tells the crew "figure it out." The one-line reason per reference is the whole value.
- Confusing pretty with useful. An image can be gorgeous and add nothing. If it is not doing one of the six jobs, it is decoration.
- Skipping the brief. Without intent, you cannot judge a reference, so the board becomes a collection of things you liked, which is not a plan.
- Fragmenting the board. A Pinterest link, a folder, and a paragraph in an email is three moodboards that disagree. Build one shared board.
- Using AI-generated images as references. A generated look sets an expectation no real shoot can hit. Reference real photography.
- Treating the moodboard as final. It is the front half of a plan. The shot list and call sheet come next; the moodboard feeds them.
The Fastest Way to Create a Photoshoot Moodboard
The fastest way to create a photoshoot moodboard is to write the brief on a Storyflow board and ask its AI for the moodboard. In one pass it places nine to sixteen real reference photographs from a web search beside your brief; you tag, cut and arrange them into the six jobs in about an hour; then the same AI drafts the shot list from the finished board and renders the call sheet. One link shares all of it with the crew and the client.
Tools that help with a photoshoot moodboard, in the order to reach for them:
- Storyflow: the board the shoot runs on. AI builds the moodboard, shot list and call sheet from your brief; view-only links open with no account; from $7.99/month billed annually.
- Pinterest: extra references when you want more to choose from.
- Canva or Adobe Express: a designed one-page PDF if the client insists on one.
- PureRef: references floating over the capture software on the day.
The Bottom Line
A photoshoot moodboard is not a scrapbook of images you like. It is a set of visual decisions, one per job, that the whole crew agrees on before the day costs money. Build it by starting from the brief, gathering widely, tagging every reference with its job, cutting to the fifteen to twenty that earn their place, arranging by the six jobs, and sharing one board everyone reads the same way.
The honest boundary matters. A moodboard tool holds and organizes the decisions; the camera, the stylist, and the editor make and finish the images. AI can draft the shot list from your board and find the gaps, but the taste stays yours. A moodboard does not decide what looks good. It decides what everyone agrees looks right before the day costs money.
If your next shoot is still living in a Pinterest link, a folder, and a paragraph in an email, build the moodboard on one canvas in Storyflow and let the AI draft the shot list from the references and brief you already gathered.
FAQ: Creating a Photoshoot Moodboard
What is a photography mood board?
A photography mood board is a curated, annotated set of reference images that defines how a shoot should look before it happens: the lighting, color, composition, pose and expression, styling and location. Each image stands in for a decision, and a short note beside it says what to take from it. It is the document the photographer, stylist, client and talent all agree on, so the shoot day is execution rather than negotiation. In Storyflow it sits on the same board as the brief and the shot list.
How many images should a photoshoot moodboard have?
Aim for fifteen to twenty, where every image is doing a specific job. A portrait or personal-brand shoot can work with eight to ten, because there is one subject and usually one location. More than twenty-five usually means you are collecting rather than deciding. The number matters less than the discipline behind it: each reference maps to one of the six jobs (lighting, color, composition, pose, styling, location) and carries a one-line note explaining why it is there.
What should a photoshoot moodboard include?
Six things: lighting references, color and palette references, composition and framing references, pose and expression references, styling and wardrobe references, and location or set references. Alongside the images, include a one-paragraph brief (what the shoot is for and what each image must do) and a short note beside each reference or cluster explaining its job. The images show the look; the notes turn the look into instructions the photographer, stylist, and client can all act on.
How do you make a moodboard for a photoshoot for free?
You can build a manual photoshoot moodboard for free. Gather references in Pinterest, then build the annotated board in a tool with a free plan: Canva, Adobe Express and VSCO Canvas have free plans, Milanote's free plan allows 100 items and 10 uploads, and PureRef is pay what you want. Storyflow is not free during early access (its Free plan launches before the end of 2026), but anyone a paid member invites to a board joins free, so a crew can work on one photographer's paid board at no cost. What you pay for in Storyflow is the AI that builds the moodboard and shot list from your brief.
What is the difference between a moodboard and a shot list?
A moodboard defines the look and feel of a shoot (lighting, color, styling, mood), while a shot list defines exactly what you capture and in what order on the day. The moodboard is the visual contract; the shot list is the execution plan drawn from it. They are sequential: you build the moodboard first, then translate it into a shot list, because the framing and priority of each shot follow from the look the moodboard established. For the fuller distinction between visual planning artifacts, see Moodboard vs Storyboard: The Complete Guide.
Can AI create a photoshoot moodboard?
Yes. Storyflow's AI builds a first-draft photoshoot moodboard on the board from your brief: it asks whether you want real photographs from a web search or generated images, then places nine to sixteen reference tiles, each a different facet of the look. It can also spot missing jobs, draft the shot list from the moodboard, and tighten your notes. It should not make the final choices: deciding that a candid frame is more on-brand than a polished one is a judgment about the brand, not the pixels. Prefer real photographs as references, because a generated look sets an expectation a real shoot cannot match.
What tool is best for a photography moodboard?
Storyflow is the best tool for a photography moodboard that has to run a shoot, because the AI builds the moodboard from your brief and the same board then holds the shot list and call sheet. Pinterest is best for gathering extra references for free. Canva and Adobe Express are best when the moodboard has to look like a designed client PDF. PureRef is best as a reference wall on shoot day, and Milanote is a solid freeform board for solo work. For a full comparison of moodboard tools built for photographers, see Best Photography Moodboard Tools in 2026 (12 Compared), or the head-to-head of Storyflow, Canva, Milanote and Pinterest for a photoshoot moodboard.
How do I present a moodboard to a client?
Lead with the brief so the client judges the board against the goal, not their personal taste, then walk the six job clusters in order and explain the one decision each cluster represents. Keep it to one shared link so there is a single version to approve, and invite specific feedback ("does this lighting feel right for the brand?") rather than open reactions. The moment a client approves an annotated board, you have a written agreement about the look, which protects everyone on the day. For a deeper method, see How to Present a Mood Board to a Client.
How long does it take to make a photoshoot moodboard?
For a single shoot, budget about ninety minutes: ten minutes on the brief, thirty gathering references, twenty tagging them by job, twenty cutting and arranging, and ten writing the shot-intent notes. The time is front-loaded on purpose, because ninety minutes of planning removes hours of on-set indecision. A larger production with more deliverables scales up, but the ratio holds: the planning time you spend on the board is bought back several times over on the day.
Should a moodboard have text on it?
Yes. The single biggest upgrade to a moodboard is the one-line note beside each reference explaining its job, plus the one-paragraph brief at the top. Images alone say "this feeling"; images with notes say "this feeling, achieved this way," which is the version a photographer can execute and an AI can read. Keep the text short and instructional, not decorative. The point is not to write an essay, it is to remove the guesswork that untagged images leave behind.
Is Storyflow free for building a moodboard?
Not during early access. Storyflow is paid-only for now, with plans from Plus at $7.99/month billed annually, and its Free plan launches before the end of 2026. What is free today is collaboration: anyone a paid member invites to a board signs up free, so a photographer on a paid plan can share the moodboard with the whole crew and client at no cost to them.
Where does Storyflow lose for moodboarding?
In three places, and they are worth naming. Storyflow does not edit, retouch, or grade images, so your final photos still go to Lightroom or Capture One. It is not a digital asset manager, so it is the wrong place to store and version your delivered files. And it is cloud-only, so it does not work offline on a remote location with no signal, where PureRef running locally on a laptop is the better call. Storyflow is the place to plan and decide the look, not to capture, finish, or archive it.
Do professional photographers use moodboards?
Yes, on almost any shoot with a client, a concept, or a crew. The moodboard is how a professional aligns everyone on the look before the day costs money, and it is the document a client approves so the shoot is judged against an agreement rather than a mood. Solo photographers shooting their own personal work often skip the formal board and carry the references in their head, which is fine when they are the only decision-maker. The moment a second person is involved (a stylist, a client, an assistant, talent), the moodboard stops being optional, because it is the only thing that keeps four people shooting the same picture.
What should a photoshoot moodboard checklist include?
Eight to twenty captioned images with explicit exclusions, a technical layer covering lighting, framing and color, a production layer covering wardrobe, hair, makeup, shot count and anything needing sourcing or permission, and delivery as one link that works without an account and reads on a phone. The exclusions line catches the most problems, because anything unsaid gets interpreted on the day.
What does a good photoshoot moodboard example look like?
It varies by shoot type more than most guides admit. A portrait board is six to ten images weighted toward expression and light; a product board is closer to a specification, showing surface, angle and shadow separately; a fashion board is split by discipline because five people read different parts of it; a wedding shoot needs two boards, one for the couple and one working board for the shooter.
How do I create a moodboard for a shoot using VSCO Canvas?
Open Canvas in VSCO, start from the Photoshoot Plan template, search VSCO or upload your own references into it, add text for lighting, styling and location, then invite collaborators by email or share a link with access controls. It is a good mobile-first reference board. If you also need the shot list and call sheet built from the board, Storyflow does that step with its AI.
Can ChatGPT or Claude make a photoshoot moodboard?
On their own they can describe one: a palette, keywords, search terms. Connected to Storyflow through its MCP connector, ChatGPT, Claude, Gemini and Grok can build the actual board in your Storyflow project, with the images placed on the canvas, and then the shot list next to it. The board stays in Storyflow, so the crew opens a link instead of reading a chat transcript.
Is there a free photoshoot moodboard template?
Yes. The template table in this guide is free to copy into any tool: brief, lighting, color, composition, pose and expression, styling, location, a "not this" cluster and a shot-list link. Storyflow's photoshoot moodboard template uses the same structure on a board, and Milanote and VSCO Canvas publish their own photoshoot plan templates.
Who is a photoshoot moodboard actually for?
Whoever has to act on it, which is rarely the person who built it. Naming that reader first changes the board: a subject needs feeling and reassurance, a stylist needs their own labelled section, a DP needs lighting and lens intent, a client needs something that looks finished. Almost every unusable moodboard was made for its author.
Table of Contents
- Which Tool Should You Use to Create a Photoshoot Moodboard?
- Key Takeaways
- What a Photoshoot Moodboard Actually Is (and Is Not)
- What Elements Should a Photoshoot Moodboard Include?
- Quick Picks: Best Tools to Build a Photoshoot Moodboard
- Comparison Table: Photoshoot Moodboard Tools at a Glance
- Frequently Asked: Which Moodboard Tools Photographers Trust, and What They Cost
- Where Each Moodboard Tool's Free Tier Stops
- How the Tools Compare on the Six Jobs
- How I Build a Moodboard: The Approach Behind This Guide
- Tools for Each Step of a Photoshoot Moodboard
- Step-by-Step: How to Create a Photoshoot Moodboard
- Where AI Actually Helps Build a Moodboard (and Where It Does Not)
- A Worked Example: A Portrait Brand Shoot
- What Building a Photoshoot Moodboard Costs
- The Photoshoot Moodboard Checklist
- Photoshoot Moodboard Examples by Shoot Type
- Photoshoot Moodboard Template (Copy This Structure)
- Other Moodboard Tools You Will See Recommended
- Common Mistakes That Kill a Photoshoot Moodboard
- The Fastest Way to Create a Photoshoot Moodboard
- The Bottom Line
- Author
- FAQ: Creating a Photoshoot Moodboard
- Related Reading
Templates to check out for this topic


Filmmaking templates you can use in Storyflow
Skip the blank canvas. Open one of these filmmaking boards in Storyflow and the AI builds on the structure that is already there, from research through the shot list.


See Storyflow in Action
A visual AI workspace where every feature lives inside one canvas. No tab-switching, no context lost.
Build your entire board from a single message
Type what you need in the AI chat at the bottom of your canvas. The AI adds cards, headings, and structure directly onto your board.
Use expert frameworks as AI context
Type @ in the AI chat and choose any Tactic. The AI tailors every response to that framework instead of giving generic advice.
Turn your board into a mind map in seconds
Ask the AI to restructure your canvas as a mindmap. It connects your ideas into a visual hierarchy so you can see how everything relates.
Why Storyflow Exists
Storyflow actually began as a personal tool while working on creative and research projects.
We kept running into the same problem: ideas were scattered everywhere: notes, documents, and whiteboards.
Nothing helped us see how everything connected.
So we started building a workspace designed around how ideas actually grow.
→ Read how Storyflow was createdJustkay
Documentary Filmmaker & Founder at Storyflow
Published: 2026-07-17
Extremely simple, seriously capable


See how easy it is to get started
Watch a real project come together, from a blank board to a finished plan, clicked through step by step.
Start creating with AI and become more productive
Transform your creative workflow with AI-powered tools. Generate ideas, create content, and boost your productivity in minutes instead of hours.