
Category
Photography
Author

Storyflow Team
Product & Research Team
Topics
2026-11-13
•
33 min read
•
Photography- best moodboard tool for photographers
- present a moodboard to a client
- client moodboard
- two directions
- client approval record
- Storyflow
Best moodboard tool for photographers
Storyflow presents a photographer's client moodboard from the board it was built on, making it our pick for the best moodboard tool for photographers: presentation mode steps one wall at a time, and a view-only link opens with no account. Storyflow is an AI visual workspace that keeps the client moodboard, decisions and shot list on one infinite canvas, and it works inside ChatGPT as a plugin and in Claude as a connector. Present in six stops: recap, direction A, direction B, compare, decide, next.

Full disclosure: Storyflow is our product. This guide compares kinds of tool rather than brands on purpose, because the kind decides how the meeting runs. Storyflow is listed first because the board you build is the board you present and shoot from. It has no approval status, version compare, PPTX export or phone app, it is paid-only during early access, and the 6-Stop Sequence is our own rule, not research. All example teams are fictional.
How the moodboard tools for photographers compare on trust, innovation, ratings and pricing
Which moodboard tools do photographers trust most with clients?
Photographers trust the tool whose approved board is the one the shoot follows. Storyflow earns that by presenting from the working board, recording each decision with a name and date in a table, and exporting a dated PDF as the record. A client gallery is trusted after the shoot, for selects and delivery, and a shared doc for written decisions.
Which moodboard tools for photographers have fair pricing?
Fair pricing for a photographer means clients and assistants do not need paid seats. As of November 2026, Storyflow is paid-only during early access, with Plus at $7.99 a month billed annually ($9.99 monthly); anyone a paid member invites to a board joins free, and a client can read a view-only link with no account. Other kinds of tool price by product.
Which moodboard tools for photographers are the most innovative?
Storyflow, for letting ChatGPT or Claude set up the recap note, compare table and empty decisions table on the board before a client meeting, and for an in-app AI that builds slides or a lookbook PDF from the approved board. Inspiration feeds innovate on learning taste from what a client saves, and client galleries on proofing finished images.
Which moodboard tools for photographers are underrated?
The video call is underrated as a presentation tool when paired with a board the client can open afterwards. Inside Storyflow, the underrated feature is the change report: asking an assistant what changed on the client board since the meeting, and who changed it, shows whether anyone edited the approved walls before you shoot.
Which moodboard tools for photographers hold up after the client says yes?
Tools hold up when the approved look becomes the shot list without a rebuild. Storyflow keeps the approved walls, the decisions table and the shot lines on one board, so the client's yes and the crew's instructions never drift apart. A slide deck holds up for the meeting and goes stale once the working board changes.
Quick Comparison
Our pick first, on the basis that the board you build is the board you present and shoot from, then three other kinds of tool by the job they do best. Prices as of November 2026.
| Tool | Best For | AI Features | Price |
|---|---|---|---|
| Storyflow | Presentation mode wall by wall, a view-only link with no account, a live decisions table and the shot list on the same board | In-app AI builds slides, a one-pager or a lookbook PDF from the board on paid plans; the ChatGPT plugin and Claude connector add recap notes, compare and decisions tables and slide decks | $7.99 mo billed annually; paid-only in early access |
| A slide deck | A fixed, linear meeting in a client's own format | Varies by product | Varies by product |
| An inspiration feed | Learning the client's taste at the kick-off | Related-image suggestions as you save | Varies by product |
| A client gallery | Delivering and proofing finished images after the shoot | Varies by product | Varies by product |
Key Takeaways
- Storyflow is our pick for the best moodboard tool for photographers who present to clients, because the board you built is the board you present: presentation mode steps one wall at a time, a view-only link needs no account, and the decisions and shot list stay beside the references.
- The best moodboard tool is the one that gets a decision, not the one with the most templates. Judge a tool by how it presents, records the choice and carries it into the shoot.
- In Storyflow, run the meeting as six stops in about 25 minutes: recap the brief, show direction A, show direction B, compare them on one wall, decide section by section, then agree what happens next.
- Offer two directions, not five. In Iyengar and Lepper's 2000 field study, nearly 30% of shoppers who stopped at a 6-jam display bought, against 3% at a 24-jam display; later reviews found the effect depends on conditions, and a shoot that can be lit one way needs one choice.
- Record the choice on the board in the client's words, with a name and a date, then export a dated PDF. Storyflow has no approval status or version compare, so the decision note and the PDF are the record.
- The async version works when the link arrives with a reading order and a reply format: which walls to look at, in which order, and the three questions to answer.
- The six-stop meeting is our editorial recommendation from meeting logic, not research.
How to Present a Moodboard to a Client in 8 Steps
Present a moodboard to a client from the Storyflow board it was built on, rearranged into meeting order, with a decisions table you fill in while the client watches. Most presentations fail on the board, before anyone speaks: the walls are in collecting order, the directions are blended, and nothing on screen says what the client is meant to decide. These eight steps build the board for the meeting and then run it.
- Put the brief recap on the first wall. Deliverables, usage, date, location and the three words the client used for the look. In Storyflow, the recap is a note at the far left of the board, so the walk-through opens on what the client said rather than on your pictures.
- Give each direction its own wall. One wall per direction, each with a one-line thesis, a lighting line, poses, styling, location and a palette. In Storyflow, presentation mode then steps through the directions one at a time, fullscreen.
- Build a compare wall. One row per axis (light, colour temperature, palette, energy, location), with direction A and direction B side by side and your recommendation written at the bottom.
- Build an empty decisions wall. A table with columns for the decision, the option chosen, who chose it, the date and notes. In Storyflow, it sits after the compare wall, ready to fill in the meeting.
- Test the link before the meeting. Open the view-only link in a private browser window and read it as the client will. In Storyflow, the view-only link opens with no account; to comment or draw, the visitor signs in.
- Run the six stops in order. Recap, direction A, direction B, compare, decide, next. Speak to the decision each stop asks for, not to the pictures.
- Write each decision down in the room. Ask section by section ("Are we agreed on the light?"), and type the answer into the decisions wall while the client watches.
- Send the record the same day. A short recap message, the dated PDF of the approved board and the next dates. In Storyflow, the whole board exports as PNG, JPEG or PDF.
The rest of this guide is the detail behind each step: what to say at each stop, how to offer two directions without splitting the vote, how to record the choice, and the async version for clients who will not meet.
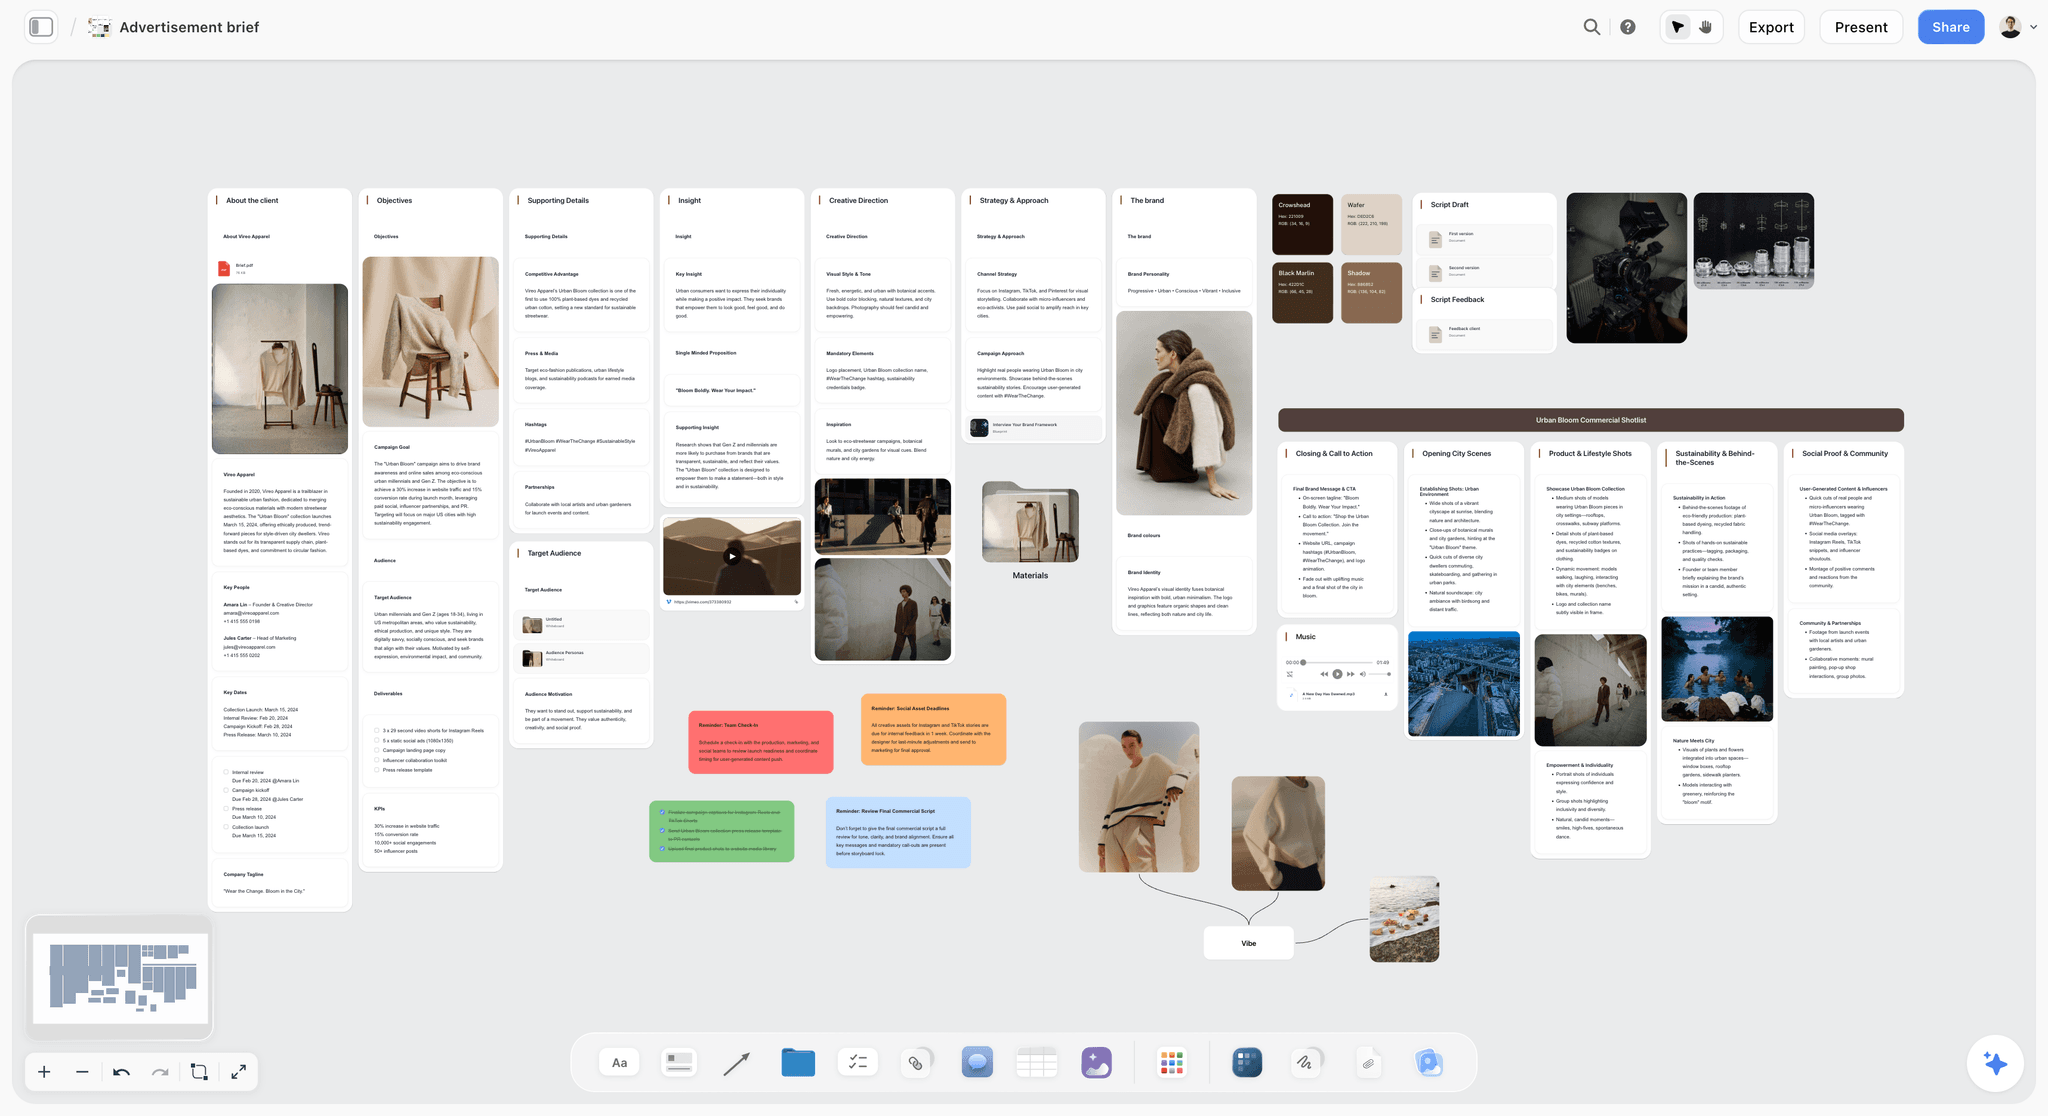
The recap wall in practice: the brief's columns sit at the left of the board, so stop one is the client's own words before any picture appears.
The Storyflow 6-Stop Sequence
The Storyflow 6-Stop Sequence runs a client moodboard meeting as six stops in presentation mode, from the brief recap to the next dates, in about 25 minutes. The familiar approach is to share your screen, scroll the board and ask "What do you think?" That question gets opinions. A moodboard meeting needs decisions, in an order the client can follow, ending on something they agreed.
The rule
Present a client moodboard in Storyflow's presentation mode as six stops (recap, direction A, direction B, compare, decide, next), spending about 25 minutes in total, and end on the decisions wall and the next dates, never on open questions. This is our editorial recommendation, built from meeting logic and the research cited below, not from a study of our own.
Why six stops
Each stop answers one question the client has in the room. Did you hear me (recap)? What could it look like (two directions)? How are they different (compare)? What are we doing (decide)? What happens now (next)? Fewer stops merge two questions and the client answers neither; more stops add pictures the client did not need to see.
Why two directions
Two directions give the client a real comparison without handing them the photographer's job. Iyengar and Lepper's 2000 field study found 60% of passers-by stopped at a display of 24 jams and 40% at 6, but nearly 30% of those who stopped at the smaller display bought, against 3% at the larger one. Wikipedia's choice overload article notes that later meta-analysis ties the effect to conditions, such as no clearly dominant option and unfamiliar choices. A moodboard meeting has both conditions, and a photoshoot can usually be lit one way on the day.
Why the meeting ends on the decision
People judge an experience largely by its most intense moment and its end, the peak-end rule from Fredrickson and Kahneman's 1993 work. A meeting that ends on "any other thoughts?" is remembered as unresolved. A meeting that ends on a filled decisions wall and a shoot date is remembered as a yes.
Timing the stops
| Stop | On screen in Storyflow | What you want from the client | Minutes |
|---|---|---|---|
1. Recap | The brief note: deliverables, usage, date, the client's three words | "Yes, that is the brief" | 3 |
2. Direction A | Direction A wall: thesis, lighting line, poses, styling, place, palette | Questions, not verdicts | 5 |
3. Direction B | Direction B wall, same sections in the same order | Questions, not verdicts | 5 |
4. Compare | The compare wall: one row per axis, your recommendation | A preference and a reason | 4 |
5. Decide | The decisions wall, filled in live | One answer per section, with a name | 5 |
6. Next | Next dates, what you will send, what you need from them | Agreement on dates and owners | 3 |
Client Moodboard vs On-Set Reference Board: What You Present and What You Shoot From
A client moodboard is built to get a decision in a meeting; an on-set reference board is built to answer "what are we matching?" in seconds, and in Storyflow they are two stages of the same board: the presentation walls before the yes, the setup walls after it. Presenting the set board loses the client in lens notes; shooting from the client board loses the assistant in options.
| Client moodboard (presented) | On-set reference board (shot from) | Where it lives in Storyflow | |
|---|---|---|---|
The question it answers | "Which look are we making?" | "What are we matching in this setup?" | Direction walls before the meeting; setup walls after it |
Directions shown | Two, side by side | One, the approved one | Rejected direction kept on its wall, titled as not chosen |
Captions say | What the client is deciding ("this warmth, not this crop") | What the crew does ("window left, no fill, 50 mm feel") | A caption under each image, rewritten after the yes |
Order | Presentation order: recap, A, B, compare, decide, next | Shoot order: setup 1, 2, 3 | Walls arranged left to right in the current order |
Who speaks over it | You, in the meeting | Nobody: it must stand alone | Presentation mode for the meeting; a PDF on a phone for set |
How it is opened | Shared screen or a view-only link with no account | A PDF export or the link, wherever signal allows | View-only link, or a PNG, JPEG or PDF export |
What gets written on it | The decisions, in the client's words | Setup numbers and shot lines | A decisions wall, then shot cards or a shot-list table |
When it is finished | When the decisions wall has a name and a date | When the last setup wraps | The decision note plus a dated PDF export |
Present the decision, not the toolkit. Lens notes and setup numbers belong on the board after the yes. A mood board, in the general sense, is a collage that conveys an idea or feeling; a client moodboard has to convey a choice. Our photography moodboard software guide covers what each board needs from the software, and the shot list conversion guide covers turning the approved walls into shot lines.
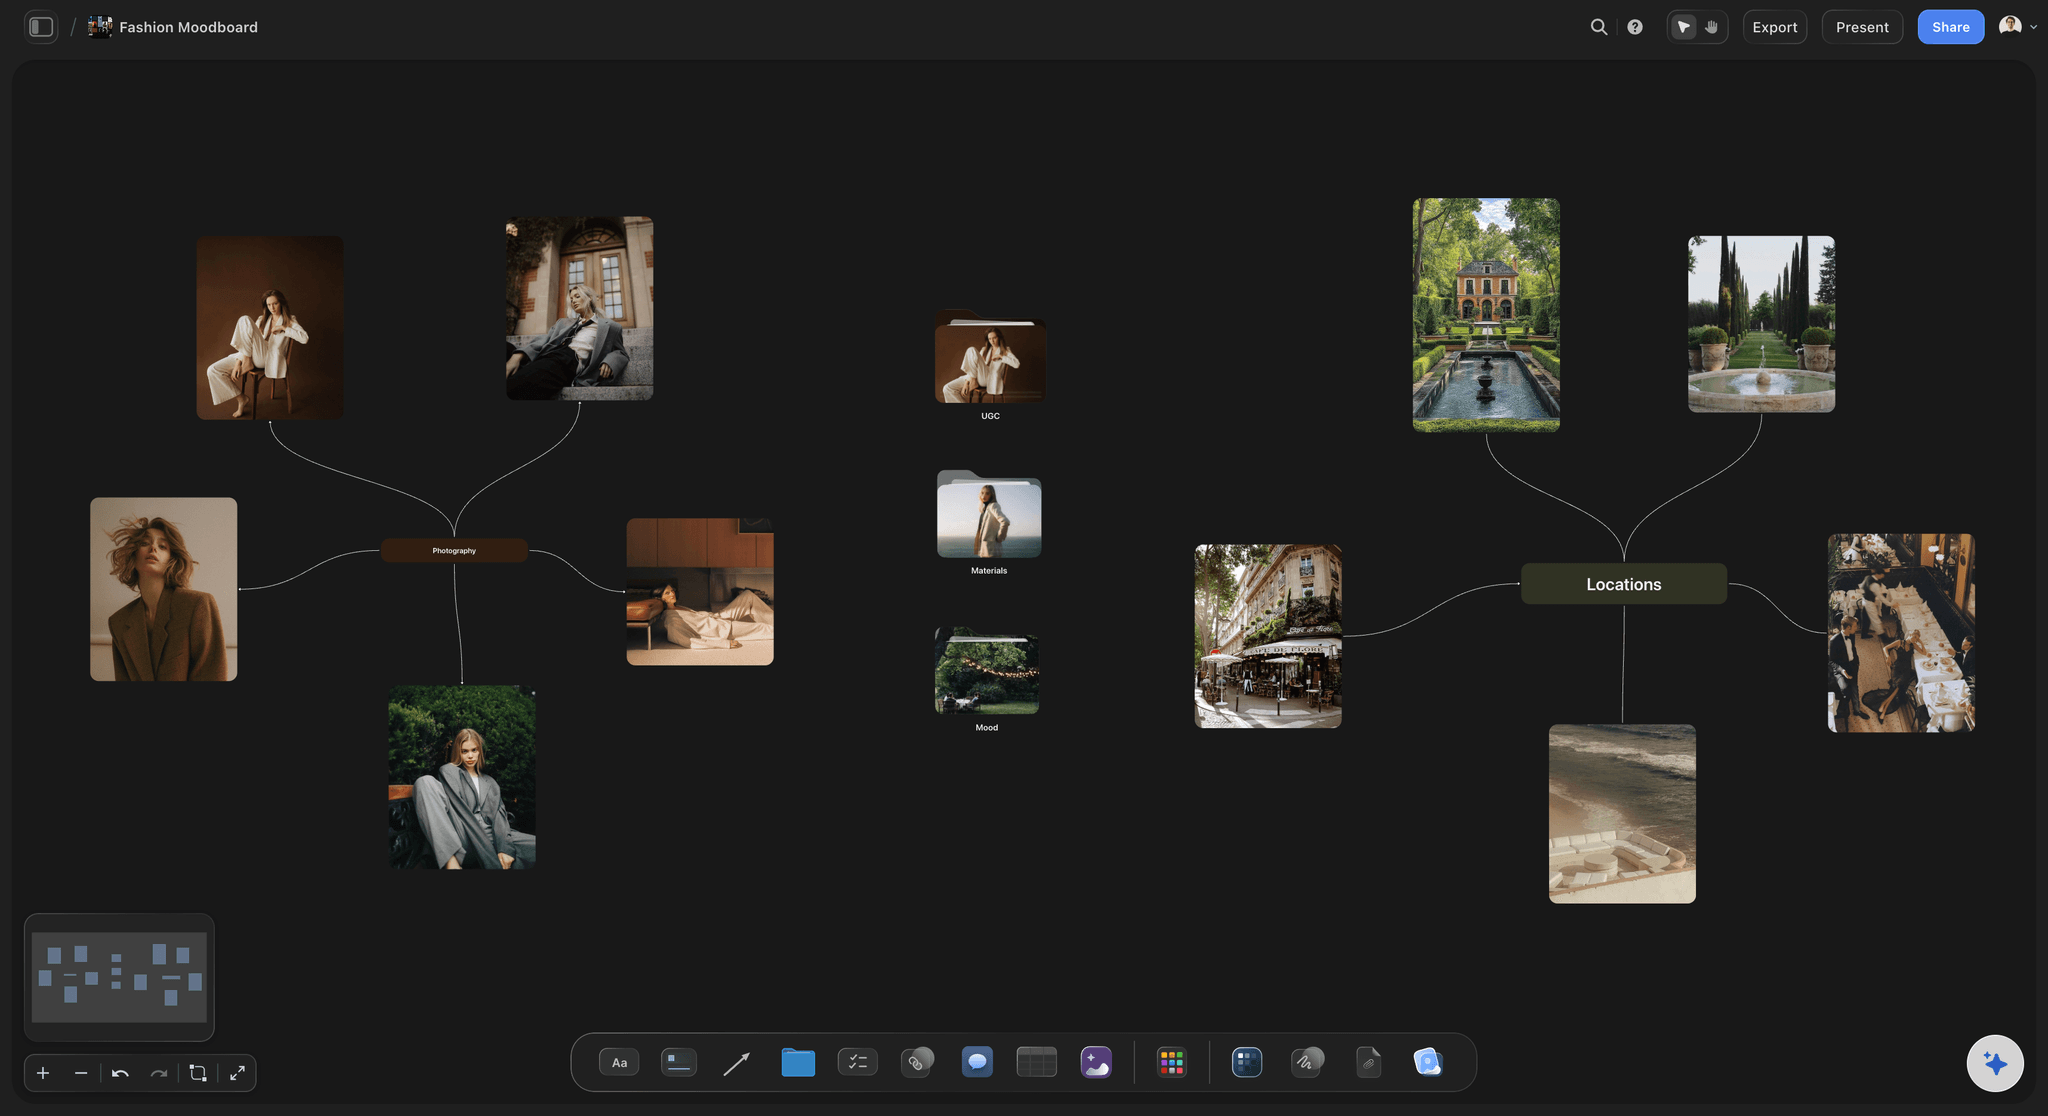
A direction wall before the meeting: references grouped by what the client decides (photography, locations), with captions written for the client rather than the crew.
Before the Meeting: Build the Board for Presenting
The board you collected on is in the order you found things. The board you present is in the order the client decides things. Rearranging it takes an hour and saves the meeting.
Order the walls left to right
Recap, direction A, direction B, compare, decisions, next. In Storyflow, arrange the walls in that order so anyone scrolling the view-only link meets them that way, and step through them in the same order in presentation mode. Put your research and holding walls to the right of "next", titled as not part of the presentation.
Write a one-line thesis for each direction
"Morning Counter: soft daylight, the bar at opening time, the product in hands." "Roastery Night: hard practicals, steam and metal, the product in the process." A thesis is what the client repeats to their boss after the meeting, so make it short enough to repeat.
Make the two directions differ on two axes
If they differ on everything, the client cannot tell what they are choosing between. If they differ on nothing, the choice is fake. Pick two axes (light quality and location, or colour temperature and energy) and hold the rest constant: the same subject, the same deliverables, the same palette logic.
Put your recommendation on the board
Write it at the bottom of the compare wall, with the reason in one sentence. Clients pay for judgment, and a photographer who will not recommend leaves the client to guess which direction you would rather shoot.
Test the link, then export a pre-meeting PDF
Open the view-only link in a private browser window and check every wall reads without you. Export a PDF as well, so a dropped connection does not end the meeting: Storyflow is an online app and needs an internet connection (offline support).
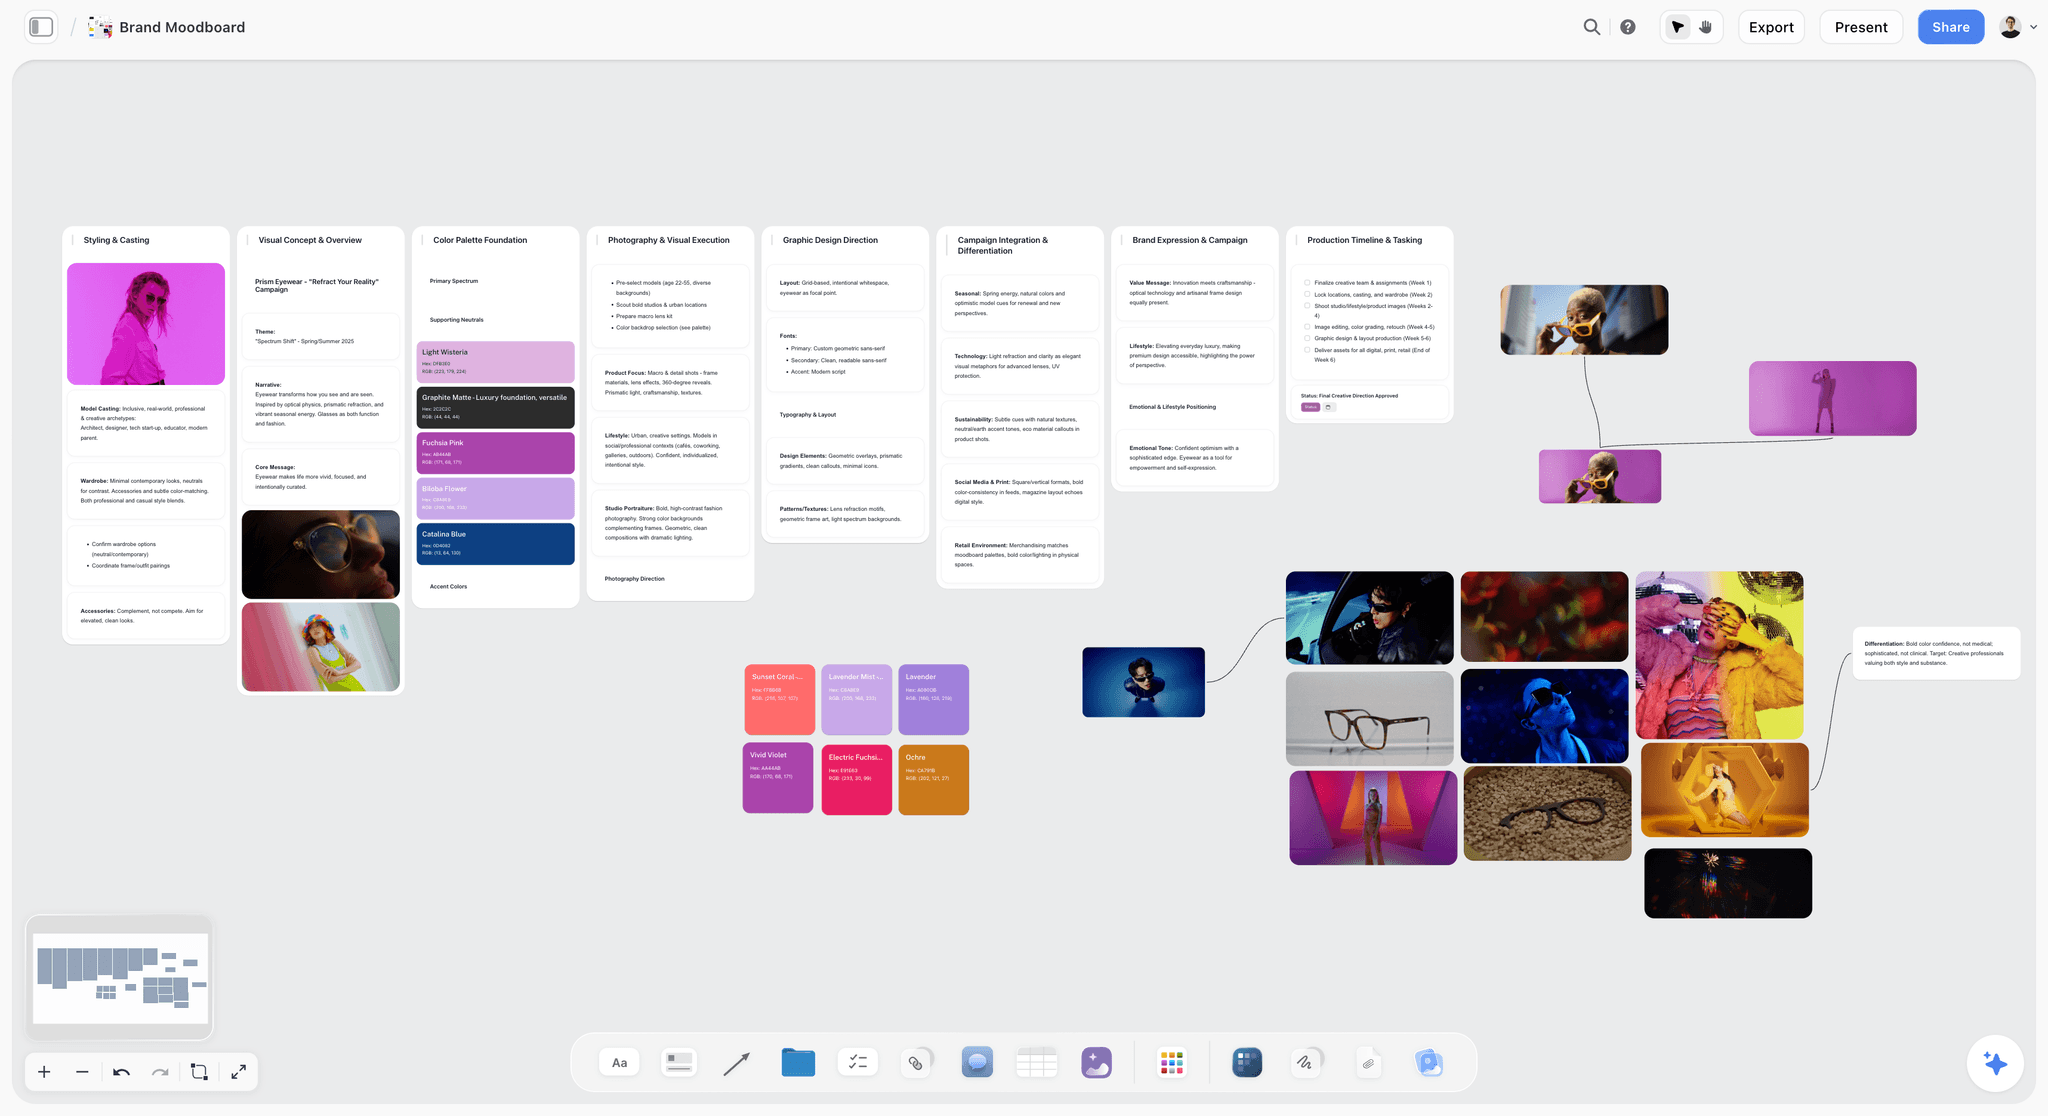
A board ordered for presenting: each column is a decision with its heading and note first, so the client reads what they are choosing before the examples.
Stop by Stop: What to Say
These are the lines that work at each stop. Adapt the words, keep the job each line does.
Stop 1: Recap the brief in the client's words
Open on what they said, not what you made. "You told us three things: the portraits have to feel like the shop at opening time, they run on the website and the menu boards, and the shoot is one morning in March. Is that still right?" Wait for the yes. If the brief has moved, you learn it before the pictures, not after.
Stop 2: Direction A, sections in a fixed order
Walk the direction in the same order every time: thesis, light, poses, styling, place, palette. "This is Morning Counter. The light is the front windows, soft, daylight. The staff are working, not posing. Aprons in the oat colour. The counter at seven. These four colours." Ask for questions, not verdicts: "What would you need to know to picture this on your website?"
Stop 3: Direction B, same sections, same order
The fixed order is what makes the comparison fair. "This is Roastery Night. The light is the roaster's practicals, hard and warm. The staff are mid-process. Dark aprons. The roasting room after close. These four colours." If the client starts choosing now, note it and move on; the compare stop is where the choice belongs.
Stop 4: Compare on one wall
"Here they are side by side on the two things that actually differ: the light and the place. Everything else is the same." Then give your recommendation and the reason: "We recommend Morning Counter, because your menu boards are bright and the roastery shots would fight them." Ask for a preference and a reason, not just a preference.
Stop 5: Decide section by section
"Are we agreed on the direction? On the light? On the styling? On the palette? On the place?" Type each answer into the decisions wall as it is given, with the person's name. A borrowed element ("We like the steam from B") gets its own line, so it is a decision, not a vague wish.
Stop 6: Next steps, then stop
"Today you will get this board as a PDF with the decisions on it. By Friday you will get the shot list. We need the staff list and the release forms by the 10th." Then end the meeting. New ideas raised after this stop go on a list for the next conversation, not into the decisions wall.
| Stop | A line that gets opinions | A line that gets a decision |
|---|---|---|
1. Recap | "So, I've been playing with some ideas" | "You told us three things. Is that still right?" |
2. Direction A | "Isn't this gorgeous?" | "What would you need to know to picture this on your site?" |
3. Direction B | "Or we could go totally different" | "Same sections, same order: here is Roastery Night." |
4. Compare | "Which one do you like?" | "They differ on light and place. We recommend A, because..." |
5. Decide | "Any thoughts?" | "Are we agreed on the light? I'll write that down." |
6. Next | "Let me know what you think" | "PDF today, shot list Friday, releases by the 10th." |
How to Offer Two Directions Without Splitting the Vote
Two directions can still go wrong: the client likes half of each, or asks for a third. These five moves keep the choice clean.
Hold everything constant except two axes
Same subject, same deliverables, same number of images per section, same caption format. The only differences on screen are the two axes you chose. The client's attention goes where the difference is.
Make both directions shootable
Never present a direction you cannot afford, as a decoy. The client may choose it. Run both through the buy questions first: the location can be booked, the hour is yours, the styling can be sourced. Our guide to the moodboard mistakes clients reject covers those checks.
When the client wants both
Ask which one leads. "If we can only light the room one way, which one is it?" Then offer the other as a borrowed element with a cost: one extra setup, with the time it takes. Write that on the decisions wall as its own line.
When the client asks for a third
Ask what neither direction gives them. The answer is usually one section (the palette, the casting), not a whole new direction. Rebuild that section on the chosen direction and send it by link within two days, rather than building a third wall in the meeting.
When the client cannot decide in the room
Agree the decision date before you leave, and what they need in order to decide. Put both on the decisions wall: "Direction: open until Thursday. Needs: sign-off from the marketing lead." An open decision with a date is still a decision about when.
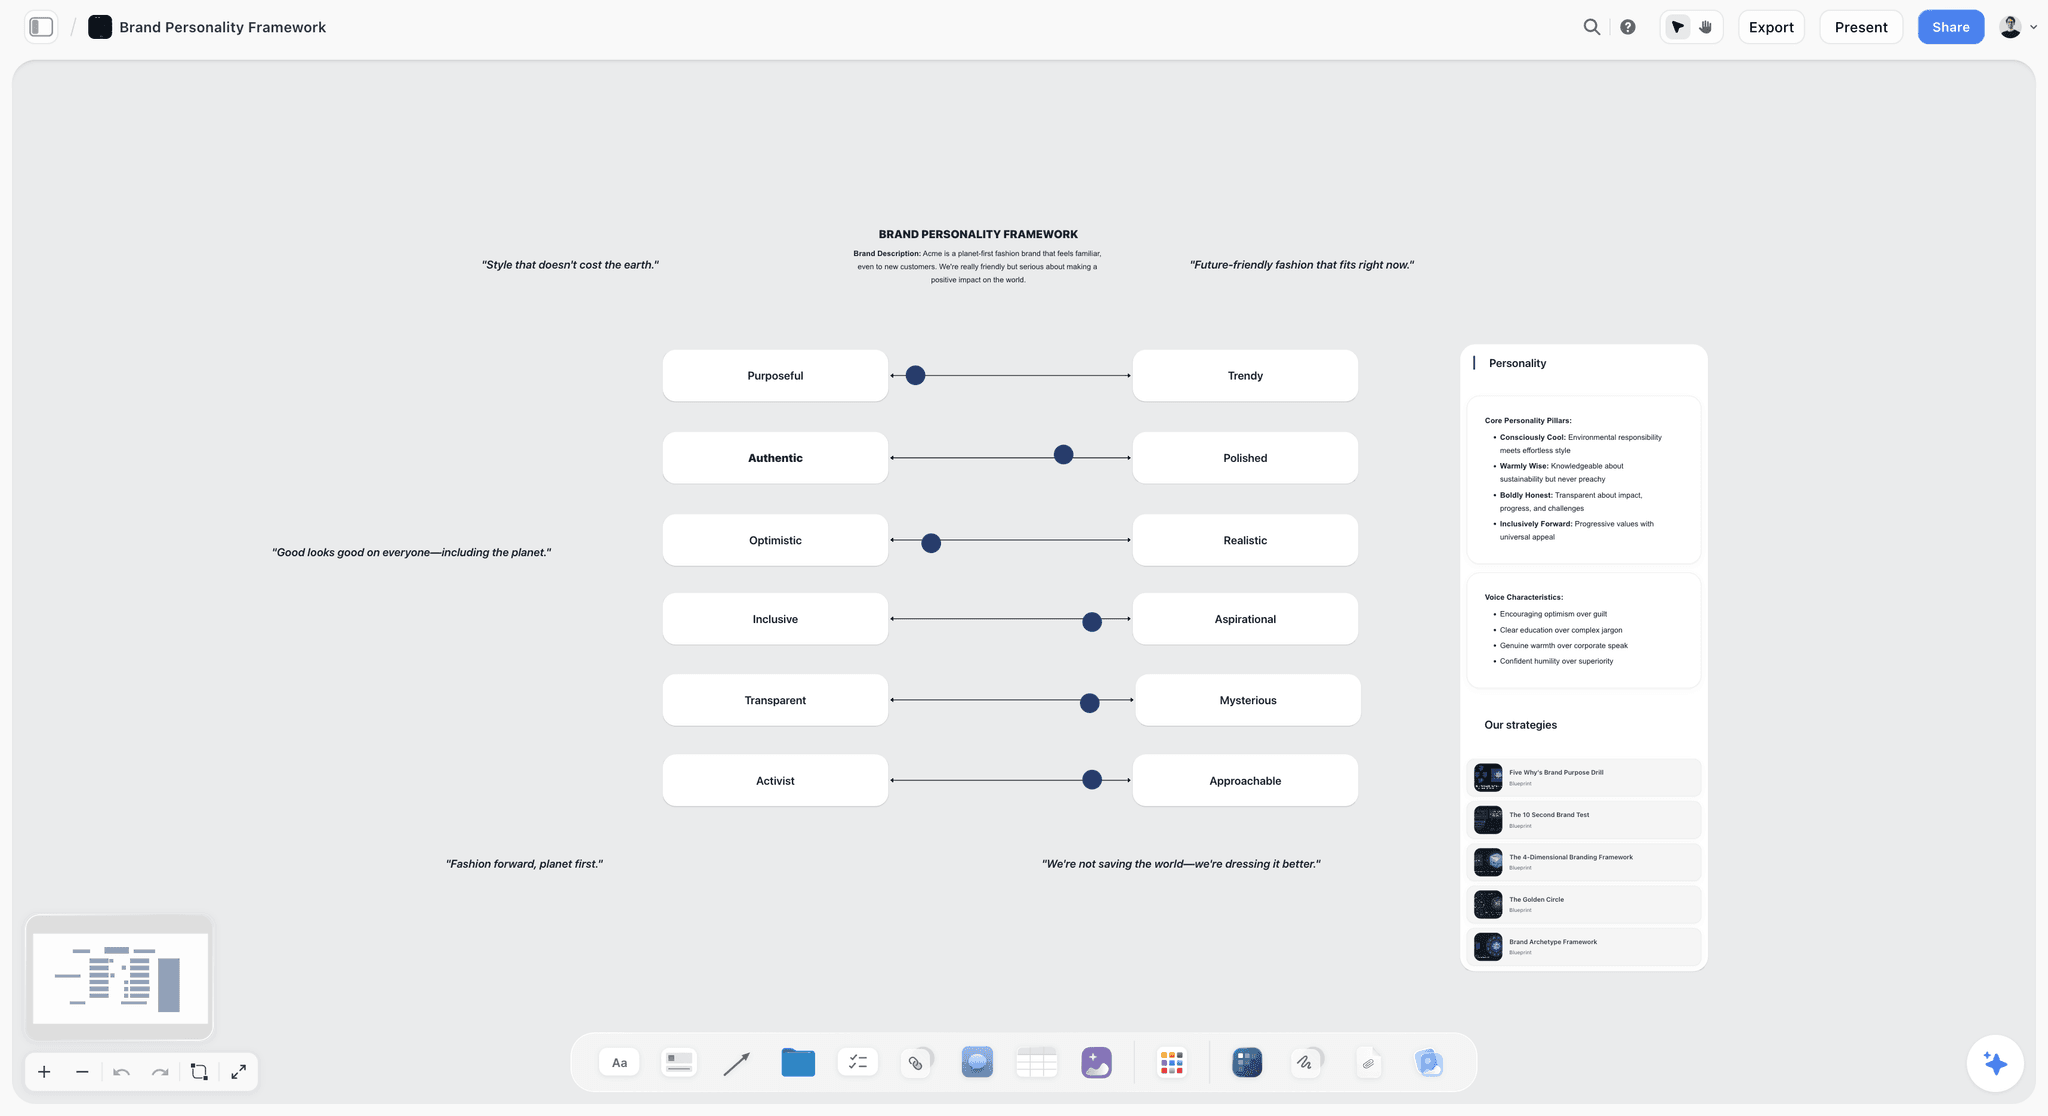
The compare wall as sliders: each row is one axis, and each direction sits at a point on it, which makes the difference visible without another picture.
Handling Objections in the Room
Five objections come up in most moodboard meetings. Each has an answer that keeps the decision moving instead of reopening the brief.
"Can we just recreate this exact photo?"
No, and say why in one sentence: the reference is another photographer's work. The US Copyright Office's Circular 42 says copyright in a photograph protects the photographer's choices of subject, positioning, lens, camera placement, angle, lighting and timing, so a close recreation copies exactly what is protected. Offer the job instead: "We will take the window direction and the warmth, in your space, with your people." The Office's fair use index says fair use is decided case by case, which is not a risk to put on a client's website.
"It looks too dark" or "too warm"
This is usually a reading of one picture on one screen, not a problem with the direction. Ask which picture, then explain the light in plain numbers: daylight sits around 5,500 to 6,500 K and reads neutral to cool, while studio tungsten sits around 3,200 K and reads warm (colour temperature). Offer to move one setting, such as more fill or a cooler balance, and write that change on the decisions wall rather than switching direction.
"My boss needs to see it"
Ask what the boss decides on (budget, brand or risk) and add a line to the decisions wall: "Final approval: name, by date." Send the view-only link with the five-line covering message from the async section, and offer the boss 15 minutes on the compare and decide stops only.
"What would both directions cost?"
Have the answer on the board before anyone asks. Write the second direction's cost as the compare wall's last row, in setups and time ("Roastery Night adds one setup, about 45 minutes, in the roasting room"), so the cost is part of the comparison rather than a surprise after it.
"Can we skip the moodboard and just shoot?"
For a small repeat client, sometimes. Say what the board protects: the light and styling decisions that otherwise get made on the day, at day rates, by whoever speaks first. Offer the short version instead: recap, one direction and the decisions, in ten minutes.
How to Record the Choice: A Decisions Template You Can Copy
A yes in a meeting fades within a week. A decisions wall with names and dates does not. This is the wall for the worked example below (Brightwater Studio, a fictional photographer, shooting for Halyard Coffee, a fictional roaster), filled in live during stop 5.
| Decision | Option chosen | Chosen by | Date | Notes |
|---|---|---|---|---|
Direction | Morning Counter | Ana Ruiz, marketing lead | 4 March | Recommended option |
Borrowed element | Steam detail from Roastery Night | Ana Ruiz | 4 March | One extra setup in the roasting room |
Light | Front windows, soft, daylight | Ana Ruiz | 4 March | Ceiling spots off during portraits |
Colour temperature | Daylight, around 5,500 K | Priya, photographer | 4 March | Practicals off or gelled |
Staff styling | Oat aprons, own clothes in palette | Tom Hale, owner | 4 March | No logos on clothing |
Palette | Oat, espresso, copper, chalk | Ana Ruiz | 4 March | Copper as accent only |
Location | The bar at 07:00, before opening | Tom Hale | 4 March | Shop opens at 08:30 |
Deliverables | 10 portraits, 8 product-in-hand, 4 wide | Ana Ruiz | 4 March | Website and menu boards |
Out of scope | Latte art close-ups, posed group shot | Ana Ruiz | 4 March | Moved to a later brief |
Releases | Six staff, signed on the day | Tom Hale | 4 March | Forms sent with the recap |
Shot list due | 8 March | Priya | 4 March | Sent by view-only link |
Shoot date | 14 March | Tom Hale | 4 March | Confirmed in the recap message |
In Storyflow, build this as a table on the decisions wall. When an assistant or the in-app AI fills a person column named Owner or Assignee, it uses people who already have access to the board; if any name matches nobody, the whole column becomes plain text with the names kept as written, which is fine for a client record.
Why names and dates
"We agreed on the light" is an opinion three weeks later. "Ana Ruiz agreed the front-window light on 4 March" is a record. Names also tell you who to ask when the decision is questioned by someone who was not in the room.
Why the record is a PDF as well
Storyflow has no approval status or version compare. A live board can still be edited after the meeting, so export the board as a dated PDF once the decisions wall is filled. The PDF is what you point to; the board is what you keep working on.
The Async Version: Presenting by View-Only Link
Some clients will not meet, and some decisions involve a boss who was not on the call. The link has to do the presenting, which means it needs the words you would have said.
The covering message
Keep it to five lines: what the board is, the order to read it in, what you recommend, the three questions to answer and the date you need answers by. "This is the moodboard for the March shoot. Read the walls left to right: recap, Morning Counter, Roastery Night, compare. We recommend Morning Counter. Please answer three questions by Thursday: which direction, anything to borrow from the other, anything on the 'not this' wall you disagree with."
A reading-order note on the board
Put a note at the top of the recap wall: "Start here. Read left to right. Stop at the compare wall." A view-only visitor can pan and zoom freely, so the note is what turns a canvas into a sequence. The view-only link opens with no account (what view-only visitors see).
The reply format
Ask for answers in a numbered reply, one per question, and keep it to three questions: Cowan's 2001 review in Behavioral and Brain Sciences puts short-term memory at about four chunks, and a client reading on a phone between meetings holds fewer. If you want comments on the walls themselves, invite the client to the board instead of sending the view-only link: anyone a paid member invites joins free, and commenting needs a signed-in visitor (inviting collaborators).
Chasing without nagging
If the date passes, send one line that restates the single most important question: "Which direction, Morning Counter or Roastery Night?" A single question gets answered; the original five-line message gets re-read and parked.
When async fails, call
Two rounds of written questions without a decision means the decision has a hidden owner. Ask who else needs to see it, and book 15 minutes with them on the compare and decide stops only.
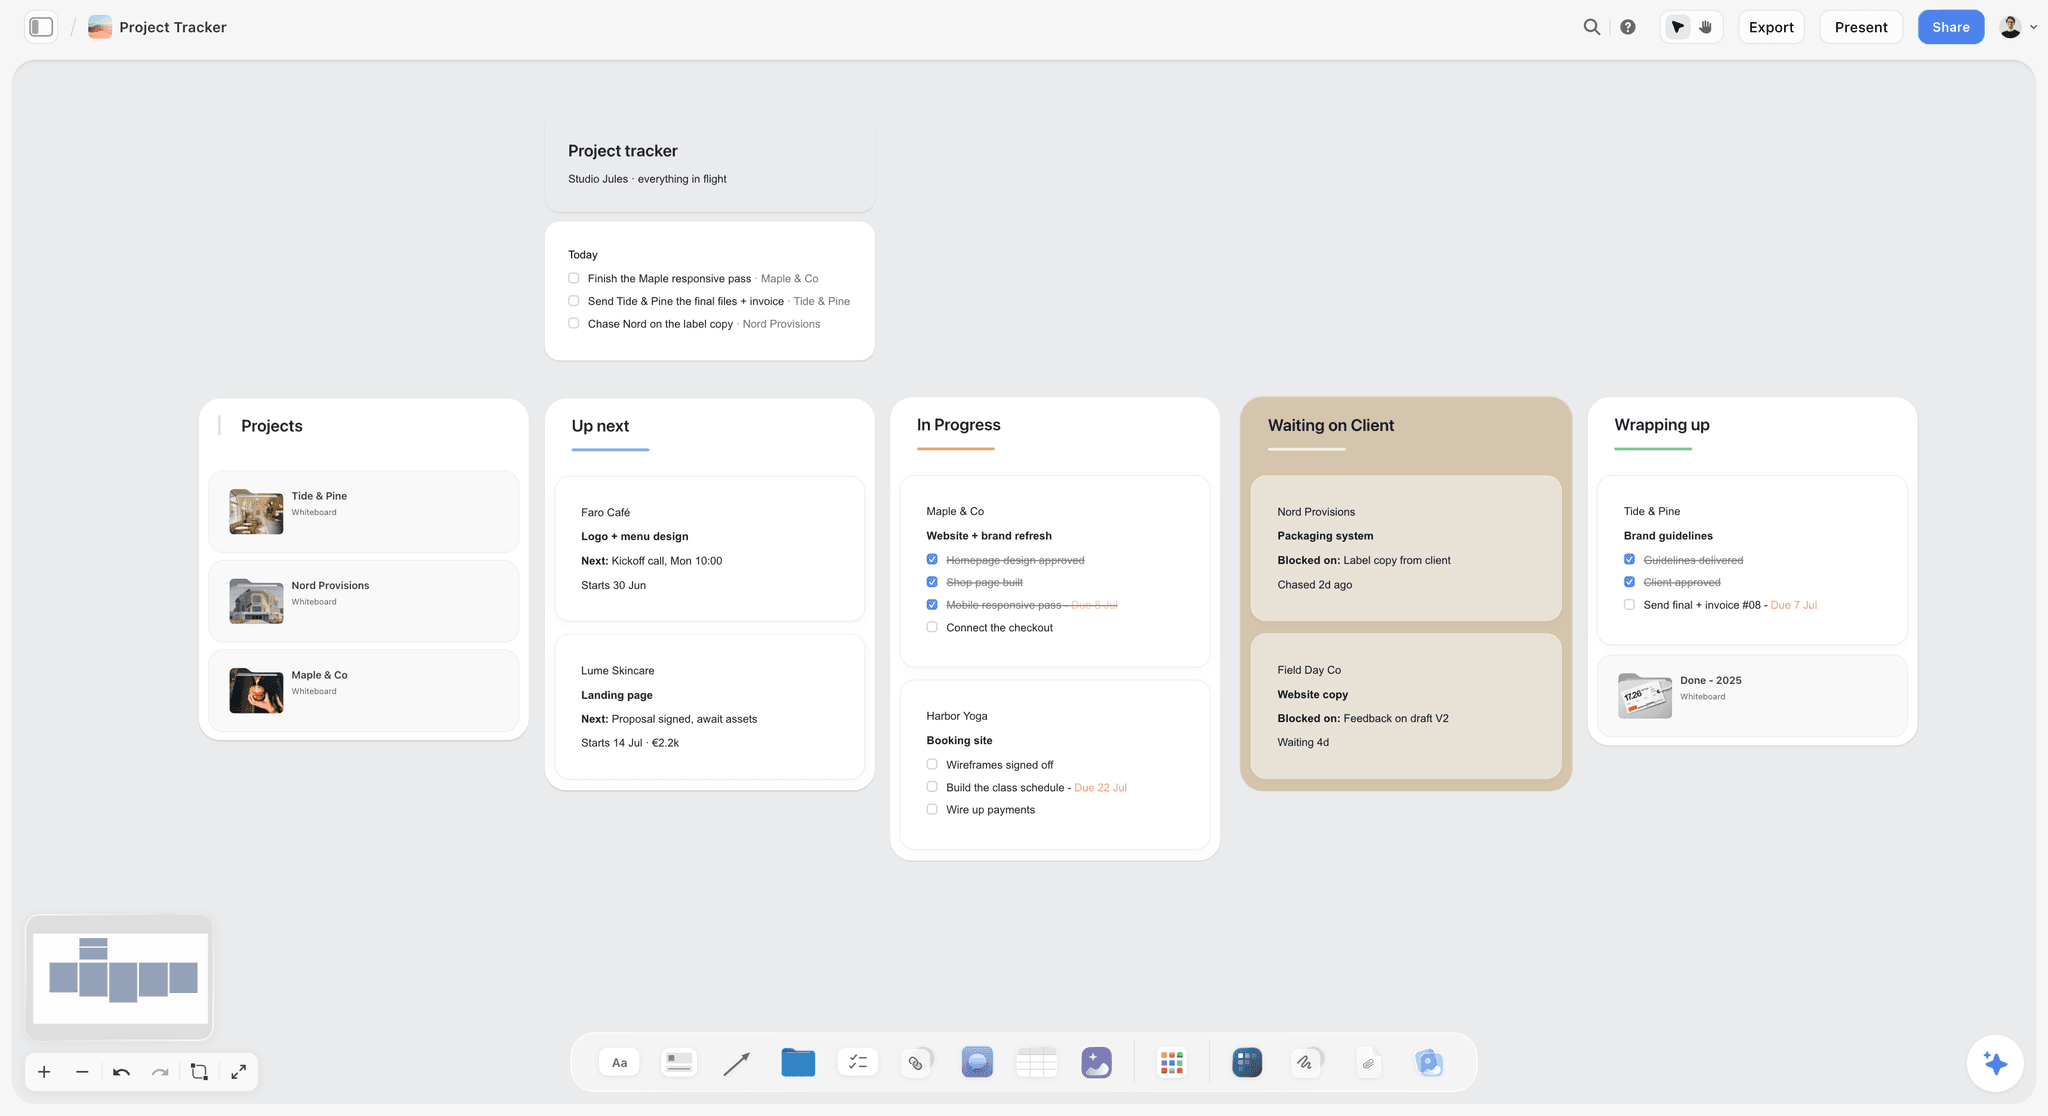
An async presentation in the studio's tracker: the card sits in "waiting on client" with the exact question and the date it is due, not a vague "feedback pending".
What to Send After the Meeting
The meeting is not over until the client has the record in writing. Send these the same day.
The recap message
Three lines: the direction chosen and by whom, what was borrowed, and the next two dates. Paste the decisions wall's key rows into the message so the client has them without opening anything.
The dated PDF
Export the approved board with the filled decisions wall as a PDF and name it with the date ("Halyard moodboard approved 4 March.pdf"). It is the version you point to if the look is questioned later.
The release forms and the usage terms
A model release is generally needed when a person's likeness is used commercially, and ASMP notes that a signed release is what lets a photographer license images commercially. Send the forms with the recap so they are signed on the day. Restate the usage the fee covers; ASMP's licensing guide sample terms frame fees as covering only the uses agreed for the assignment.
The shot list preview
If the shot list is ready within a few days, say when. The shot list is where the approved references become lines the crew works from, and it is the next thing the client should see. In Storyflow, it sits on the same board, beside the approved walls.
What not to send from Storyflow
Storyflow does not do contracts, e-signature, invoices or payments, and it does not send call sheets. Send those from the tools you use for them, and link the board in the message.
Worked Example: Two Directions for a Coffee Roaster
The studio, client and people are fictional, and the example is illustrative. Priya Nandakumar runs Brightwater Studio, a one-photographer studio with a freelance assistant. Halyard Coffee, a roaster with one shop, wants staff portraits and product-in-hand images for its website and menu boards, shot one morning before opening.
The brief Priya recapped
Deliverables: 10 portraits, 8 product-in-hand images and 4 wide shots of the shop. Usage: website and printed menu boards for two years. Date: one morning in March, before the 08:30 opening. The client's three words: "honest, early, warm".
The two directions
Morning Counter: soft daylight from the front windows, staff working at the bar, oat aprons, a pale palette. Roastery Night: hard warm practicals in the roasting room, steam and metal, dark aprons, a deep palette. They differed on two axes, light quality and place. Everything else (subjects, deliverables, caption format) was held constant.
The meeting, stop by stop
The recap got a yes and one correction (the menu boards are printed, so the images need to work on paper). Direction A drew a question about the staff's own clothes. Direction B drew the reaction "I love the steam". At the compare stop, Priya recommended Morning Counter because the printed menu boards are pale and the roastery palette would fight them. The marketing lead chose Morning Counter and borrowed the steam, which went on the decisions wall as one extra setup.
What went out that afternoon
The recap message, the dated PDF and the release forms. The shot list followed four days later on the same board, built from the approved walls, and the owner confirmed the shoot date in reply.
| When | Step | What changed on the board |
|---|---|---|
Day 1 | Brief call | Recap note written with the client's three words |
Day 3 | Two directions built | Two direction walls, each with a thesis and lighting line |
Day 4 | Compare wall and empty decisions wall | One row per axis, recommendation written |
Day 5 | Link test and pre-meeting PDF | Reading-order note added to the recap wall |
Day 5 | 25-minute meeting | Decisions wall filled live, names and dates |
Day 5 | Recap sent | Dated PDF exported; release forms attached |
Day 9 | Shot list | Shot lines built beside the approved walls |
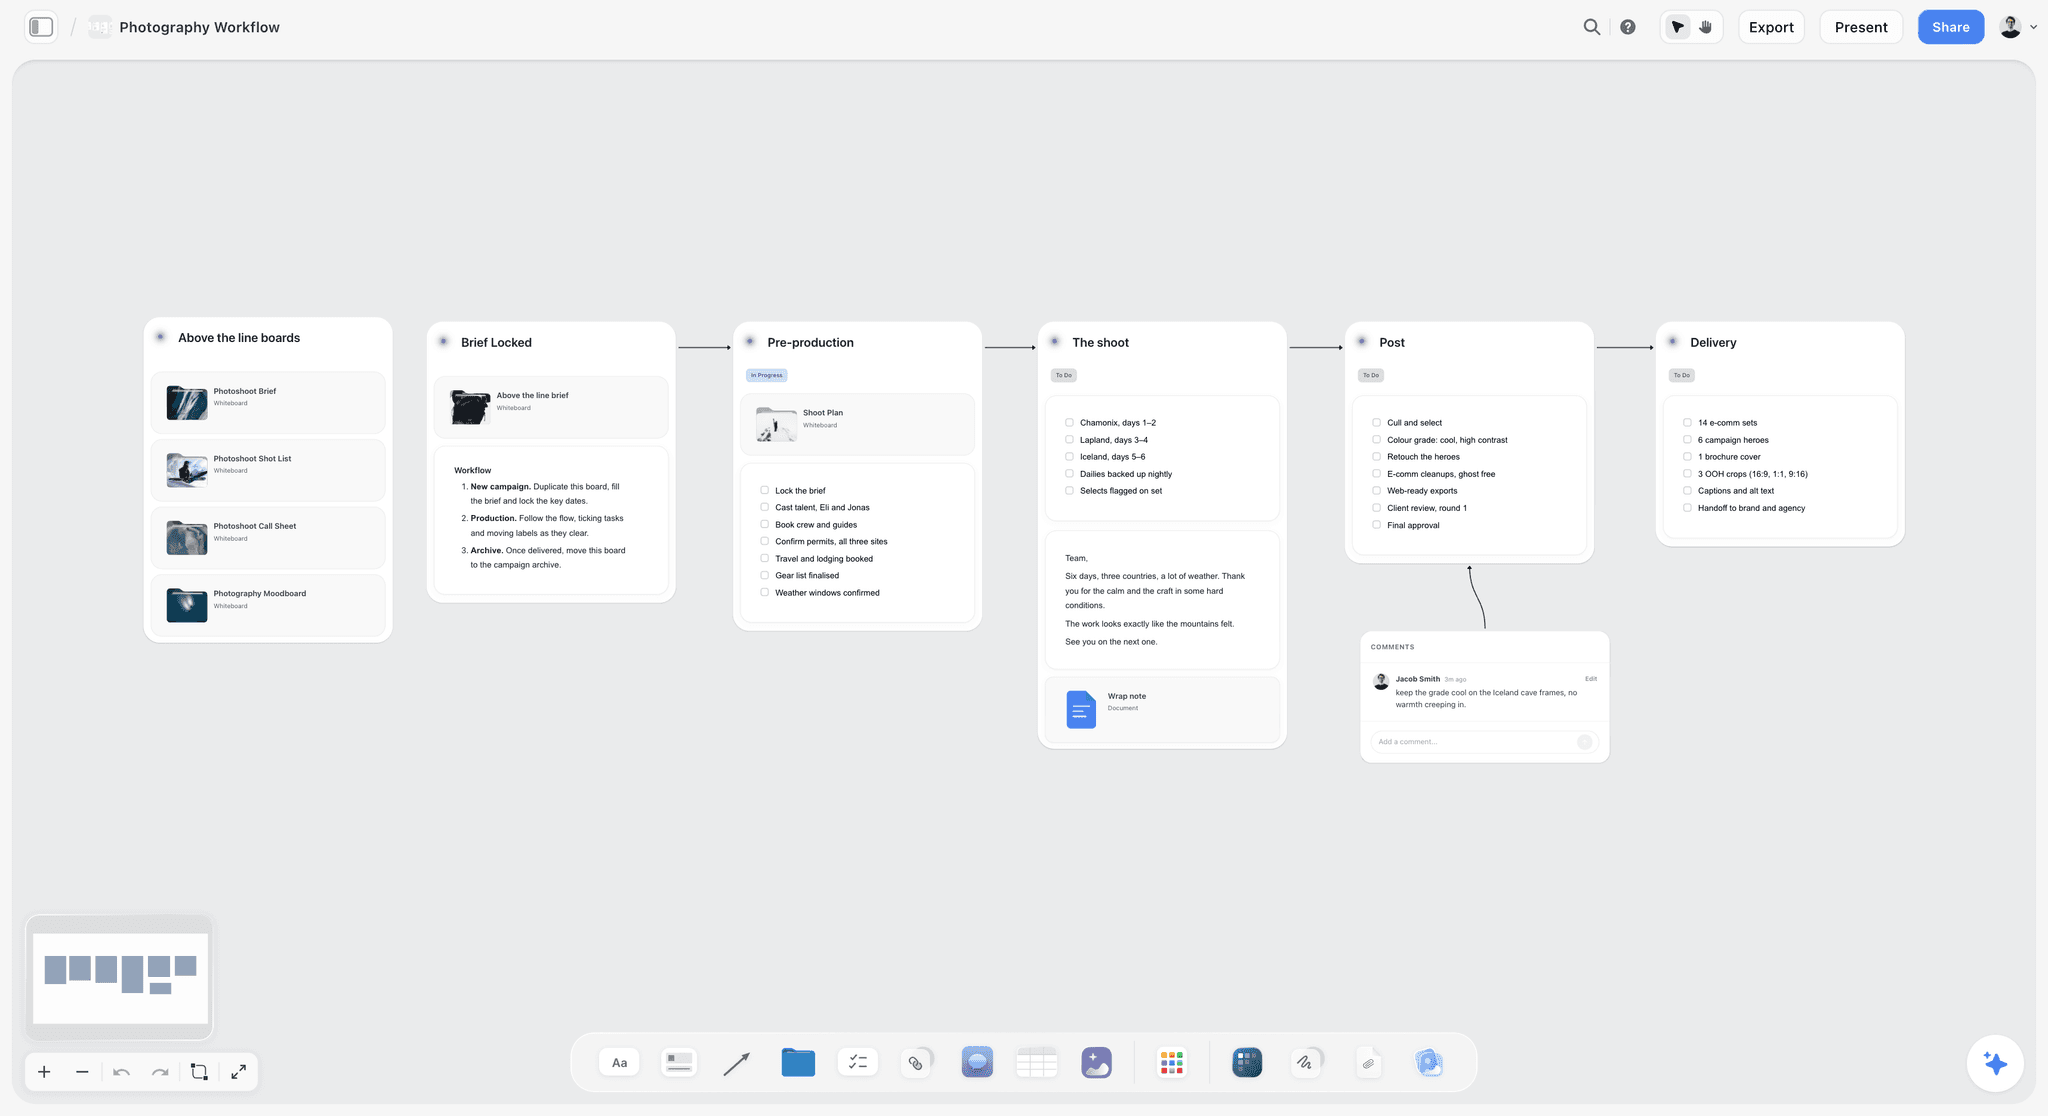
Where the presentation sits in the whole job: after the brief locks and before pre-production, with the comment thread holding the client's questions.
Features That Matter When You Present a Client Moodboard
Feature lists for moodboard tools run to dozens of items. For a photographer presenting to a client, eight decide whether the meeting ends in a yes. This is how Storyflow covers each one, and what to check in any tool.
| Feature | Why it matters in the meeting | In Storyflow |
|---|---|---|
Presentation mode | The client sees one decision at a time, fullscreen | Steps one wall, note, image or document at a time |
Link with no account | Nobody loses ten minutes to a sign-up | A view-only link opens with no account |
Comments and drawing | The client can point at the exact picture | Signed-in visitors comment and draw |
Image organisation | Two directions stay separate and comparable | Walls group images; captions sit under each image |
Colour palette | Palette decisions are explicit, not implied | Colour swatch elements with names |
Decisions record | The yes survives the week | A table on the decisions wall, plus a PDF export |
Collaboration | Your assistant and stylist work on the same board | Real-time co-editing on paid plans; invitees join free |
Carry-over to the shoot | The approved look becomes the shot list | Shot cards or a shot-list table on the same board |
Pricing shapes collaboration more than any feature. In Storyflow, the photographer who owns the boards needs a paid plan, and the people they invite to a board join free. Plus is $7.99 a month billed annually ($9.99 monthly), Pro is $14 billed annually ($19 monthly) and adds AI image generation, and Max is $39 billed annually ($49 monthly) with a Team Workspace (pricing).
Do This in ChatGPT or Claude
If you prepare presentations in ChatGPT or Claude, the assistant can set up the presentation board on Storyflow while you choose the pictures and say the words. This is the Storyflow plugin in ChatGPT and the Storyflow connector in Claude, separate from the AI inside Storyflow.
Install it once
In ChatGPT, open the Storyflow listing, select Install plugin, sign in to Storyflow and choose which projects ChatGPT may use (all, or the ones you pick). Read access is always on; you decide whether ChatGPT may also make changes, and ChatGPT's own permission settings, such as Always ask or Allow read actions, decide when it asks before acting (OpenAI's app permissions help). Mention it with @ in a chat or pick it from the + menu (plugins in ChatGPT). Availability depends on your ChatGPT plan, workspace and region. In Claude, add a custom connector with the address https://mcp.storyflow.so/mcp under Customize, then Connectors, and switch it on in a chat from the + menu (Anthropic's connector help). Storyflow's setup page covers each assistant. The plugin runs on ChatGPT's own model and your ChatGPT plan, so its actions use no Storyflow AI credits.
Prompts for a presentation board
- "Read my Halyard moodboard board and tell me which walls exist, left to right."
- "Add a recap note at the far left with these deliverables, the usage, the date and the client's three words: honest, early, warm."
- "Make a compare wall with a table: rows for light, colour temperature, palette, energy and place; columns for Morning Counter and Roastery Night."
- "Create a decisions wall with a table: Decision, Option chosen, Chosen by, Date, Notes. Leave the rows empty."
- "Make a slide deck from the two direction walls, one slide per section, in the same order for both."
- "Add a note at the top of the recap wall that says: Start here. Read left to right. Stop at the compare wall."
- "What changed on this board since Monday, and who changed it?"
- "Add to-dos for the release forms and the shot list with these due dates."
What lands, and what to check by hand
The notes, walls, tables, to-dos and a slide deck land on the Storyflow board; the deck presents fullscreen and exports as PDF, with no PPTX export and no speaker notes. Photos attached in the ChatGPT chat do not reach Storyflow; ask for an upload link for the board instead. The plugin cannot read the board's comments, so read the client's comments on the board yourself. Check by hand that both directions use the same section order, that the recommendation is yours, and that the decisions table is empty before the meeting. The ChatGPT client presentation page and the Claude version show the same flow.
The assistant prepares the board from the chat; the client meets it on the canvas, in presentation mode or by link.
Where to Build It: Storyflow vs Other Kinds of Tool
Storyflow comes first on one basis: the board you build is the board you present and the board you shoot from, with a view-only link that needs no account. The other kinds of tool follow by the job they do best. We compare kinds of tool rather than brands on purpose, because the kind decides how the meeting runs.
| Kind of tool | Best at | Where it stops for a client moodboard presentation | Choose it when |
|---|---|---|---|
Storyflow (our pick first) | Presenting from the working board, recording decisions, carrying them into the shot list | No proofing mark-up, no approval status, no PPTX export, no phone app | The meeting must end in a recorded yes that the shoot follows |
A slide deck | A fixed, linear meeting in a client's own format | Rebuilt from the working board; drifts after edits | The client's process requires a deck file |
A design file or layout app | A polished, designed board as a pitch artefact | Page by page; the decisions live elsewhere | The moodboard is itself a deliverable the client keeps |
An inspiration feed | Getting the client to show their taste before you build | Pictures with no captions, no decisions wall | You are at the kick-off, collecting the client's references |
A client gallery | Delivering and proofing finished images | Not built for references before the shoot | The shoot is done and the client is choosing selects |
A video call with screen share | Talking through the board live | Nothing is recorded unless you write it down | You present a Storyflow board over the call |
A shared doc | The written decisions and the recap | Pictures in a column, no side-by-side compare | The record matters more than the pictures |
Storyflow
Best at presenting from the board you built: presentation mode steps one wall at a time, the view-only link needs no account, a decisions table fills in live, and the approved walls become the shot list. The in-app AI can also build designed deliverables from the board on paid plans, such as slides, a one-pager or a lookbook PDF, for clients who want a file to forward; a lookbook, in the general sense, is a set of photographs compiled to show a style, which is exactly what an approved direction becomes. Limits are listed in their own section below.

The board you plan on is the board you present: the same columns, opened fullscreen in presentation mode or by a view-only link.
A slide deck
Best at a fixed order in a format every client recognises. Its limit is that it is a copy of the working board, so it drifts the moment a reference changes. Choose a slide deck when the client's process demands a file, built from the signed Storyflow board rather than instead of it.
A design file or layout app
Best at a single designed page that wins a pitch. Its limit is that decisions and the shot list live somewhere else, so the designed board becomes a picture of a decision rather than the record of one. Choose it when the moodboard is part of what the client buys.
An inspiration feed
Best before the presentation: asking the client to save twenty pictures they like is the fastest way to learn their taste. Its limit is that it cannot hold a decision. Choose it for the kick-off, then bring the client's saves onto the Storyflow board as part of the recap.
A client gallery
Best after the shoot, for delivering and proofing finished images. Its limit is that it starts once images exist. Choose it for selects and delivery; our client gallery guide covers that stage.
A video call and a shared doc
A video call is how most presentations happen, and it records nothing on its own; present the Storyflow board over it and type the decisions into the board. A shared doc is a sound home for the recap text; keep the pictures and the decisions table on the board so the doc and the look never disagree.
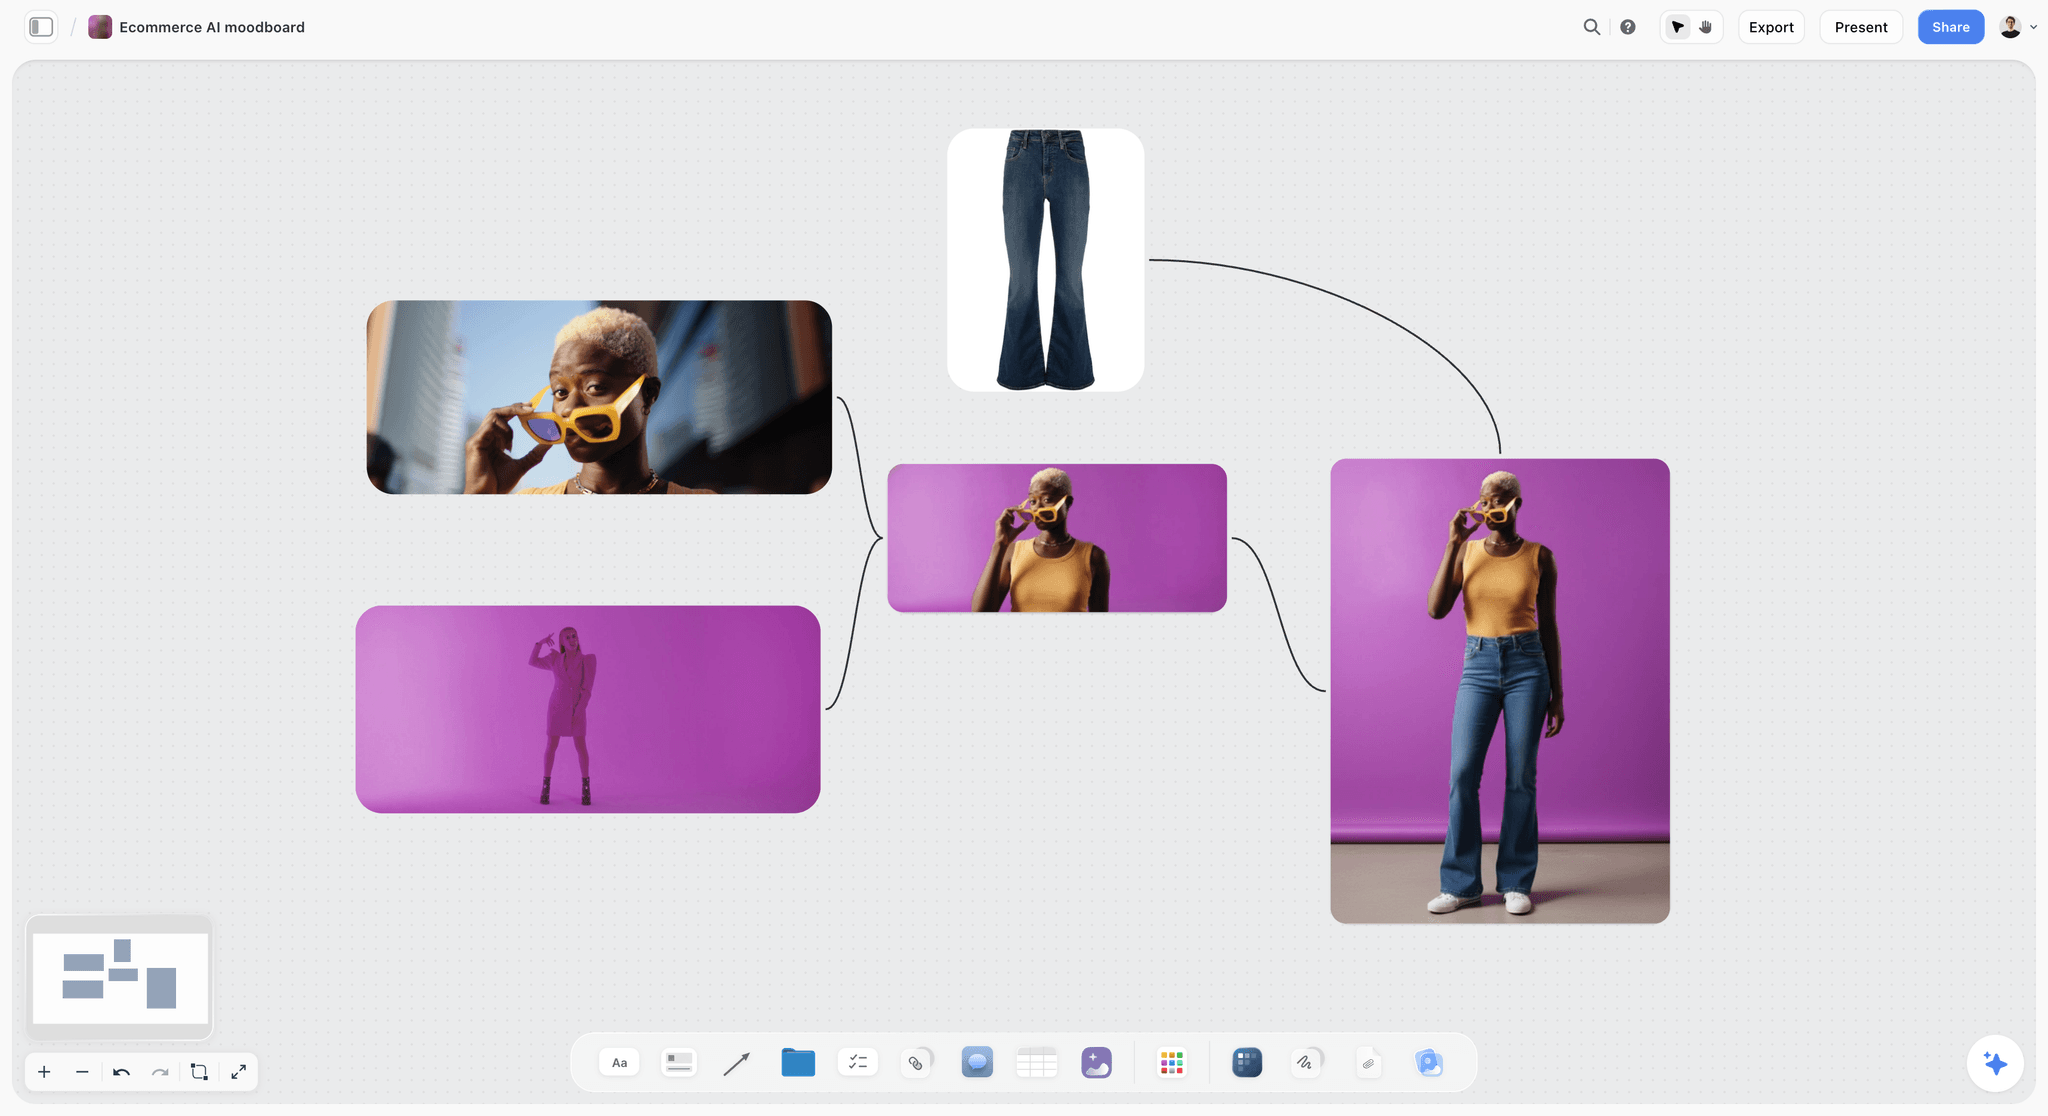
A Storyflow product moodboard with a model in yellow sunglasses and flared jeans on a purple backdrop, connected to product detail frames
Present the board you built, then record the yes
Install Storyflow in ChatGPT and set up the recap note, a compare table and an empty decisions table on your moodboard board, then present it wall by wall and fill the decisions in the room.

Mistakes When Presenting a Moodboard, and the Fixes
Opening on the pictures
The client judges images before knowing what they are for. Fix: open on the recap and get a yes to the brief first.
Presenting in collecting order
The board shows the order you found things, so the directions interleave. Fix: rearrange walls into recap, A, B, compare, decide, next before the meeting.
Asking "What do you think?"
Opinions arrive, decisions do not. Fix: ask section by section, "Are we agreed on the light?", and write each answer down.
Two directions that differ on everything
The client cannot tell what they are choosing. Fix: hold everything constant except two axes.
A decoy direction
You show a direction you cannot afford to make the other look sensible, and the client chooses it. Fix: only present directions you can shoot.
No recommendation
The client guesses what you would rather do. Fix: write your recommendation and one reason at the bottom of the compare wall.
Ending on open questions
The meeting is remembered as unresolved. Fix: end on the filled decisions wall and the next two dates.
Sending the link with no instructions
The client pans around, likes one picture and replies "looks great". Fix: a five-line covering message, a reading-order note on the board and three numbered questions.
Treating the live board as the record
Someone edits the board a week later and the approved version is gone. Fix: export a dated PDF the day of the yes.
Storyflow's Honest Limits for Client Presentations
- No approval status or version compare, and no proofing mark-up on images. The decisions table and a dated PDF are the record; for frame-by-frame sign-off on retouched finals, use a proofing tool or a client gallery.
- No PPTX export and no presenter view or speaker notes. Decks present fullscreen and export as PDF.
- No native phone or desktop app. Storyflow runs in a browser and needs an internet connection, so export a PDF as a fallback for the meeting and for set.
- View-only visitors cannot comment; to comment or draw, the visitor signs in. Invite the client to the board if you want comments on the walls.
- No contracts, e-signature, invoices or payments, and Storyflow does not send call sheets.
- No AI image generation through the ChatGPT plugin, and a photo attached in a ChatGPT chat does not reach Storyflow; use the upload link the plugin gives you.
- Paid-only during early access: Plus is $7.99 a month billed annually ($9.99 monthly) and includes the AI inside Storyflow. Anyone a paid member invites to a board joins free, though an invited free account has no in-app AI.
Which Setup Fits Which Photographer
The six stops stay the same; the walls behind them change with the work.
| Photographer | What the client decides | Directions to show | What to add to the board |
|---|---|---|---|
Brand portrait | Light, styling, how formal | Two: one softer, one more graphic | The subjects' own liked photos on the recap wall |
Product | Surface, light, props, crop | Two: one studio, one in use | A composition wall per deliverable shape |
Editorial | Casting, place, energy | Two, sometimes the editor's and yours | Location facts on each direction wall |
Wedding | Light at each part of the day, family shots | One look, two light plans (indoor, outdoor) | A timeline note per part of the day |
Real estate and interiors | Time of day, styling of rooms | One look, two times of day | Room-by-room order matching the shoot |
Lookbook | Styling order, backdrop, movement | Two backdrops or two movement styles | A wall per outfit group |
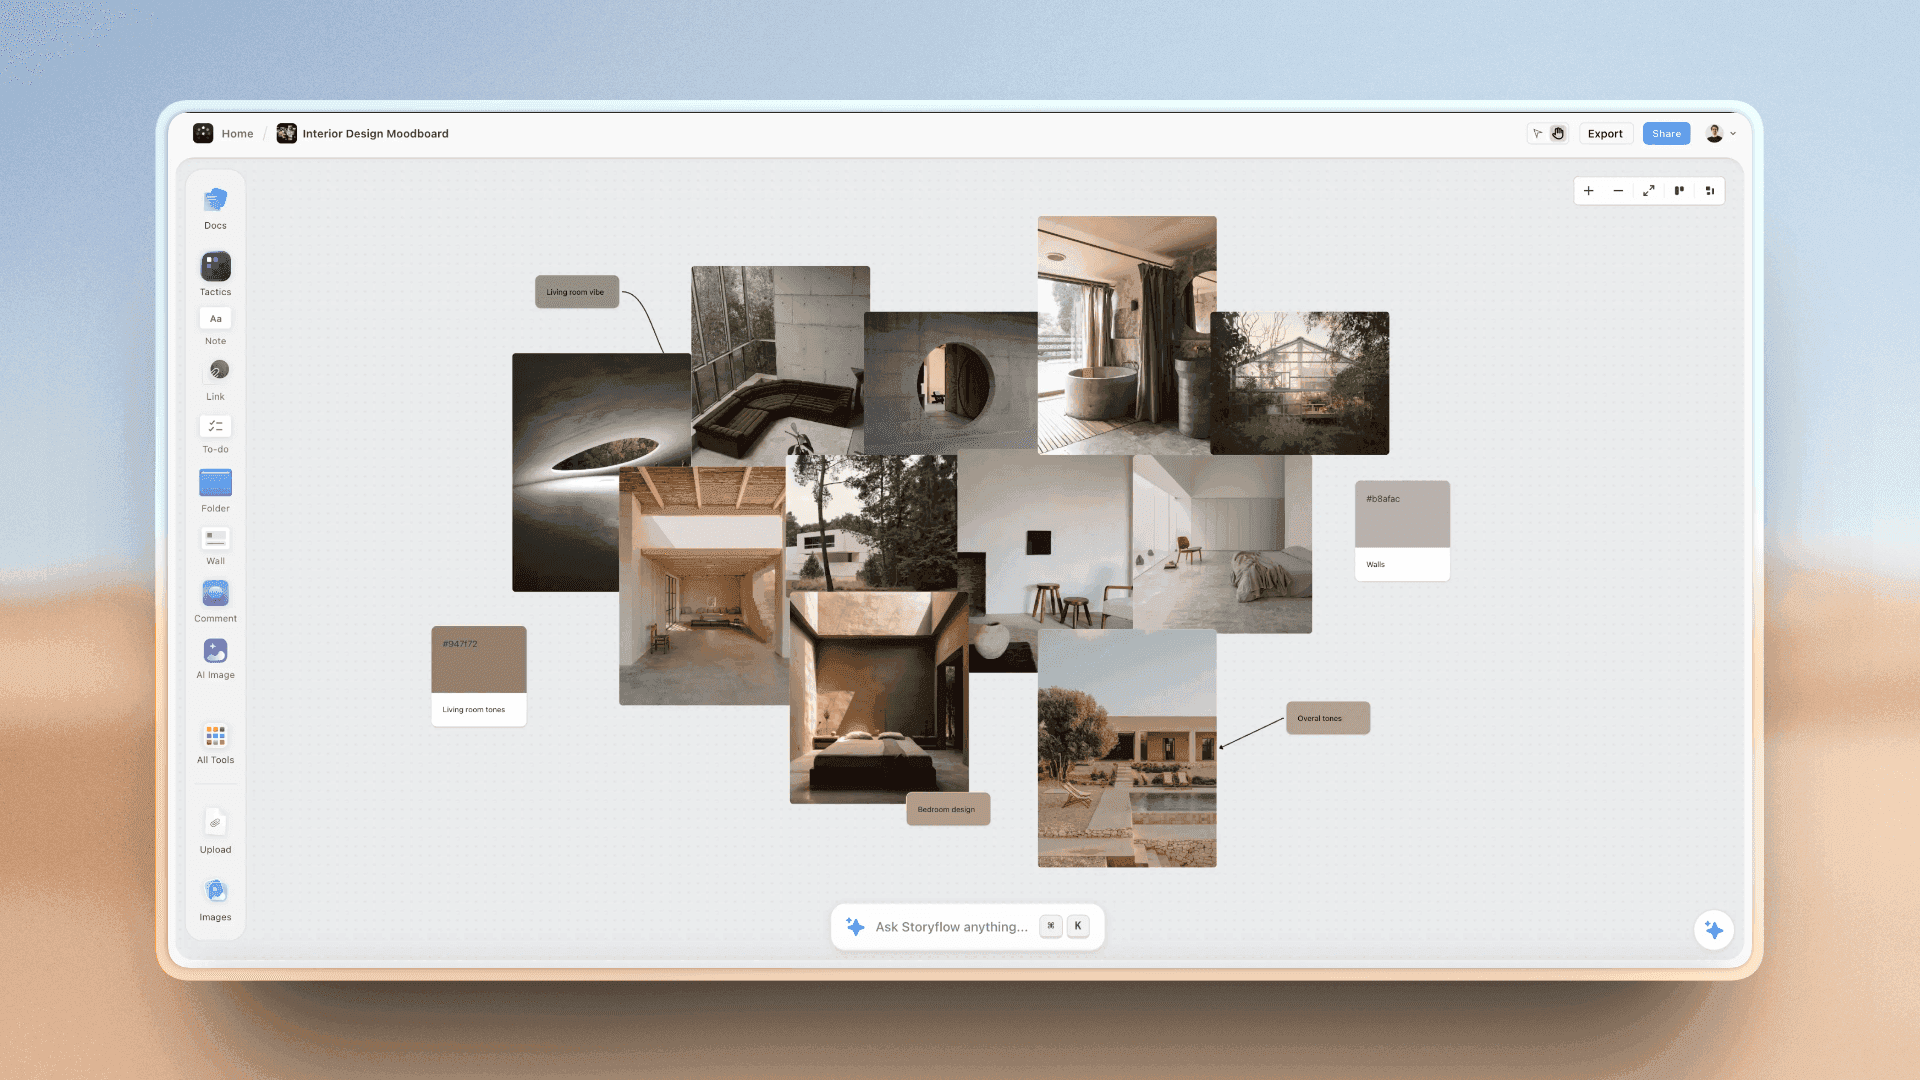
An interiors board ready for a time-of-day choice: one look, with the morning and evening light plans shown as the two options.
For portrait work, the portrait photographers' moodboard guide goes deeper on the tool side, and for property work the real estate photographers' guide covers the rest of the stack.
The Bottom Line
The best moodboard tool for photographers is the one that turns a presentation into a recorded yes the shoot can follow. That is a method more than a feature list: recap, two directions, compare, decide, next, in about 25 minutes, with every answer written down in the room. In Storyflow, the board you built is the board you present, and the walls the client approves become the shot list, so nothing has to be rebuilt between the yes and the shoot. Start with the client moodboard page, the client presentation tool and the moodboard tool for photographers page, and see Storyflow for photographers for the rest of the job.
FAQ: Presenting a Moodboard to a Client
Best moodboard tool for photographers?
Storyflow is our pick for the best moodboard tool for photographers, because the board you build is the board you present and shoot from: presentation mode steps one wall at a time, a view-only link opens with no account, the decisions table fills in live and the approved walls become the shot list. An inspiration feed is better for collecting, and a client gallery for delivering finished images.
What is the best way to present a moodboard to a client?
The best way is six stops in about 25 minutes: recap the brief in the client's words, show direction A, show direction B, compare them on one wall with your recommendation, decide section by section while you write the answers down, then agree the next dates. In Storyflow, presentation mode steps through those walls one at a time, fullscreen.
What is the Storyflow 6-Stop Sequence?
The Storyflow 6-Stop Sequence is our editorial rule for presenting a client moodboard: six stops in Storyflow's presentation mode (recap, direction A, direction B, compare, decide, next), about 25 minutes in total, ending on the filled decisions wall and the next dates rather than on open questions. It comes from meeting logic and choice research, not a study of our own.
How many directions should I show a client?
Show two. One gives the client nothing to compare; more than two hands them the photographer's job, and choice research suggests larger sets can make a decision less likely when no option clearly dominates. Make the two differ on two axes, such as light quality and place, and hold everything else constant so the client knows exactly what they are choosing.
How do I present a moodboard without a meeting?
Send the view-only link with a five-line message: what the board is, the order to read it in, your recommendation, three questions to answer and the date you need answers by. Put a reading-order note at the top of the first wall. In Storyflow, the view-only link opens with no account; invite the client to the board if you want comments on the walls.
How do I record a client's moodboard approval?
Write each decision on a decisions wall during the meeting, with the option chosen, the person's name and the date, then export the approved board as a dated PDF the same day. Storyflow has no approval status or version compare, so the decisions table on the board and the PDF together are the record you point to later.
What should I say when presenting a moodboard?
Say what each stop asks the client to decide. Open with "You told us three things. Is that still right?", walk each direction in the same order (thesis, light, poses, styling, place, palette), compare on the axes that differ, recommend one with a reason, then ask "Are we agreed on the light?" section by section and write each answer down.
What if the client likes both directions?
Ask which one leads: "If we can only light the room one way, which is it?" Then offer the other as a borrowed element with its cost, usually one extra setup and the time it takes, and write the borrowing on the decisions wall as its own line. A blended direction without a named lead produces a shoot that fits neither.
When does a client moodboard become an on-set reference board?
On the day the client signs it. Before the yes, the board shows two directions with captions about what the client is deciding, in meeting order. After it, keep only the approved direction, rewrite the captions as crew instructions ("window left, no fill") and move the walls into shoot order. In Storyflow it is the same board, so export the approved version as a dated PDF before you rewrite it.
Can clients comment on a Storyflow moodboard?
Yes, once they sign in. A view-only link opens with no account and lets the client pan, zoom and read the board, but commenting or drawing needs a signed-in visitor. Anyone a paid member invites to a board joins free, so invite the client when you want comments on specific walls, and send the view-only link when you only need them to read.
Can ChatGPT or Claude prepare a moodboard presentation?
Yes, the structure. With the Storyflow plugin in ChatGPT or the Storyflow connector in Claude, the assistant adds the recap note, a compare table, an empty decisions table, to-dos and a slide deck to your Storyflow board. It cannot read the board's comments or generate images, and photos attached in the ChatGPT chat do not reach the board. The recommendation and the words in the room stay yours.
Is Storyflow free?
Not yet. Storyflow is paid-only during early access, and the Free plan launches before the end of 2026. Anyone a paid member invites to a board joins free. Plus is $7.99 a month billed annually ($9.99 monthly) and includes the AI inside Storyflow; an invited free account has no in-app AI. Clients can read a view-only link with no account at all.
How long should a moodboard presentation take?
About 25 minutes for two directions: three minutes on the recap, five on each direction, four on the comparison, five on the decisions and three on next steps. If the meeting runs much longer, the board probably holds a third direction or unanswered buy questions; fix those before the meeting rather than in it.
What should I send a client after presenting the moodboard?
Send a three-line recap the same day (the direction chosen and by whom, anything borrowed, the next two dates), the dated PDF of the approved board with the decisions on it, the release forms and the usage the fee covers. Then send the shot list on the date you promised, built from the approved walls on the same board.
Table of Contents
- Key Takeaways
- How to Present a Moodboard to a Client in 8 Steps
- The Storyflow 6-Stop Sequence
- Client Moodboard vs On-Set Reference Board: What You Present and What You Shoot From
- Before the Meeting: Build the Board for Presenting
- Stop by Stop: What to Say
- How to Offer Two Directions Without Splitting the Vote
- Handling Objections in the Room
- How to Record the Choice: A Decisions Template You Can Copy
- The Async Version: Presenting by View-Only Link
- What to Send After the Meeting
- Worked Example: Two Directions for a Coffee Roaster
- Features That Matter When You Present a Client Moodboard
- Do This in ChatGPT or Claude
- Where to Build It: Storyflow vs Other Kinds of Tool
- Storyflow
- A slide deck
- A design file or layout app
- An inspiration feed
- A client gallery
- A video call and a shared doc
- Mistakes When Presenting a Moodboard, and the Fixes
- Storyflow's Honest Limits for Client Presentations
- Which Setup Fits Which Photographer
- The Bottom Line
- FAQ: Presenting a Moodboard to a Client
- Related Reading
Templates to check out for this topic


Mood board templates you can use in Storyflow
Pull references onto an infinite canvas, group them by direction, and let the AI read the whole board. Open any of these mood board templates and start dropping in images.


See Storyflow in Action
A visual AI workspace where every feature lives inside one canvas. No tab-switching, no context lost.
Build your entire board from a single message
Type what you need in the AI chat at the bottom of your canvas. The AI adds cards, headings, and structure directly onto your board.
Use expert frameworks as AI context
Type @ in the AI chat and choose any Tactic. The AI tailors every response to that framework instead of giving generic advice.
Turn your board into a mind map in seconds
Ask the AI to restructure your canvas as a mindmap. It connects your ideas into a visual hierarchy so you can see how everything relates.
Why Storyflow Exists
Storyflow actually began as a personal tool while working on creative and research projects.
We kept running into the same problem: ideas were scattered everywhere: notes, documents, and whiteboards.
Nothing helped us see how everything connected.
So we started building a workspace designed around how ideas actually grow.
→ Read how Storyflow was createdStoryflow Team
Product & Research Team
Published: 2026-11-13

