
Category
Filmmaking
Author

Justkay
Documentary Filmmaker & Founder at Storyflow
Topics
2026-05-18
•
12 min read
•
FilmmakingTable of Contents
- Quick Answer: How to Make a Storyboard
- What a Storyboard Is and Why It Matters
- What You Need Before You Start
- How to Make a Storyboard Step by Step
- Shot Types and Camera Language Explained
- Common Storyboarding Mistakes
- Tools for Storyboarding
- FAQ: How to Make a Storyboard
- The Bottom Line
- Author
- Related Reading
Templates to check out for this topic


Home > Blog > Filmmaking > How to Make a Storyboard: A Step-by-Step Guide
By Justkay, Documentary Filmmaker and Founder of Storyflow
Published May 18, 2026 · Updated July 2, 2026 · 12 min read · Filmmaking
Table of Contents
- Quick Answer: How to Make a Storyboard
- What a Storyboard Is and Why It Matters
- What You Need Before You Start
- How to Make a Storyboard Step by Step
- Shot Types and Camera Language Explained
- Common Storyboarding Mistakes
- Tools for Storyboarding
- FAQ: How to Make a Storyboard
- The Bottom Line
- Author
- Related Reading
How do you make a storyboard?
Break your script into shots and draw one frame per shot in sequence: read the script, list the shots, sketch thumbnails, pick an aspect ratio, draw each panel, annotate shot type and camera moves, order the panels, review against the script. A two-page scene takes six to fifteen panels and about an hour.
Turn your scenes into a storyboard the AI drafts
Once you know the shots, paste a scene into Storyflow and let the AI block it into frames on a canvas you can restage and annotate. You do the directing; it removes the blank-frame work.

1) Quick Answer: How to Make a Storyboard
To make a storyboard, break your script into shots, then draw one frame per shot in sequence. Each frame shows what the camera sees, plus a short note for the shot type, the camera angle or movement, the action, and any dialogue. Work in eight steps: read the script, list the shots, sketch thumbnails, choose a frame aspect ratio, draw each panel, annotate camera and action, arrange the panels in order, then review the board against the script. What you end up with is a board a crew can shoot from: for a typical two-page scene that means six to fifteen annotated panels and roughly one to two hours of focused work. You do not need to draw well. Stick figures, boxes, and arrows communicate a shot as clearly as polished art. A storyboard is a planning document, not an art piece.
A storyboard is a decision, not a drawing. Every frame settles a question the camera would otherwise have to answer on set, when time is expensive and options are gone.
I have run multiple documentary projects from research through pre-production, and the boards that saved shoot days were never the pretty ones. They were the ones that forced a decision early. This guide walks the process I actually use, the camera language you need to annotate a frame, and the mistakes that make a storyboard useless once you are on location.
2) What a Storyboard Is and Why It Matters
A storyboard is a sequence of drawings that maps a script shot by shot before anything is filmed. Each panel represents one camera setup. Read left to right, top to bottom, the panels show the visual flow of a scene the way a comic strip shows the flow of a story.
The technique was invented at the Walt Disney studio in the early 1930s. Animator Webb Smith started drawing scenes on separate sheets of paper and pinning them to his office wall instead of describing the plot in words. Walt Disney saw the value, ordered corkboards, and the first complete storyboards were created for the 1933 short Three Little Pigs. By 1938 the practice had spread to Warner Brothers and the Walter Lantz studio. Ninety years later the corkboard is a screen, but the logic has not changed: see the film before you shoot it.
Here is why the storyboard matters more than its modest reputation suggests.
It moves expensive decisions to a cheap stage. Deciding a shot is a wide on set costs a lighting reset, a camera move, and the patience of a crew standing around. Deciding it on paper costs a pencil line. The storyboard is the cheapest place in the production to be wrong, change your mind, and be wrong again.
It is a shared language. A director, a cinematographer, and an editor can each read a storyboard and arrive at the same mental film. A script cannot do that. The words "they argue in the kitchen" produce four different scenes in four different heads. A frame produces one.
It exposes coverage gaps before they become editing problems. When the panels are laid out in sequence, a missing reaction shot or an unmotivated cut is visible. You see the hole on the board instead of discovering it in the edit, where the only fix is a reshoot or a compromise.
It is the bridge between the script and the shot list. The script says what happens. The shot list says what to capture. The storyboard is the visual step in between that makes the shot list specific instead of a guess. That relationship changes how you prepare, which is the subject of the next section.
A storyboard is not the same as a beat sheet or a treatment. A treatment describes the film in prose. A beat sheet maps the story's emotional structure. A storyboard maps the camera. It is the most concrete pre-production document you will make, and it is the one that talks directly to the crew on the day.
3) What You Need Before You Start
A storyboard is the visual translation of a plan. If the plan does not exist yet, you are not storyboarding, you are inventing the film one panel at a time, and it will show. Gather four things before you draw a single frame.
A locked or near-locked script or outline. You need to know what happens before you decide how the camera sees it. For a narrative project that means a script. For a documentary it means a sequence outline or a paper edit of the story you expect to tell. Storyboarding against a script that is still changing wastes the work, because every script change ripples through the panels.
A scene to focus on. You rarely storyboard an entire feature. You storyboard the scenes that need it: action sequences, complex blocking, effects shots, anything where the camera choreography is not obvious. Pick the scene. Storyboarding the wrong scenes is a common way to spend a week and protect nothing.
Rough shot ideas. You do not need final shot decisions yet, but you need raw material: how you imagine the scene opening, the moment that carries the emotion, the shots a director instinctively wants. These are the seeds the storyboard will sort, cut, and order.
Reference images. Locations, lighting moods, framings from films you admire, lens character. References are the difference between a storyboard that communicates a specific look and one that communicates a generic one. Pull them before you start so they sit beside the panels as you draw.
The relationship to remember is this. The script is the what. The storyboard is the how the camera sees it. The shot list is the what to capture, derived from the storyboard. When all three live in one place, a script change updates the board and the board updates the shot list. When they live in three separate apps, a change in one silently rots the other two. Keep them connected.
4) How to Make a Storyboard Step by Step
Here is the eight-step process. It runs from a finished script to a board a crew can shoot from. The steps are sequential, but steps four through seven loop: you will draw, annotate, reorder, and redraw until the sequence reads cleanly.
Step 1: Read the script and break it into beats
Read the scene you are storyboarding and mark its beats. A beat is a unit of action or emotion: an entrance, a revelation, a decision, a reaction. A two-page scene might hold six beats. Marking beats first stops you from drawing the scene as one undifferentiated block. Each beat is a candidate for at least one shot, often more.
Step 2: List the shots
Turn each beat into one or more shots. Ask what the camera needs to see for the beat to land. An entrance might need a wide to establish the space and a medium to catch the character. A revelation might need a close-up on the face and an insert on the object revealed. Write the shots as a plain list before you draw anything. This list is the spine of the storyboard, and it is also the first draft of your shot list. If you want that draft in a structure a crew can use later, the Shotlist template gives you the columns up front.
Step 3: Sketch thumbnails
Draw each shot tiny and fast. A thumbnail is a two-inch sketch with no detail: boxes for the frame, a few lines for composition, an indication of where the subject sits. Thumbnails are for thinking, not showing. Their job is to let you try ten framings for a shot in the time a finished panel takes. Keep the ones that work. The thumbnail stage is where the real directing happens, so do not rush it to get to the clean drawing.
Step 4: Choose your frame aspect ratio
Draw your panels in the aspect ratio you will actually shoot: 16:9 for most digital video, 2.39:1 for anamorphic widescreen, 4:5 or 9:16 for vertical social formats, 1.85:1 for standard theatrical. This sounds like a detail. It is not. A composition that works in 16:9 can fall apart in 9:16, and a storyboard drawn in the wrong ratio plans a film you are not making. Lock the ratio before you draw clean panels. A storyboard template with pre-sized frames makes this step automatic.
Step 5: Draw each panel
Now draw the keeper thumbnails as clear panels, on paper or on a board like the Storyboard template, which opens with the frame sequence already laid out. Clear, not beautiful. A panel needs to communicate four things: what is in the frame, where it sits in the composition, the camera height and angle, and the rough scale of the subject. Stick figures are fine. Boxes for furniture are fine. What is not fine is ambiguity about where the camera is. If a crew member cannot tell from the panel whether the shot is a wide or a medium, the panel has failed.
Step 6: Annotate camera, action, and dialogue
A drawing alone is half a storyboard. Every panel needs a caption block with: the shot type (wide, medium, close-up), the camera angle (eye level, high, low), the camera movement (static, pan, tilt, dolly, handheld) drawn as an arrow on the panel itself, the action in the frame, and any dialogue or key sound. Movement arrows go on the drawing; the rest goes in the caption. This is the layer that turns a picture into an instruction.
Step 7: Arrange the panels in sequence
Lay the panels out in shooting-story order and read them as a strip. This is where coverage gaps appear: a cut with no motivation, a missing reaction, a jump in screen direction that will cross the line. Reorder. Add the panels you are missing. Cut the panels that repeat. The sequence is the product, not the individual panel, and the sequence only becomes legible when every panel is visible at once.
Step 8: Review the board against the script
Final pass. Put the script beside the finished board and check that every beat is covered, every line of dialogue has a frame to live in, and the visual flow matches the emotional flow. Then share it: a cinematographer and an editor will each catch problems a director's eye slides past. A storyboard reviewed by one person is a guess. A storyboard reviewed by the people who will shoot and cut it is a plan.
That is the loop. Read, list, thumbnail, set the ratio, draw, annotate, sequence, review. The fastest way to slow a shoot down is to skip steps three and seven, because the thumbnails are where the thinking happens and the sequencing is where the gaps show.
Turn your scene into shootable frames
Describe the scene and get rough panels in minutes, then annotate shot types and camera moves on a board that keeps the script, frames, and shot list connected.
5) Shot Types and Camera Language Explained
You cannot annotate a storyboard without the vocabulary of the camera. A panel that says "close-up, low angle, slow push in" tells a crew exactly what to build. A panel that says "shot of the guy" tells them nothing. Here is the working language.
Shot types: how much of the subject the frame holds
The three foundational shots are the wide, the medium, and the close-up. Everything else is a variation in between.
- Wide shot (or long shot). Shows the full figure and the surrounding space. Used to establish location, geography, and the relationship between a character and their environment. The widest version, the establishing shot, opens a scene by answering where are we.
- Medium shot. Frames a character from roughly the waist up. The workhorse of dialogue scenes. Close enough to read expression, wide enough to keep body language and gesture in frame.
- Close-up. Fills the frame with the face or a single detail. This is the emotional shot. It removes context and forces the audience to look at one thing. The extreme close-up tightens further, to the eyes or a small object, for maximum intensity.
In a caption, abbreviate consistently: WS, MS, CU, ECU, plus the establishing shot for the scene opener. Pick your abbreviations and use them on every panel.
Camera angles: where the camera sits relative to the subject
- Eye level. The camera sits at the subject's eye height. Neutral. The default that draws no attention to itself.
- High angle. The camera looks down on the subject. It tends to make the subject look smaller, more vulnerable, or observed.
- Low angle. The camera looks up at the subject. It tends to make the subject look larger, more powerful, or dominant.
Angle is a storytelling choice, not a technical one. A storyboard that specifies angle is making an emotional decision and writing it down where the crew can honor it.
Camera movement: how the camera moves during the shot
- Static. The camera does not move. Lock it off.
- Pan. The camera rotates horizontally on a fixed point, to follow action or reveal space.
- Tilt. The camera rotates vertically on a fixed point, looking up or down.
- Dolly. The camera physically moves toward, away from, or alongside the subject.
- Handheld. The camera is operated by hand for an unstable, immediate feel.
Draw movement directly on the panel as an arrow. An arrow from the subject toward the frame edge reads as a pan following them out. An arrow growing larger reads as a dolly in. The arrow is the storyboard's most efficient piece of notation, because it shows in one mark what a sentence would labor to describe.
The reason this vocabulary matters: a storyboard is a shared language, and a shared language only works if every speaker uses the same words. A storyboard is a decision, not a drawing, and the camera language is how the decision gets recorded precisely enough to survive the handoff to a crew.
6) Common Storyboarding Mistakes
Most storyboards fail in predictable ways. Here are the ones I see most, and what to do instead.
Treating it as an art project. The most common mistake. A storyboard is judged on whether a crew can shoot from it, not on whether the drawing is good. Hours spent rendering a panel are hours not spent fixing the sequence. Stick figures and arrows are sufficient. The board communicates or it does not, and rendering is not communication.
Skipping the thumbnail stage. Drawing finished panels first locks you into the first framing you thought of. Thumbnails are cheap, so you can try and discard ten framings per shot. Skip them and you commit to mediocre framings because redrawing a finished panel feels expensive.
Drawing in the wrong aspect ratio. A board drawn in 16:9 for a film delivered in 9:16 is planning a film that does not exist. Compositions do not survive a ratio change. Lock the ratio in step four and draw every panel in it.
Forgetting the caption layer. A panel with no shot type, no angle, no movement note is half a storyboard. The drawing shows the framing; the caption shows the instruction. A crew needs both. A board of un-annotated drawings looks finished and communicates almost nothing.
Storyboarding in isolation from the script and shot list. When the storyboard lives in one app, the script in another, and the shot list in a third, a script change rots the board silently. You discover the mismatch on set. Keep the three connected so a change in one is visible in the others.
Never showing it to anyone. A storyboard reviewed only by its author inherits that author's blind spots. A director's eye slides past the missing reaction shot because the director already knows the scene. A cinematographer and an editor will catch it. Share the board before the shoot.
Over-storyboarding. You do not need a panel for every shot in the film. Board the scenes where camera choreography is genuinely hard: action, effects, complex blocking. Spending a week boarding simple dialogue coverage protects nothing. Storyboard where the risk is.
7) Tools for Storyboarding
You can storyboard with a pencil and a stack of index cards, and for a small scene that is genuinely a fine choice. Paper is fast, free, and has no learning curve. The limit of paper is that it does not connect to anything: the panels sit in one place, the script sits in another, and reordering means physically shuffling cards.
Dedicated storyboarding apps solve the drawing and sequencing problem. They give you frame templates, panel libraries, and camera-move notation, and they output a clean board to share with a crew. If your priority is polished panels and you have an artist drawing them, a dedicated storyboard app is the right tool. If you would rather skip installs, an online storyboard app runs the same workflow in the browser. For a deeper comparison, see the storyboarding software and AI storyboarding tool guides linked below.
But a storyboard is rarely the only thing you are planning. It sits next to a script, a shot list, a set of references, and a schedule. This is where a visual canvas changes the work.
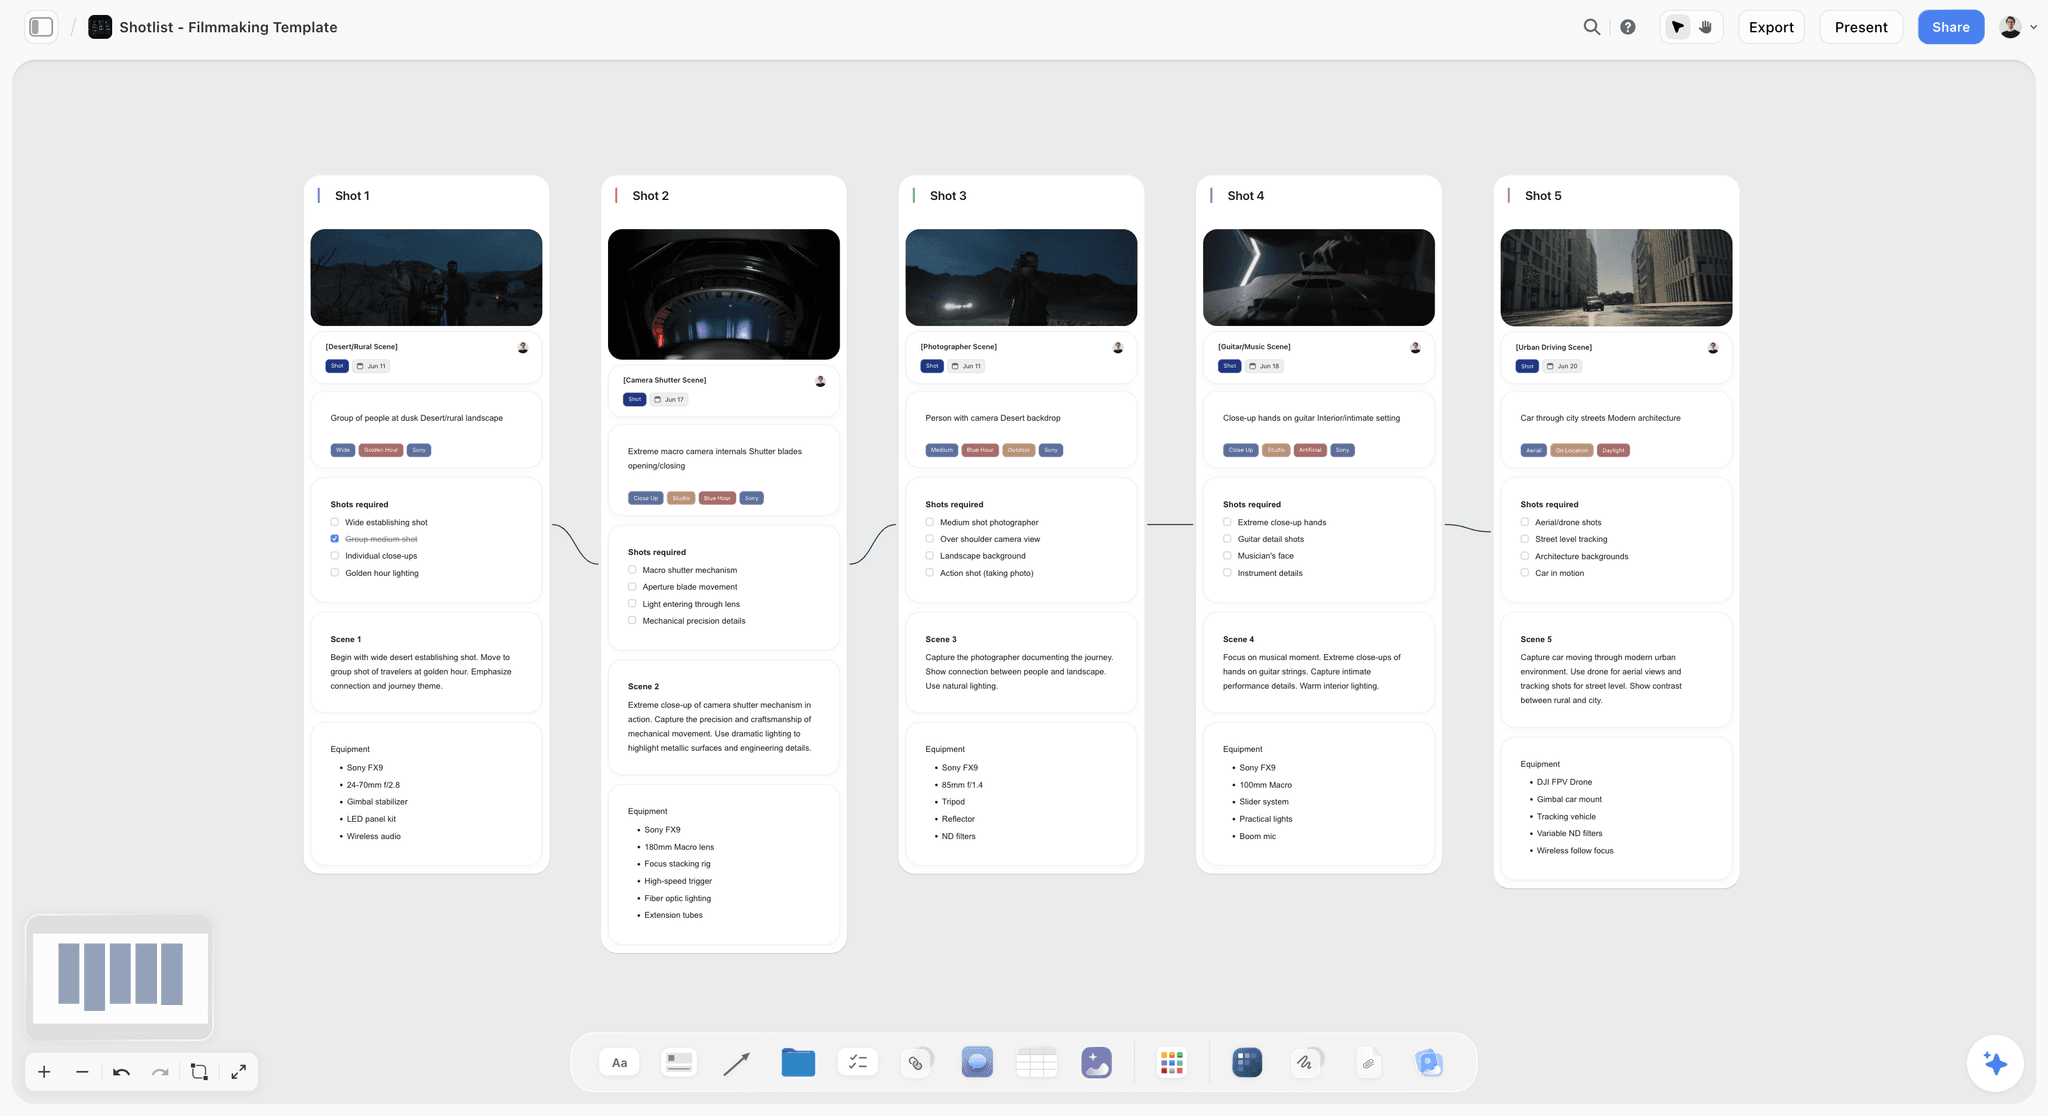
Storyflow is an AI-powered visual creative workspace built on an infinite canvas. For storyboarding, that means your frames, shot notes, camera annotations, reference images, and the script itself all live on one board instead of scattered across separate apps, and the Pre-Production Board template opens with that structure in place. You place frame cards in sequence, drop reference images beside them, write the shot type and camera move as structured notes, and reorder the whole sequence by dragging. When the script beside the board changes, the gap is visible immediately, because the script and the storyboard share the same surface.
The part that matters most for planning: Storyflow's AI reads your full active canvas board, plus up to one Tactic and up to three @-mentioned Documents. So the AI sees the script, the frames, and the notes together. You can ask it to flag a beat with no coverage, suggest shots for a sequence, or draft the camera notes for a panel, and it answers from your actual project rather than from a blank prompt. The 200+ Story Blueprints library gives you expert framework templates to structure the pre-production work around the board, so you are planning the shoot inside a system, not on a loose page.
Honest caveat: if what you want is hand-drawn, finished frame artwork, pair Storyflow with a dedicated illustration tool. Storyflow is the canvas where the storyboard, the shots, the references, and the script connect, not a digital art easel.
Pricing is straightforward. The Free plan is $0 forever: unlimited notes, images, and links, unlimited shared boards, basic AI, 20 file uploads, and unlimited collaboration, which is enough to build and share a real storyboard. You can start with the free storyboard maker directly in the browser. Plus is $9.99/mo on an annual plan or $12.50/mo monthly, and adds the 200+ Story Blueprints, and unlimited uploads. Pro is $14/mo annual and adds AI image generation. Max is $39/mo annual.
If you are planning a shoot and the storyboard keeps drifting out of sync with the script and the shot list, build the next one on a canvas where all three connect. Try the AI storyboard generator to turn a scene description into rough frames in minutes, then open a free Storyflow workspace to put your script, frames, and shot notes on one board.
9) The Bottom Line
Making a storyboard is not a drawing exercise. It is a sequence of decisions: which shots, in which order, from which angle, with which movement, made on paper where being wrong is free. Run the eight steps. Read the script and break it into beats. List the shots. Thumbnail fast. Lock your aspect ratio. Draw clear panels. Annotate every one with shot type, angle, movement, action, and dialogue. Sequence the panels. Review the board against the script with the people who will shoot and cut it.
A storyboard is a decision, not a drawing. The roughest board that covers every beat and is annotated precisely will protect a shoot day better than the most beautiful one that skips a shot.
The storyboard does not live alone. It sits beside the script it translates and the shot list it feeds, and when those three drift apart in three separate apps, the cost shows up on set. If you want the storyboard, the shots, the references, and the script on one connected surface, with AI that reads the whole board and helps you spot the coverage gaps, build your next one on a visual canvas. Start a free Storyflow workspace and plan the shoot frame by frame in one place.
8) FAQ: How to Make a Storyboard
How do you make a storyboard step by step?
Make a storyboard in eight steps. Read the script and break the scene into beats. List the shots each beat needs. Sketch fast thumbnails to try framings. Choose your frame aspect ratio. Draw each keeper as a clear panel. Annotate every panel with shot type, camera angle, movement, action, and dialogue. Arrange the panels in sequence. Review the board against the script with your crew. The drawing quality does not matter. The decisions do.
Do I need to know how to draw to make a storyboard?
No. A storyboard is a planning document, not an art piece. Stick figures, boxes for furniture, and arrows for camera movement communicate a shot as clearly as polished art. A crew reads a storyboard to learn where the camera goes and what the frame holds, and that information survives in a rough sketch. If you can draw well, draw fast. If you cannot, draw simple. Both work.
What should every storyboard panel include?
Every panel needs a drawing and a caption. The drawing shows what is in the frame, the composition, and the camera height. The caption names the shot type (wide, medium, close-up), the camera angle (eye level, high, low), the camera movement (static, pan, tilt, dolly, handheld), the action, and any dialogue. Camera movement is also drawn as an arrow on the panel. A panel without a caption is half a storyboard.
How is a storyboard different from a shot list?
A storyboard is visual and a shot list is textual, and they answer different questions. The storyboard shows how the camera sees each moment, frame by frame. The shot list is the running inventory of what to capture: every setup, with notes on lens, location, and order. The storyboard usually comes first and the shot list is derived from it. The best workflow keeps both connected so one updates the other.
What is the difference between a storyboard and a script?
The script is the what: dialogue, action, and story. The storyboard is the how the camera sees it: the visual translation of the script into frames. A script can be read four ways by four crew members. A storyboard produces one shared mental film. The storyboard is built from the script and should be reviewed against it, beat by beat, before a shoot.
How many panels does a storyboard need?
As many as the scene has distinct camera setups, not more. One panel per shot. A two-page scene might be six to fifteen panels. You do not draw a panel for every second of screen time, and you do not need to storyboard the whole film. Board the scenes where camera choreography is hard: action, effects, complex blocking. Simple dialogue coverage often does not need a board at all.
What aspect ratio should I draw my storyboard in?
Draw in the ratio you will deliver. Use 16:9 for most digital video, 2.39:1 for anamorphic widescreen, 1.85:1 for standard theatrical, and 9:16 or 4:5 for vertical social formats. The ratio is not a detail. A composition that works in 16:9 can fall apart in 9:16. Lock the aspect ratio before you draw clean panels so the board plans the film you are actually making.
What are the basic shot types in a storyboard?
The three foundational shot types are the wide shot, the medium shot, and the close-up. A wide shot shows the full figure and surrounding space. A medium shot frames a character from roughly the waist up. A close-up fills the frame with a face or a single detail. Variations such as the establishing shot and the extreme close-up sit at the extremes. Annotate each panel with the shot type so a crew can build it.
How do you show camera movement on a storyboard?
Draw camera movement directly on the panel as an arrow. An arrow pointing from the subject toward a frame edge reads as a pan following them. An arrow that grows larger reads as a dolly pushing in. Add a written note in the caption naming the move: pan, tilt, dolly, or handheld. The arrow shows direction at a glance and the caption confirms the type. Together they remove ambiguity for the camera operator.
Can I make a storyboard digitally instead of on paper?
Yes. Paper is fast and has no learning curve, which makes it fine for a single small scene. Digital tools add frame templates, easy reordering, and shareable output, and they let the storyboard sit next to the script, the shot list, and references. A visual canvas like Storyflow keeps all of those connected on one board, so a script change is visible against the frames immediately. Choose digital when the project has moving parts.
When in pre-production should I make the storyboard?
Make the storyboard after the script or sequence outline is locked or near-locked, and before the shoot is scheduled. Storyboarding too early, against a script that is still changing, wastes the work because every script change ripples through the panels. Storyboarding too late leaves no time to fix the coverage gaps it reveals. The board belongs in the middle of pre-production, with room to act on what it shows.
What is the most common storyboarding mistake?
Treating the storyboard as an art project instead of a planning document. Hours spent rendering a beautiful panel are hours not spent fixing the sequence, finding the missing reaction shot, or correcting a screen-direction error. A storyboard is judged on whether a crew can shoot from it. The fastest, roughest board that covers every beat and is annotated clearly beats a gallery of finished drawings that skips a shot.
Filmmaking templates you can use in Storyflow
Skip the blank canvas. Open one of these filmmaking boards in Storyflow and the AI builds on the structure that is already there, from research through the shot list.


See Storyflow in Action
A visual AI workspace where every feature lives inside one canvas. No tab-switching, no context lost.
Build your entire board from a single message
Type what you need in the AI chat at the bottom of your canvas. The AI adds cards, headings, and structure directly onto your board.
Use expert frameworks as AI context
Type @ in the AI chat and choose any Tactic. The AI tailors every response to that framework instead of giving generic advice.
Turn your board into a mind map in seconds
Ask the AI to restructure your canvas as a mindmap. It connects your ideas into a visual hierarchy so you can see how everything relates.
Why Storyflow Exists
Storyflow actually began as a personal tool while working on creative and research projects.
We kept running into the same problem: ideas were scattered everywhere: notes, documents, and whiteboards.
Nothing helped us see how everything connected.
So we started building a workspace designed around how ideas actually grow.
→ Read how Storyflow was createdJustkay
Documentary Filmmaker & Founder at Storyflow
Published: 2026-05-18
Start creating with AI and become more productive
Transform your creative workflow with AI-powered tools. Generate ideas, create content, and boost your productivity in minutes instead of hours.
Ask Storyflow to