
Category
Filmmaking
Author

Justkay
Documentary Filmmaker & Founder at Storyflow
Topics
2026-07-01
•
13 min read
•
FilmmakingTable of Contents
- Quick Answer: How to Storyboard a Music Video with AI
- The 4 Passes: From Song to Shoot on One Canvas
- Why a Music Video Storyboard Is Different
- Step by Step: The 4 Passes in Order
- What to Storyboard First: Where the Passes Pay Off
- Storyboard the Video in Storyflow
- Syncing Shots to the Track
- When to Reach for a Dedicated Tool Instead
- Common Mistakes That Wreck a Music Video Storyboard
- FAQ: Storyboarding a Music Video with AI
- The Bottom Line
- Author
- Related Reading
Templates to check out for this topic


Home > Blog > Filmmaking > How to Storyboard a Music Video with AI
By Justkay, Documentary Filmmaker and Founder of Storyflow
Published July 1, 2026 · Updated July 1, 2026 · 13 min read · Filmmaking
Table of Contents
- Quick Answer: How to Storyboard a Music Video with AI
- The 4 Passes: From Song to Shoot on One Canvas
- Why a Music Video Storyboard Is Different
- Step by Step: The 4 Passes in Order
- What to Storyboard First: Where the Passes Pay Off
- Storyboard the Video in Storyflow
- Syncing Shots to the Track
- When to Reach for a Dedicated Tool Instead
- Common Mistakes That Wreck a Music Video Storyboard
- FAQ: Storyboarding a Music Video with AI
- The Bottom Line
- Author
- Related Reading
How do you storyboard a music video with AI in 2026?
Run the song through four passes on one canvas: a concept and treatment pass that decides what the video argues, a visual references pass that builds the mood board, a shot vision pass that maps a look to each section of the track, and a storyboard and shot list pass that turns it into frames and a plan. Keep all four on the same board so the AI can read the whole thing and draft shot ideas from your actual concept and references instead of a blank prompt. Start with the argument, not the shots. A music video is not a song with pictures; it is a visual argument, and the storyboard is where you win it.
You have a track and a shoot date. Now win the argument.
Run the four passes on one canvas: concept, mood board, section-by-section vision, then storyboard and shot list. Storyflow's AI reads the whole board, so the shots it drafts come from your real concept and references, not a cold prompt.

1) Quick Answer: How to Storyboard a Music Video with AI
To storyboard a music video with AI, run the song through four passes on one canvas: a concept and treatment pass that decides what the video argues, a visual references pass that builds the mood board, a shot vision pass that maps a look to each section of the track, and a storyboard and shot list pass that turns all of it into frames and a plan you can shoot. The reason to do all four in one place is that the AI can then read the whole board, so it drafts shot ideas from your actual concept and references instead of from a blank prompt. A music video is not a song with pictures. It is a visual argument, and the storyboard is where you win it.
Start with the concept, not the shots. Play the track, write the one thing the video is saying about the artist or the song, and let every later pass answer to it. Most directors skip this and start listing cool shots, which is why the third act of so many videos feels like a highlight reel with no spine. The passes exist to stop that.
I have run this exact sequence on documentary and commissioned work, where music has to carry a story with no voiceover to lean on. The pattern that always held: the concept has to be settled before the visuals are worth anything, and the visuals before the shot list means anything. This guide is that sequence, made concrete.
For the wider field, see The 12 Best AI Storyboarding Tools in 2026 and the foundational What Is a Storyboard? The Complete Guide.
2) The 4 Passes: From Song to Shoot on One Canvas
Most music video storyboarding advice jumps straight to drawing frames. That is the fourth pass. The first three are what make it good. Here is the framework this whole guide runs on.
Pass 1: Concept and treatment. Decide what the video argues. Not the plot, the argument: the single claim the video makes about the song, the artist, or the feeling. "This is the moment she stops apologizing." "The city is the antagonist." "Success looks like loneliness." Write it as one sentence, then a short treatment that says how the video makes that claim visible. Everything downstream serves this. Without it, you have a playlist of shots.
Pass 2: Visual references and mood board. Build the look. Pull frames from films, photographers, other videos, color palettes, wardrobe, locations, textures, and lighting references onto the canvas. This is where the argument gets a surface: grain, color, contrast, movement. The mood board is not decoration. It is the visual grammar every shot in the video will speak.
Pass 3: Shot vision per section, synced to the track. Break the song into its real sections (intro, verse, pre-chorus, chorus, bridge, outro) and give each one a visual intention tied to the concept. The chorus is not just "the big part." It is where the argument peaks, so it needs the shot that carries the peak. This pass maps a look and an energy to each timestamp before a single frame is drawn.
Pass 4: Storyboard and shot list. Now you draw. Turn each section's vision into actual frames, then into a shot list with camera, lens, movement, and location per shot. Because passes one through three are on the same canvas, the storyboard is the argument made frame by frame, and the shot list is the plan to capture it.
The order is the point. A music video is not a song with pictures. It is a visual argument, and the storyboard is where you win it. You cannot win an argument you have not written, dressed, or timed, which is exactly what the first three passes do. Run them out of order and you get a beautiful video that says nothing. Run them in order and the storyboard almost draws itself.
3) Why a Music Video Storyboard Is Different
A narrative film storyboard serves a script. A music video storyboard has no script. That single difference is why generic "how to storyboard" advice keeps failing directors who work to music.
There is no dialogue to anchor the cuts. In a scripted scene, the edit follows the conversation. In a music video, the edit follows the track: the beat, the drop, the lyric that lands, the silence before the chorus. A frame that would hold for four seconds in a film might need to cut on the eighth note here. Timing is not a detail you add later. It is structural, and it belongs in the storyboard.
The argument carries the weight the plot usually does. With no dialogue and no three-act script, what keeps a viewer watching is the visual argument developing across the runtime. This is why Pass 1 is non-negotiable. A music video is not a song with pictures. It is a visual argument, and the storyboard is where you win it. The storyboard is where you prove the argument builds from intro to outro instead of repeating three looks until the song ends.
Repetition is a trap and a tool. Songs repeat: the chorus comes back three times. A weak video shows the same chorus footage each time. A strong one uses the repetition to escalate, so the third chorus pays off a promise the first one made. Planning that escalation means seeing all three choruses at once, which a linear frame-by-frame tool hides and a canvas shows.
The deliverable is emotional, not informational. A commercial storyboard sells a product. A music video storyboard sells a feeling, and feelings are built from accumulated images, not single shots. That is why the mood board pass sits so early: the feeling is decided in the references before it is captured in the frames.
These four differences are why doing the passes on one surface beats scattering them across a doc, a Pinterest board, and a spreadsheet, where the connections break at every handoff.
4) Step by Step: The 4 Passes in Order
Here is the sequence, concretely, from the first time you hear the track to the moment you hand the shot list to your first assistant director.
Pass 1: Write what the video argues
Play the song three times before you write anything: for the feeling, for the structure, then for the lyric doing the most work. Then write one sentence, the argument. "The video is about the gap between how she performs happiness and how she feels it." Under it, write a four to six line treatment: the world, the performer, the arc from first frame to last, and the one image the whole thing builds toward.
If you are using AI here, give it the artist, the genre, the lyrics, and three reference videos you admire, and ask for three distinct concepts, each as a one-sentence argument plus a treatment. Do not take its first idea; use the three to find the angle you would not have reached alone, then write the final argument yourself.
Pass 2: Build the mood board
Open the canvas and start pulling references: film stills, music video frames, fashion editorials, street photography, color palettes, lighting setups, textures, locations, wardrobe. Cluster them by color, movement, wardrobe, and lighting. The goal is a board where anyone could look at it and know what the video will feel like before a frame is shot.
On the Pro tier, Storyflow's AI image generation earns its place here: generate reference frames in the look you are chasing, so you can see a specific mood before you have a location or a camera. Treat them as directional sketches to align you, your DP, and your artist, not final shots.
Pass 3: Map a vision to each section of the track
List the song's sections down the canvas with rough timestamps: intro 0:00 to 0:12, verse one 0:12 to 0:38, pre-chorus, chorus, and so on. Beside each, write its visual intention in one line, tied to the argument. Intro: establish the isolation. Chorus one: the first crack in the performance. Bridge: the collapse. This is the pass that makes the storyboard buildable: every frame now has a job connected to a specific moment in the music, and when the chorus repeats you can see it three times on the board and plan how each one differs.
Pass 4: Draw the storyboard and build the shot list
Now draw the frames. Section by section, sketch the shots that carry each section's intention (you do not need every frame). For each, note the essentials on a card beside it: shot size, camera movement, lens, location, and any performance direction. Those cards, read in order, are your shot list, with the argument, look, and timing from the earlier passes still visible right next to the frames.
5) What to Storyboard First: Where the Passes Pay Off
You do not storyboard a music video front to back. You storyboard it in order of leverage.
Storyboard the chorus first. The chorus is where the argument peaks, where the budget goes, and what ends up in the teaser and thumbnail. Draw it before anything else, because if the chorus does not work the video does not work, and you want to know that on the board, not on set. Storyboarding it first also anchors the verses, which exist to set the chorus up.
Storyboard the hook shot second. Every strong video has one image it is remembered for: the frame that goes in the press, the loop that gets clipped. Decide what that shot is and storyboard it in detail, because everything else can flex around it but that shot has to be captured exactly.
Storyboard the transitions third. The cuts between sections carry as much weight as the shots themselves, because they are timed to the music: the move from verse to chorus, the beat where the drop hits, the silence before the last chorus. A great shot on either side of a weak transition still reads as weak.
Storyboard the connective shots last. The B-roll, the cutaways, the texture shots matter, but they flex. Plan them last and lightly, because on the day they are what you adjust when you are losing light.
This order is a direct consequence of the passes: Pass 1 gave you the argument and Pass 3 gave you the section vision, so you already know which moments carry the most weight. Storyboard those first and let the rest support them.
6) Storyboard the Video in Storyflow
The reason to run the four passes in one workspace instead of four apps is simple: the AI can only help with what it can see, and the passes only compound if they stay connected.
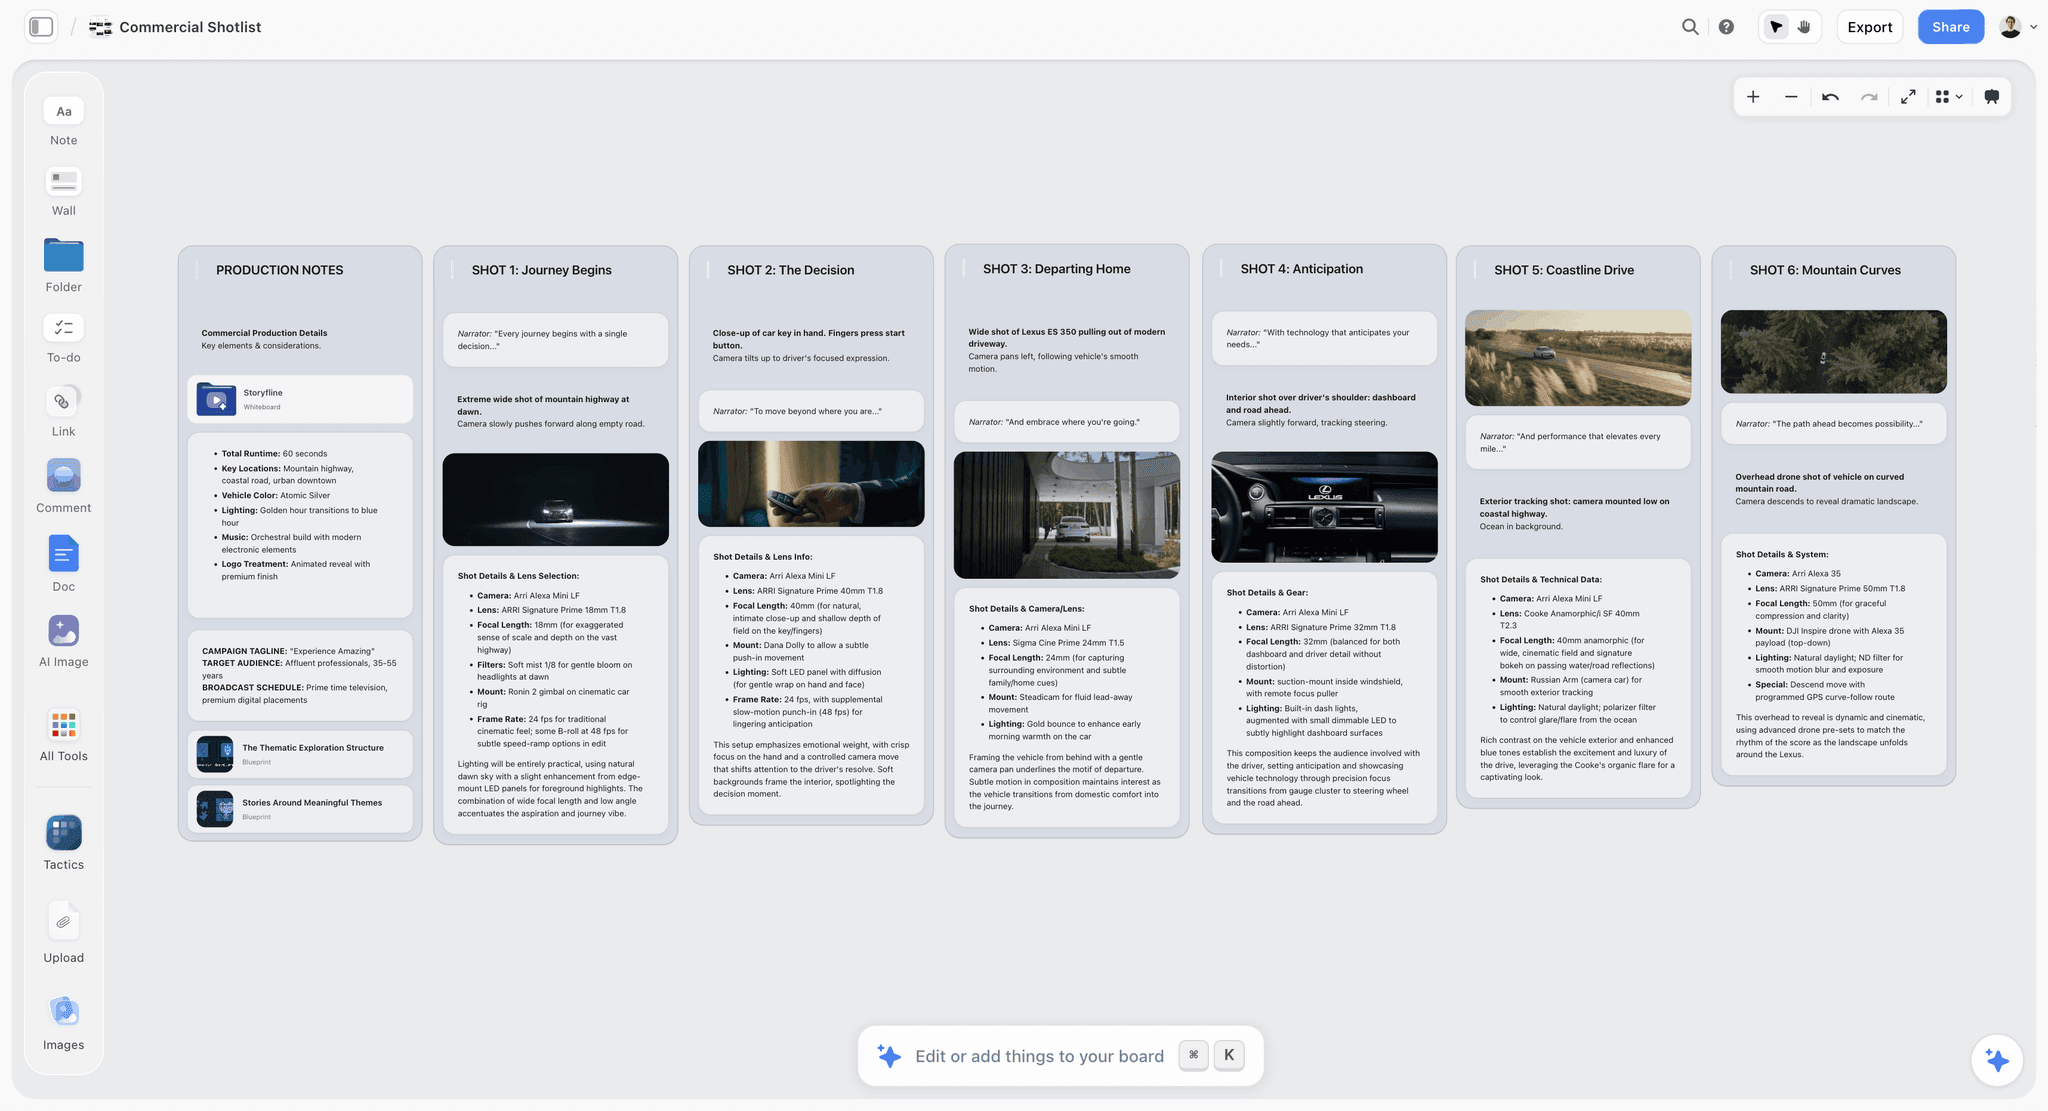
All four passes live on one infinite canvas. Concept and treatment in one region, the mood board in another, the section vision down the middle, and the storyboard frames and shot list cards across the bottom. When you change the concept, you are looking at the mood board and the shots at the same time, so the whole plan stays coherent instead of drifting across apps.
The AI reads the whole board. This is the feature that makes AI storyboarding actually useful here. Storyflow's AI reads your entire active canvas board by default, plus up to 1 Tactic and up to 3 Documents you @-mention in the chat. So when you ask it to draft shot ideas for the bridge, it already has your argument, references, and section vision in context. It is not guessing from a one-line prompt; it is building on the board you made. Ask it to turn your chorus vision into six shot options, to find the weakest section in your storyboard, or to draft the shot list from the frames, and it answers with everything you have already put down.
AI image generation for reference frames, on Pro. On the Pro tier, you can generate reference frames directly on the canvas to visualize a look before you have a location or a camera. Chasing a specific color and grain for the chorus? Generate a few frames in that style and put them next to the storyboard so your DP and artist see the target. These are directional references to align the team, not final shots.
Story Blueprints give you a running start. On Plus, Pro, and Max, Storyflow's Story Blueprints library includes 200+ ready-made boards, with storyboard and shot list layouts you can drop in and fill instead of building the structure from scratch. Because the frames and their shot cards live on the same board, you never rebuild the storyboard into a separate shot list document: the cards beside each frame, read in order, are the shot list. Export or share a link, and your crew has the argument, the look, the timing, and the shots in one place.
Here is the honest accounting, because a real recommendation names the limits. Storyflow is not a video editor. You storyboard, plan, and build the shot list here, then you shoot and cut in Premiere, Resolve, or Final Cut. Storyflow gets you to the shoot with a bulletproof plan; it does not replace your edit bay. AI-generated reference frames are directional, not final. They align the team on a look and fill reference gaps, not stand in as the shots in your video. Use them as sketches. And Storyflow is cloud-only. There are no local files and no full offline mode, so if you need to storyboard on a plane with no connection or you have strict local-first requirements, that is a real constraint. For the concept-to-shoot workflow here, the trade is worth it.
7) Syncing Shots to the Track
The single thing that separates a music video storyboard from every other kind is that it is timed to music. Here is how to finish what Pass 3 starts so your storyboard holds on the beat.
Timestamp every section. Before you draw, put real timecodes on the song's sections. Not "the chorus" but "0:52 to 1:18." The storyboard is only useful if it maps frames to time, because on set your playback and edit both run to that clock.
Plan cuts to musical events, not to seconds. The strongest cuts land on a musical event: the downbeat, the snare, the vocal entrance, the drop. In your section vision, note which shots cut on which events ("cut to wide on the first snare of the chorus"). This is the difference between an edit that feels tight and one that feels loose, and it is decided in the storyboard, not discovered in the edit.
Storyboard the repeats as an escalation. Lay all three choruses out side by side on the canvas. Chorus one introduces the look. Chorus two complicates it. Chorus three pays it off. Seeing them together is the only way to plan the build, and it is exactly what a linear tool cannot show you.
Mark the silence. The most powerful moment in many videos is the beat of silence or the breakdown before the last chorus. Storyboard it deliberately: often it is a single held shot, the one place the fast cutting stops. Plan the quiet as carefully as the loud, because the contrast is what makes the loud land.
When the timing lives in the storyboard, your first assistant director knows how long each setup holds and your editor knows where every cut falls before the footage exists.
8) When to Reach for a Dedicated Tool Instead
An honest guide names where its own recommendation is not the best fit. Storyflow is built for the concept-to-shoot workflow, but some jobs want a specialized tool.
For finished, illustrated frames, use a dedicated storyboard artist or app. If your production needs polished, fully rendered panels drawn by an artist, a dedicated storyboarding app or a hired illustrator is the right call. Storyflow's frames are planning frames: sketches, references, and shot cards, not a portfolio-grade panel sequence.
For the edit, use Premiere, Resolve, or Final Cut. Storyflow ends at the shoot. The moment you have footage, you are in an editor. Storyflow is where you plan the cuts; your NLE is where you make them. And if your video is narrative enough to want proper script formatting, pair Storyflow with a dedicated screenwriting app and keep the visual planning on the canvas.
The rule holds across all of these: use Storyflow to run the four passes and get to the shoot with a plan the AI helped you build, and reach for the specialist when a single task needs depth Storyflow does not chase.
9) Common Mistakes That Wreck a Music Video Storyboard
The passes exist to prevent specific, repeatable failures. Here are the ones that sink music video storyboards most often.
Starting with shots instead of the argument. The most common mistake is opening a doc and listing cool shots. You end up with a highlight reel that says nothing, because Pass 1 never happened. Fix it by writing the one-sentence argument first and refusing to draw a single frame until it is settled.
Treating the mood board as decoration. A folder of pretty images that never informs the shots is wasted work. The mood board is the visual grammar of the video; every frame should speak its language. If your storyboard frames do not obviously come from your references, one of the two is lying.
Ignoring the track's structure. Storyboarding to a vague sense of "the song" instead of its real sections and timestamps produces an edit that drifts. Break the song into timed sections in Pass 3 and give each one a job. A storyboard that is not timed to the music is not a music video storyboard.
Showing the same chorus three times. Because the chorus repeats, lazy planning repeats its footage. Lay all the choruses out together and plan the escalation, or the back half of your video dies. This is the mistake the canvas is best at preventing.
Rebuilding the plan across five apps. Concept in a doc, references on Pinterest, timing in a spreadsheet, frames in a slide deck, shot list in another spreadsheet. Every handoff loses something, and the AI can help with none of it because it cannot see across apps. Keep the four passes on one board.
Confusing directional references with final shots. When you generate AI reference frames, do not mistake them for the look you will capture. They align the team on intent; the camera, location, and performance decide the real frame. Keep that line clear with your DP and artist, or you will promise a look the shoot cannot deliver.
Every one of these is a pass done wrong or skipped. Run the four passes in order, on one canvas, and each forces the decision the mistake skips.
11) The Bottom Line
Storyboarding a music video is not about drawing pretty frames. It is about proving, before you spend a shoot day, that the video says something and builds. The four passes are how you do that: settle the argument, dress it with references, time a vision to every section of the track, and only then draw the frames and the shot list. A music video is not a song with pictures. It is a visual argument, and the storyboard is where you win it.
Do all four passes in one place, and the AI stops being a novelty and becomes useful, because it can finally read the whole board and draft shots from your real concept and references instead of a cold prompt. That is why the storyboard, the mood board, and the shot list belong on one canvas.
If you have a track and a shoot date, storyboard your music video on Storyflow's free canvas and run the four passes on one board, with the AI reading all of it, from concept to shot list.
10) FAQ: Storyboarding a Music Video with AI
How do you storyboard a music video with AI?
Run the song through four passes on one canvas: concept and treatment, visual references, shot vision per section synced to the track, then storyboard and shot list. Keep all four on the same board so the AI can read the whole thing and draft shot ideas from your actual concept and references instead of a blank prompt. The AI widens your options; you make the creative calls. Start with the argument, not the shots.
Do I need to storyboard a music video at all?
Yes, if you want the chorus and the hook to land and the budget to go where it matters. A music video has no script to hold it together, so the storyboard is where the visual argument is proven to build across the runtime. Even a rough storyboard of the chorus, the hook shot, and the transitions prevents a shoot day spent improvising the most important footage.
What should I storyboard first in a music video?
The chorus. It is where the argument peaks, where the budget goes, and what ends up in the teaser and thumbnail. Storyboard the chorus, then the single hook shot the video will be remembered for, then the transitions between sections, and lastly the connective B-roll. This order follows leverage: plan the moments that carry the most weight first, and let the rest support them.
Can AI generate storyboard frames for a music video?
AI can generate directional reference frames that show a look, which is useful for aligning your DP and artist on color, grain, and mood before you have a location or camera. On Storyflow's Pro tier you can generate these frames on the canvas. Treat them as sketches, not final shots: the camera, location, and performance decide the real frame. They set intent; they do not replace the shoot.
How do I sync my storyboard to the beat of the song?
Timestamp the song's sections with real timecodes, then note which shots cut on which musical events (the downbeat, the snare, the drop, the vocal entrance). Plan cuts to events, not to round seconds. Lay repeated sections like the chorus side by side so you can plan an escalation across them. When the timing lives in the storyboard, both the shoot and the edit inherit it.
What is the difference between a music video storyboard and a film storyboard?
A film storyboard serves a script and follows dialogue; a music video storyboard has no script and follows the track. The music video version is timed to musical events, carries its meaning through a visual argument instead of a plot, and has to plan the escalation of repeated sections like choruses. That build does the work the plot usually does, which is why the concept pass matters so much.
Is Storyflow a video editor?
No. Storyflow is where you storyboard, plan, and build the shot list, all the way up to the shoot. Once you have footage, you edit in Premiere, DaVinci Resolve, or Final Cut. It gets you to set with the concept, mood board, section vision, storyboard, and shot list on one board that the AI reads, but it does not cut footage. Use it for the plan; use your NLE for the edit.
How much does Storyflow cost for storyboarding a music video?
Storyflow's Free plan is $0 with no credit card and includes unlimited notes, images, and links, unlimited shared boards, unlimited collaboration, and basic AI, which is enough to run the four passes. Plus is $9.99/mo annual ($12.50 monthly), adding 200+ Story Blueprints and unlimited file uploads. Pro is $14/mo annual ($19 monthly), adding AI image generation for reference frames plus 20x more AI. Max is $39/mo annual ($49 monthly).
Can my artist and DP collaborate on the storyboard?
Yes. Storyflow's Free plan includes unlimited real-time collaboration on shared boards, so your artist, DP, and producer can be in the same board with you at no cost. The Max tier adds a team workspace with permissions and roles for larger productions. Everyone works from the same argument, look, timing, and shot list instead of chasing versions across email.
What does the AI actually read when it helps me storyboard?
Storyflow's AI reads your entire active canvas board by default, plus up to 1 Tactic and up to 3 Documents you @-mention in the chat. It does not read all your boards or your whole workspace at once. This is exactly why keeping the four passes on one board matters: with your concept, references, and section vision on the active board, the AI drafts shot ideas from real context instead of a blank prompt.
Filmmaking templates you can use in Storyflow
Skip the blank canvas. Open one of these filmmaking boards in Storyflow and the AI builds on the structure that is already there, from research through the shot list.


See Storyflow in Action
A visual AI workspace where every feature lives inside one canvas. No tab-switching, no context lost.
Build your entire board from a single message
Type what you need in the AI chat at the bottom of your canvas. The AI adds cards, headings, and structure directly onto your board.
Use expert frameworks as AI context
Type @ in the AI chat and choose any Tactic. The AI tailors every response to that framework instead of giving generic advice.
Turn your board into a mind map in seconds
Ask the AI to restructure your canvas as a mindmap. It connects your ideas into a visual hierarchy so you can see how everything relates.
Why Storyflow Exists
Storyflow actually began as a personal tool while working on creative and research projects.
We kept running into the same problem: ideas were scattered everywhere: notes, documents, and whiteboards.
Nothing helped us see how everything connected.
So we started building a workspace designed around how ideas actually grow.
→ Read how Storyflow was createdJustkay
Documentary Filmmaker & Founder at Storyflow
Published: 2026-07-01
Start creating with AI and become more productive
Transform your creative workflow with AI-powered tools. Generate ideas, create content, and boost your productivity in minutes instead of hours.
Ask Storyflow to