What is an Animatic? The Complete Guide (2026)
An animatic is a storyboard timed to sound. Learn what it is, how it differs from a storyboard, when to make one, and the exact steps to build one.

Category
Filmmaking
Author

Justkay
Documentary Filmmaker & Founder at Storyflow
Topics
2026-07-01
•
11 min read
•
FilmmakingTable of Contents
- Quick Answer: What is an Animatic?
- Animatic vs Storyboard vs Previs
- The Storyboard That Moves
- What Goes Into an Animatic
- When to Make an Animatic (and When to Skip It)
- Build an Animatic in Storyflow
- How to Make an Animatic: Step by Step
- Types of Animatic by Discipline
- Common Animatic Mistakes
- FAQ: Animatics
- The Bottom Line
- Author
- Related Reading
Templates to check out for this topic


Home > Blog > Filmmaking > What is an Animatic
By Justkay, Documentary Filmmaker and Founder of Storyflow
Published July 1, 2026 · Updated July 1, 2026 · 11 min read · Filmmaking
Table of Contents
- Quick Answer: What is an Animatic?
- Animatic vs Storyboard vs Previs
- The Storyboard That Moves
- What Goes Into an Animatic
- When to Make an Animatic (and When to Skip It)
- Build an Animatic in Storyflow
- How to Make an Animatic: Step by Step
- Types of Animatic by Discipline
- Common Animatic Mistakes
- FAQ: Animatics
- The Bottom Line
- Author
- Related Reading
What is an animatic?
An animatic is a storyboard timed to sound. You take the still frames from your storyboard, hold each one on screen for its real duration, and lay a scratch track underneath (dialogue, temp music, key sound effects), so the sequence plays in real time and you can watch the story instead of imagining it. A storyboard tells you what the shots are; an animatic tells you whether they work in the order and rhythm you chose, because now the cut has a clock. It is the last cheap draft before a scene starts costing a shoot day or weeks of animation.
Lay the boards in sequence, then export to assemble.
Storyflow keeps your storyboard frames, timing notes, references, and shot list on one infinite canvas, with an AI that reads the whole board, so you get the sequence right before you export the frames and cut the animatic in your editor.

1) Quick Answer: What is an Animatic?
An animatic is a storyboard timed to sound. You take the still frames from your storyboard, hold each one on screen for its real duration, and lay a scratch track underneath: dialogue, a temp music bed, key sound effects, a voiceover. The result is a rough moving version of the sequence that plays in real time, so you can watch the story instead of imagining it. It is the last cheap draft before a scene starts costing real money.
That timing is the whole point. A storyboard tells you what the shots are; an animatic tells you whether they work in the order and rhythm you picked, because now the cut has a clock. A joke that reads fine as three panels can die when you feel the two seconds of dead air before the punchline. A transition that looked clever on the wall can feel abrupt once sound carries you across it. An animatic is the cheapest place to fail. Fix the cut before it costs a shoot day.
I have made animatics for documentary sequences, and the lesson repeats on every project. The version in my head always plays better than the version on the timeline, and the gap between them is exactly the set of problems I would otherwise discover on location or three weeks into an edit, when they are expensive to fix. This guide covers what an animatic is, how it differs from a storyboard and previs, when it earns its time, and the steps to build one, with an honest account of which tools do which part. For the wider field, see What is a Storyboard? The Complete Guide and the walkthrough in How to Make an Animatic in 2026.
2) Animatic vs Storyboard vs Previs
Three artifacts sit next to each other in pre-production and get confused constantly. They are not the same tool, and picking the wrong one wastes days.
A storyboard is spatial. It answers framing, staging, and shot order as a set of stills you can pin to a wall and rearrange. It has no clock, so it cannot tell you about pace: a still panel takes as long to read as your eye needs, not as long as the shot will actually hold, so a storyboard can look perfect and still hide a scene that drags.
An animatic is temporal. It takes those same panels and adds the two things a storyboard is missing, duration and sound, so every shot lasts its real length, cuts happen on the beat you chose, and a scratch track carries dialogue and music underneath. This is the first time the sequence exists as an experience rather than a plan.
Previs is a different tool again. It is rough 3D, built to solve camera moves, blocking, lens choices, and physical feasibility, usually for VFX-heavy or complex action work. Previs answers where the camera can go; an animatic answers whether the edit lands. It is not that one replaces another. It is that each one fails a different question, and the animatic is the only one that tests rhythm. Most projects need a storyboard, many benefit from an animatic, and only some need full previs.
3) The Storyboard That Moves
Here is the frame this whole guide runs on. An animatic is The Storyboard That Moves: a storyboard timed to sound, so a static plan becomes something you can actually watch and judge. Everything useful about an animatic comes from that one upgrade. The panels are the same drawings; the difference is that time flows through them.
That upgrade changes what you can catch. A storyboard is judged with the imagination, and the imagination is a generous editor: it fills gaps, smooths transitions, and keeps the pace you wish the scene had. The moment you add a clock and a track, it stops covering for you. You feel the beat that is a half-second too long, the reveal that arrives before the audience is ready, the line of dialogue that has nowhere to breathe. None of that is visible in stills.
This is why the animatic sits where it does. It is the bridge between the plan and the expensive version of the plan. Before it, everything is cheap: you are moving drawings and notes around. After it, everything is costly: you are booking a crew, rendering frames, or animating in-betweens. The animatic is the last stage where changing your mind costs an afternoon instead of a budget line. An animatic is the cheapest place to fail. Fix the cut before it costs a shoot day.
So the discipline is simple: treat the animatic as a test, not a deliverable. Its job is not to look good; its job is to surface the problems in your sequence while they are still free to solve. A rough animatic that exposes three problems is worth more than a beautiful one that hides them.
4) What Goes Into an Animatic
An animatic has four ingredients, and none of them needs to be finished art. That is what lets you build one fast and cheap, which is the entire reason it exists.
The panels. These are your storyboard frames, and rough is fine. Stick figures, gray boxes, and scribbled arrows carry timing information just as well as polished drawings. The temptation to draw beautiful panels first is the most common way an animatic stops being cheap. Save the rendering for when the cut is locked.
The timing. Each panel holds for its real on-screen duration, which is what makes it an animatic rather than a slideshow. A two-second establishing shot holds for two seconds; a quick cut holds for twelve frames. Getting the holds right is where the sequence reveals its true pace, and it is the thing you will adjust the most.
The scratch track. Temp sound: scratch dialogue read by anyone, a temp music bed pulled from a reference track, a few key sound effects, a placeholder voiceover. It does not need to be clean. It needs to carry the rhythm the picture is cut against, because half of what makes a sequence work is how sound and image land.
Basic motion (optional). Some animatics stay as held stills; others add simple moves like a slow push, a pan across a wide frame, or a cross-dissolve instead of a hard cut. Motion helps a sequence read closer to the final, but the held-still version already tests what matters most, which is rhythm. Add it only if the sequence depends on a move to make sense.
5) When to Make an Animatic (and When to Skip It)
An animatic is not free. Honesty about when it pays off is more useful than pretending every project needs one.
Make an animatic when the sequence is expensive to get wrong. Animation is the clearest case: every second you animate is hours or days of labor, so testing the cut first with rough panels is how the discipline works. Commercials are next, because the client is paying for a shoot day and the edit has to hit an exact runtime and beat. Complex action, VFX sequences, comedy that lives or dies on timing, and any music-driven cut all reward an animatic, because in every one the rhythm is the product.
Make an animatic when you need to sell the sequence before you make it. A moving version with a scratch track is far more persuasive than a wall of panels: directors use animatics to align a crew, agencies use them to get client sign-off, and animation studios use them to lock the edit before a single frame is rendered. It is the cheapest way to get everyone to agree on what the sequence is.
Skip the animatic, or keep it minimal, when the stakes are low and the shoot is flexible. A simple two-person dialogue scene you can reshoot cheaply may not justify one, and a documentary sequence where you are still discovering the story on location often cannot be animaticked in advance because you do not yet know the shots. The test is the same as the frame: if getting the cut wrong is cheap to fix later, the animatic is buying insurance you may not need.
6) Build an Animatic in Storyflow
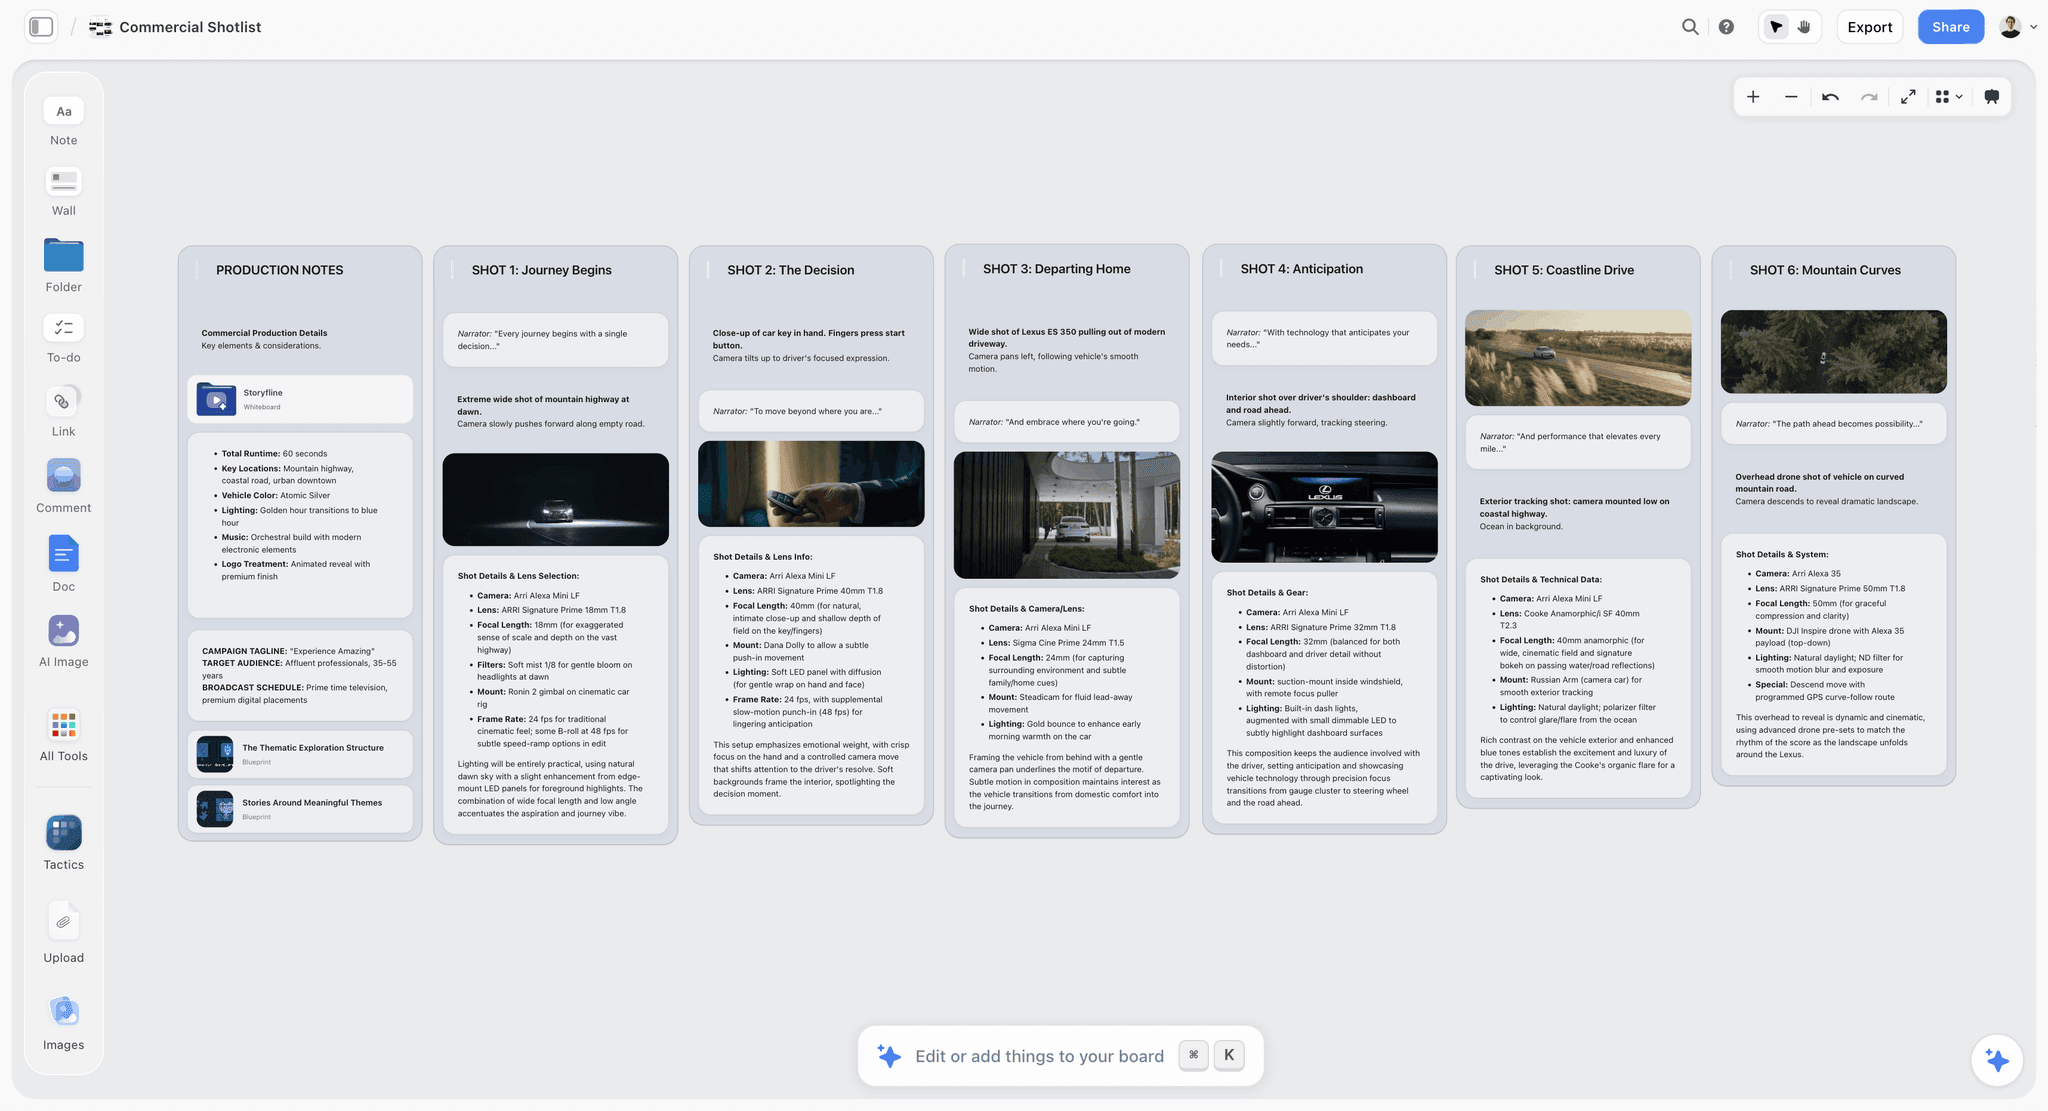
Storyflow is an AI visual workspace built on an infinite canvas, and it is a strong home for the pre-animatic work: planning the sequence, laying the boards in order, and getting the timing right before you assemble the cut. Here is the honest version of what it does well and where it stops.
The familiar approach is to storyboard in one tool, keep the shot list in a spreadsheet, gather references in a folder, and hold the timing in scattered notes, then rebuild all of it in an editor. Storyflow collapses the planning half onto one board. You lay your storyboard frames left to right in shot order, drop a timing note under each one (the intended duration, the beat it hits, the sound cue it cuts against), pull your references and scratch-track notes in beside them, and see the whole sequence as a single readable strip before anything gets shot.
Then you use the AI on the sequence itself. Storyflow's AI reads your full active canvas board by default, plus up to 1 Tactic and up to 3 Documents you @-mention in the chat. That means it looks at the actual boards and timing notes in front of you. Ask it to pressure-test the pacing of a sequence you have laid out, flag a hold that is too long or a reveal that lands too early, or draft the scratch voiceover lines for each panel. Because it sees the board, the notes come back about your sequence, not about animatics in general.
When the plan is right, you export the frames into your editor to build the timed animatic against real sound. Storyflow gets the sequence and the timing decided; the editor turns that decision into a playing cut.
A few concrete moves that make this work:
- Keep references, the scratch-track plan, and the shot list on the same board, so nothing about the sequence lives in a different tab.
- Use Story Blueprints (the 200+ template library on Plus, Pro, and Max) for the surrounding pre-production, like the shot list and the treatment, so the animatic plan sits inside the whole project.
Honest limits, because an animatic is a timing job and Storyflow does not do every part of it:
- Storyflow is not a video editor or an animation tool. You assemble and time the actual animatic in Premiere or After Effects. Storyflow plans the sequence and lays out the frames; it does not render a playing timeline.
- Storyflow is cloud-only. There is no offline or local-first mode, so if you need to work with no connection or keep everything on a local drive, this is the wrong tool for that requirement.
- There is no audio timeline. You cannot scrub picture against a waveform or sync sound to frames inside Storyflow. Sound-to-picture syncing happens in your editor, not on the canvas.
Storyflow pricing is flat per account, not per user. Free is $0 with no card (unlimited notes, images, and links, unlimited shared boards, unlimited collaboration, basic AI, 20 file uploads). Plus is $9.99/mo annual ($12.50 monthly) and adds the 200+ Story Blueprints, and unlimited uploads. Pro is $14/mo annual ($19 monthly) and adds AI image generation and 20x more AI usage. Max is $39/mo annual ($49 monthly) and adds unlimited AI and a team workspace with roles and permissions.
7) How to Make an Animatic: Step by Step
The process is the same whether the animatic is for a commercial, a short film, or an animated sequence. The tools change; the steps do not.
- Lock the storyboard first. You cannot time frames you have not drawn. Get the shots and their order settled as stills before you add a clock, because retiming a sequence whose shots keep changing is wasted work.
- Estimate the duration of every shot. Go panel by panel and decide how long each one holds, in seconds or frames. This is your first honest guess at pace, and it will be wrong in useful ways.
- Build a scratch track. Record scratch dialogue, pull a temp music bed from a reference, and drop in the two or three sound effects that carry the sequence. Rough is fine; it only has to hold the rhythm.
- Assemble the timed cut in an editor. Bring the panels into Premiere, After Effects, or your tool of choice, hold each one for its estimated duration, and lay the scratch track underneath.
- Watch it against sound and find the problems. Play it in real time and feel where it drags, where a cut is early, where a beat has no air. The problems you find here are the entire payoff.
- Retime, recut, and iterate. Adjust holds, reorder shots, tighten or extend beats, and watch again until it plays the way it should. Most of the value is in this loop.
- Lock it and hand it off. Once the cut works, the animatic becomes the reference the shoot, the render, or the animation is built against.
Steps 1 through 3 are canvas work: laying frames in order, noting durations, gathering the scratch-track plan. Step 4 onward is editor work, because assembling and syncing a playing timeline is a video-editing job. Knowing which step lives in which tool is half the battle.
8) Types of Animatic by Discipline
An animatic means slightly different things depending on who is making it. The frame holds across all of them, but the emphasis shifts.
The animation animatic. In animation, the animatic is not optional; it is a core stage of the pipeline. Because animating is so expensive, the entire edit is locked at the animatic stage first: rough boards, held to time, cut against scratch dialogue and a temp track, so the timing is signed off before anyone animates a single in-between.
The commercial animatic. In advertising, the animatic exists to sell the spot and to lock the edit before an expensive shoot day. Agencies present animatics to clients for sign-off, because a moving version is far more persuasive than a board and a thirty-second spot has to hit an exact runtime and a precise emotional beat. Client approval on the animatic is how you make sure the shoot produces the film everyone agreed on.
The film animatic. In live action, animatics show up most for complex sequences: action, VFX, stunts, or any scene where timing and staging are hard to hold in your head. Directors use them to plan coverage, work out cut rhythm, and align the crew before the day. For a simple dialogue scene, a storyboard and a shot list are usually enough; for a set-piece, the animatic keeps a costly day on the rails. The stakes change across the three, but the job is always to test rhythm while it is still cheap to change.
9) Common Animatic Mistakes
Most bad animatics fail in a few predictable ways, and each traces back to forgetting that the animatic is a test, not a deliverable.
Drawing beautiful panels first. The most common and most expensive mistake. Polishing the art before the cut is locked wastes the hours the animatic was supposed to save, and it makes you attached to shots you should cut. Rough panels test timing just as well. Save the rendering for after the sequence works.
Skipping sound. An animatic without a scratch track is a slideshow. Half of what makes a sequence work is how picture and sound land together, and a silent animatic cannot test that. If you add one thing beyond timing, add sound.
Guessing durations instead of estimating them honestly. Holding every panel for the same length, or picking durations to make the sequence feel good rather than reflect the real shots, defeats the purpose. The point is to discover the true pace, which means committing to honest holds even when they expose a problem.
Treating the animatic as final. The animatic's whole value is the iteration loop: watch, find the problem, retime, watch again. Making one pass and calling it done skips the part where it earns its time. Plan to redo the cut several times.
11) The Bottom Line
An animatic is a storyboard timed to sound, and its value is about when you find your problems. Watch the sequence with a clock and a scratch track and they show up now, while they cost an afternoon. Skip it and the same problems surface on a shoot day or three weeks into an animation pipeline, when they cost real money. An animatic is the cheapest place to fail. Fix the cut before it costs a shoot day.
The practical split is simple. Decide the sequence and the timing on a canvas where the whole thing reads at a glance, then assemble the timed cut in a real editor and iterate until it plays. Do the planning half on the same board as the rest of your pre-production: lay your next sequence out in Storyflow, put the timing under each frame, and export to assemble. Start at storyflow.so.
10) FAQ: Animatics
What is an animatic in simple terms?
An animatic is a storyboard timed to sound. You hold each storyboard frame on screen for its real duration and play a scratch track underneath (dialogue, temp music, key sound effects), so you get a rough moving version of the sequence you can actually watch. It lets you judge the pace and rhythm of a scene before you shoot it or animate it, which a still storyboard cannot show you.
Do I need an animatic for a live-action film?
Not always. Animatics pay off most for complex or expensive sequences: action, VFX, stunts, comedy that lives on timing, or any scene where the edit rhythm is hard to hold in your head. For a simple dialogue scene you can reshoot cheaply, a storyboard and a shot list are usually enough. The test is cost: if getting the cut wrong is cheap to fix later, you may not need one.
What software do I use to make an animatic?
You plan and lay out the sequence in a canvas or storyboarding tool, then assemble and time the actual animatic in a video editor like Adobe Premiere or After Effects. Those are the industry standards for the assembly step, because holding frames to time and syncing them against sound on a timeline is a video-editing job. The planning step, laying frames in order with timing notes, is where a tool like Storyflow fits.
Can I make an animatic in Storyflow?
You can do the planning half in Storyflow: lay your storyboard frames in sequence on the infinite canvas, add a timing note and sound cue under each one, keep your references and shot list on the same board, and use the AI to pressure-test the pacing. Then you export the frames and assemble the timed animatic in a video editor. Storyflow is honest about this: it is not a video editor or an animation tool, it is cloud-only, and it has no audio timeline, so the final timed cut happens in Premiere or After Effects.
What is a scratch track?
A scratch track is the temporary sound laid under an animatic: scratch dialogue read by anyone available, a temp music bed pulled from a reference track, a few key sound effects, and any placeholder voiceover. It does not need to be clean or final. Its only job is to carry the rhythm the picture is cut against, so you can test how sound and image land together before you record the real thing.
What is the difference between an animatic and previs?
An animatic is a storyboard timed to sound, and it tests whether the edit works: pace, cut rhythm, shot order. Previs is rough 3D of the scene, and it tests where the camera goes and what is physically possible: blocking, lens choices, complex moves. They answer different questions. Many VFX-heavy projects use both, an animatic to lock the cut and previs to solve the camera and staging.
Filmmaking templates you can use in Storyflow
Skip the blank canvas. Open one of these filmmaking boards in Storyflow and the AI builds on the structure that is already there, from research through the shot list.


See Storyflow in Action
A visual AI workspace where every feature lives inside one canvas. No tab-switching, no context lost.
Build your entire board from a single message
Type what you need in the AI chat at the bottom of your canvas. The AI adds cards, headings, and structure directly onto your board.
Use expert frameworks as AI context
Type @ in the AI chat and choose any Tactic. The AI tailors every response to that framework instead of giving generic advice.
Turn your board into a mind map in seconds
Ask the AI to restructure your canvas as a mindmap. It connects your ideas into a visual hierarchy so you can see how everything relates.
Why Storyflow Exists
Storyflow actually began as a personal tool while working on creative and research projects.
We kept running into the same problem: ideas were scattered everywhere: notes, documents, and whiteboards.
Nothing helped us see how everything connected.
So we started building a workspace designed around how ideas actually grow.
→ Read how Storyflow was createdJustkay
Documentary Filmmaker & Founder at Storyflow
Published: 2026-07-01
Start creating with AI and become more productive
Transform your creative workflow with AI-powered tools. Generate ideas, create content, and boost your productivity in minutes instead of hours.
Ask Storyflow to