How to Make an Animatic: A Step-by-Step Guide (2026)
How to make an animatic in 2026, step by step. Time your storyboard, add scratch audio, and test the pacing of a scene before you spend a single shoot day.

Category
Filmmaking
Author

Justkay
Documentary Filmmaker & Founder at Storyflow
Topics
2026-06-18
•
12 min read
•
FilmmakingTable of Contents
Templates to check out for this topic


Home > Blog > Filmmaking > How to Make an Animatic: A Step-by-Step Guide
By Justkay, Documentary Filmmaker and Founder of Storyflow
Published June 18, 2026 · Updated June 18, 2026 · 12 min read · Filmmaking
Table of Contents
How do you make an animatic?
To make an animatic, take a finished storyboard and play it back as a timed video. Hold each frame on screen for the length the shot will run, lay scratch voiceover, temp music, and rough sound effects underneath, and watch the scene play at real speed. Work in eight steps: finalize the storyboard, set frame timings, add scratch audio, sequence the panels to the audio, add simple camera moves, review the pacing, get notes, then iterate. An animatic is a timed, moving version of a storyboard, and its job is to test pacing before you shoot.
Board the sequence first, then time it into an animatic
Storyflow drafts your frames on an infinite canvas and keeps timing notes beside each one, so the storyboard you build is ready to cut into an animatic.

1) Quick Answer: How to Make an Animatic
To make an animatic, take a finished storyboard and play it back as a timed video. You hold each frame on screen for the exact length the shot will run, lay scratch voiceover, temp music, and rough sound effects underneath, and watch the scene play in real time before you shoot it. Work in eight steps: finalize the storyboard, set the timing for each frame, record scratch audio, sequence the panels to picture, add simple camera moves, review the pacing, get notes from your team, then iterate. The point is not to make something pretty. The point is to hear and see whether the scene works at the speed an audience will actually experience it.
An animatic is not a prettier storyboard. It is a clock. A storyboard tells you what the shots are. An animatic tells you whether they breathe, drag, or rush once you press play.
I have run multiple documentary projects from research through pre-production, and the cheapest mistake I ever caught was a thirty-second sequence that read fine as a static board and fell apart the moment I timed it: the reveal landed four seconds too early and the whole scene deflated. Fixing it on a timeline cost an afternoon. Fixing it after the shoot would have cost a reshoot. This guide walks the process I use to turn a storyboard into a timed animatic, where the honest answers about pacing show up before the money does.
2) What an Animatic Is and Why It Matters
An animatic is a timed, moving version of a storyboard. You take the static frames, decide how long each one stays on screen, string them together in a video editor, and add a rough audio track: scratch voiceover, temp music, and placeholder sound effects. The result is a low-fidelity preview that plays at the real running time of the scene. It is the closest you can get to watching the film before the film exists.
The technique comes from animation, where shooting is so expensive that nobody can afford to animate a sequence that does not work. Studios have used pencil tests and story reels for decades to test timing before committing to full animation, because animating thirty seconds an audience will find boring is thirty seconds of wasted, expensive labor. The animatic catches the boredom first. Live-action filmmakers, ad agencies, and music-video directors adopted the same tool for the same reason. A shoot day is the most expensive hour in the schedule, and the animatic is where you find out whether the plan is worth one.
Here is why the animatic matters more than its rough appearance suggests.
It tests pacing, which a storyboard cannot. A storyboard is silent and frozen. You can lay it out perfectly and still have no idea whether the scene moves at the right speed, because pacing only exists in time. The animatic adds the one dimension a static board is missing, and pacing problems that are invisible on the wall become obvious the instant the sequence plays.
It validates the edit before the edit. When you time the frames and watch them cut from one to the next, you are previewing the rhythm of the finished edit. A cut that feels jarring in the animatic will feel jarring in the final film. You find the bad cut now, when fixing it means dragging a clip, instead of in post, when fixing it means a missing shot you never captured.
It exposes whether the audio and picture fit. Scratch voiceover over timed frames tells you if the narration is too long for the shots, or the shots too short for the narration. Music against picture tells you if a beat lands on the wrong frame. These mismatches are silent on a storyboard and loud in an animatic.
It is the cheapest place to be wrong about time. Deciding a shot runs three seconds instead of six costs a drag on a timeline. Discovering it on set costs a setup. Discovering it in the edit costs a reshoot. The animatic moves every timing decision to the stage where being wrong is free, which is the whole reason it exists.
3) Animatic vs Storyboard vs Rough Cut
The three documents sit on a line from cheapest and most abstract to most expensive and most concrete. Confusing them wastes effort, because each answers a different question at a different stage.
A storyboard answers what the shots are. It is a sequence of static frames, one per camera setup, read like a comic strip. It is silent and frozen. It settles composition, shot type, and order, but it cannot tell you anything about speed, because nothing on a storyboard moves.
An animatic answers whether the scene works in time. It is the storyboard set to a clock, each frame held for its real duration with rough audio underneath. It is moving and timed, but the imagery is still placeholder: drawings or stills, not footage. It settles pacing, rhythm, and the fit between picture and sound, using assets that cost almost nothing to change.
A rough cut answers whether the footage works. It is assembled from real shots you have already filmed, edited into a first pass. It is moving, timed, and made of footage. It settles the actual edit, but every change is now expensive, because reshooting a shot means going back to set.
The relationship that matters: an animatic uses the cheapest possible material to answer the most important question as early as possible. It is not a rough cut made of drawings. It is a pacing test made of placeholders. You learn what a rough cut would teach you, at a stage where the lesson is still free to act on.
A storyboard that looks finished can still hide a pacing disaster. A rough cut that reveals the same disaster has already cost you the shoot. The animatic is the stage in between that catches it for the price of an afternoon.
4) What You Need Before You Start
An animatic is a timing test, and a test needs something to test. If the underlying decisions do not exist yet, you are not making an animatic, you are guessing at a film one frame duration at a time. Gather four things before you open a timeline.
A finished or near-finished storyboard. The animatic times the storyboard, so the board has to exist first. If the storyboard is still in flux, the animatic will be too, and you will re-time the same scene every time a panel changes. Lock the board, or at least the scene you are animaticking, before you start. If you have not built it yet, the storyboarding guide linked below covers the full process.
Frame timings, even rough ones. You need a first instinct for how long each shot runs. You do not need to be right yet, that is what the animatic is for, but you need a starting number for every frame. A reveal might hold for four seconds, a quick reaction for one, an establishing shot for six. These rough numbers are the raw material the animatic will sharpen.
Scratch audio. Pacing is half picture and half sound, so you need rough audio to test against. For a narrative scene that means a scratch read of the dialogue; for a documentary or a commercial, a scratch voiceover. Add temp music if music will carry the scene, and rough sound effects for any beat that depends on a sound. Scratch means rough on purpose: a phone recording of yourself reading the lines is enough. The animatic does not need good audio, it needs the right length of audio.
A simple editing surface. You need somewhere to lay frames on a timeline and set durations: a dedicated animatic app, a storyboarding tool with a play feature, or a plain video editor. Section 7 covers the honest options. What you do not need is anything that produces a finished render. The animatic is a draft, and a draft tool is the right tool.
The relationship to keep in front of you: the storyboard is the what, the frame timings are the how long, and the scratch audio is the against what. When all three live together, a change to one updates your sense of the others. When they live in separate places, a timing change quietly breaks the fit with the audio and you do not notice until playback.
5) How to Make an Animatic Step by Step
Here is the eight-step process. It runs from a finished storyboard to a timed animatic your team can review. The steps are sequential, but steps two through seven loop: you will time, sequence, watch, adjust, and re-time until the scene plays at the right speed.
Step 1: Finalize the storyboard
Lock the board for the scene you are animaticking. Every panel should be a clear, single camera setup, in shooting-story order, annotated with shot type and any camera move. You are about to assign a duration to each frame, so ambiguity now becomes confusion later. The animatic inherits every problem the storyboard has, so the cleaner the board, the more honest the timing test.
Step 2: Set the frame timings
Decide how long each frame holds on screen. Start with your rough instincts and assign a duration to every panel: this reveal holds for four seconds, this cut is a one-second reaction, this establishing shot breathes for six. Do not agonize over precision yet. The first pass exists so you have something to play and react to. The real timing emerges when you watch it, not when you guess at it. Write the durations down per frame so you can adjust them deliberately rather than by feel.
Step 3: Add scratch voiceover, temp music, and SFX
Record the rough audio and bring it in. Lay a scratch read of the dialogue or a scratch voiceover, drop temp music under any beat that depends on it, and add rough sound effects for the moments that need a sound to land. The audio is not decoration. It is half the pacing test. A scene that looks correctly timed can fall apart the moment you hear how long the narration actually takes, and you only learn that with sound on the timeline.
Step 4: Sequence the panels to picture
Lay the frames on the timeline in order, each held for the duration you set, and line them up against the audio. The storyboard becomes a moving sequence cut to your scratch track. Make the picture changes hit where the audio tells you they should: a new frame on a new line of dialogue, a cut on a music beat. Sequencing to picture, against real audio lengths, is where the animatic stops being a slideshow and starts being a timed scene.
Step 5: Add simple camera moves
Add the moves that change how a shot reads in time: a slow push in, a pan across a frame, a tilt up, a simple zoom on a still. You do not need real camera work, you need the timing of the move, because a static frame and the same frame with a four-second push in feel completely different at playback. Add the moves that carry pacing and skip the ones that are only decoration.
Step 6: Review the pacing
Play the whole thing, start to finish, at real speed, and watch it as an audience would. This is the moment the animatic earns its existence. Where does it drag? Where does it rush? Does the reveal land too early? Does a cut feel jarring? Is the voiceover longer than the shots that carry it? Watch it more than once. The first viewing tells you the big problems, the second and third tell you the subtle ones. Note every timing that feels wrong.
Step 7: Get notes
Show the animatic to the people who will shoot and cut the scene, and to someone who has never seen it. A director's eye slides past a pacing problem the director already knows is coming. An editor, a cinematographer, and a fresh viewer will each feel a drag the author has gone numb to. Pacing is felt, not measured, so more eyes catch more than one author can. Collect the notes before you touch the timeline again.
Step 8: Iterate
Take the notes and the problems you found, and re-time. Stretch the shots that rushed, trim the shots that dragged, move the cut that felt jarring, slide the reveal to where it lands. Then play it again. The animatic is not a one-pass document, it is a loop: time, watch, adjust, repeat, until the scene plays at the speed it should. Stop when a fresh viewing produces no new pacing notes, not when you run out of patience.
That is the loop. Finalize, time, add audio, sequence, add moves, review, get notes, iterate. The fastest way to waste an animatic is to skip steps six and seven, because reviewing the pacing is the entire reason the animatic exists, and outside notes are how you catch the drags you have stopped noticing.
6) A Worked Example
Take a thirty-second documentary opening: a subject walks into frame, sits, and delivers a single line that sets up the film. The storyboard has six panels and reads cleanly as a static board. Here is what happens when you turn it into an animatic.
The first timing pass assigns durations by instinct. The empty room holds three seconds, the subject entering four, sitting down three, settling two, the close-up before the line two, and the line delivered six. Total: twenty seconds. You record a scratch voiceover of the line, drop a low temp music bed under the whole thing, and add the sound of a door and a chair.
Then you play it. Two problems surface immediately, and neither was visible on the board. First, the empty room at three seconds feels endless with nothing happening, so the scene is dead before it starts. Second, the close-up before the line, at two seconds, rushes straight into the dialogue with no breath, so the line lands before the audience has settled on the face. The board hid both because the board has no clock.
You iterate. Cut the empty room to a second and a half so the scene starts moving sooner. Stretch the close-up before the line to four seconds so the audience arrives on the face and waits with it. Play it again. Now the opening has a shape: a quick start, a settle, a held beat, and a line that lands in the silence you built for it. The total barely changed, but the experience is completely different, because pacing is about where the time sits, not how much there is.
That is the whole value in one scene. The static board said the shots were right. The animatic said the timing was wrong. It is not that the storyboard failed. It is that the storyboard answered a different question, and only the animatic could answer this one. The fix cost an afternoon at a timeline. Found on set, it would have cost a setup. Found in the edit, it would have cost a shot you never knew to capture.
7) Tools for Animatics
There is an honest hierarchy of animatic tools, and the right one depends on how much fidelity you need and how connected the animatic has to be to the rest of your planning.
Dedicated animatic and storyboarding tools. Boords is the closest thing to a purpose-built animatic tool: you build the storyboard, set a duration per frame, add audio, and it plays back a timed animatic in the browser. Storyboarder, the free app from Wonder Unit, does the same job offline and exports a timed sequence. If your priority is a fast, clean animatic with timing baked into the storyboarding step, these are built for exactly that, and they are where most animatics should be made.
A video editor. For full control over timing, audio mixing, and camera moves, a real editor is the most capable option. DaVinci Resolve is free and powerful enough to cut a professional animatic, and Premiere Pro does the same in the Adobe ecosystem. Drop your frames on the timeline, set durations, lay scratch audio, add moves, and you have an animatic with the same precision you will use on the real edit. The trade-off is a steeper learning curve and a tool that is overkill for a simple thirty-second test.
But the animatic is rarely the only thing you are planning. It sits next to a storyboard, a script, a shot list, and references, and its timing decisions depend on all of them. This is where a visual canvas changes the planning around the animatic, even though it does not make the timed video itself.
Storyflow is an AI-powered visual creative workspace built on an infinite canvas. It is not an animatic tool, and that is the honest framing: Storyflow does not render a timed video and will not export an MP4 of your scene playing at speed. What it does is hold everything the animatic is built from on one board. Your storyboard frames, the per-frame timing notes, the scratch script, the reference images, and the shot list all live on the same surface, so when the animatic tells you a shot needs to run longer, you update the plan in the same place the storyboard lives instead of in a fourth disconnected app.
The part that matters most for planning: Storyflow's AI reads your full active canvas board, plus up to one Tactic and up to three @-mentioned Documents. So the AI sees the frames, the timing notes, and the script together. You can ask it to flag a sequence where the planned durations do not add up to the scene length you need, draft the scratch voiceover for a panel, or suggest where a beat is under-timed, and it answers from your actual project rather than a blank prompt. On Pro and above, AI image generation can create storyboard frames directly on the canvas, so you can rough in a missing panel without leaving the board. The 200+ Story Blueprints library gives you expert framework templates to structure the pre-production work around.
Two honest limitations beyond the obvious one. First, Storyflow plans the animatic but does not play it: you still take your timed frames into Boords, Storyboarder, or a video editor to produce the moving animatic with synced audio. Second, Storyflow is cloud-only, so a strict local-first or offline workflow is a poor fit, and you should reach for Storyboarder instead. Storyflow is the canvas where the storyboard, the timing notes, the script, and the references connect, not the editor that renders the timed video.
Pricing is straightforward. The Free plan is $0 forever: unlimited notes, images, and links, unlimited shared boards, basic AI, 20 file uploads, and unlimited collaboration, which is enough to plan a real storyboard and its timing on one board. Plus is $7.99/mo on an annual plan or $9.99/mo monthly, and adds the 200+ Story Blueprints, and unlimited uploads. Pro is $14/mo annual ($19/mo monthly) and adds AI image generation for creating frames. Max is $39/mo annual ($49/mo monthly) and adds the team workspace with roles and permissions. Pricing is flat per account, not per user.
If your storyboard and its timing keep drifting apart from the script and the shot list, plan the next one on a canvas where all four connect, then take the timed frames into a dedicated animatic tool to play it. Generate the storyboard your animatic comes from with AI, then start a free Storyflow workspace and put your frames, timing notes, and script on one board.
Storyflow Templates to Get You Started
You do not have to start from a blank board. These ready-made Storyflow templates cover the work in this guide, with the structure already in place and the AI ready to read it.
Storyboard Template
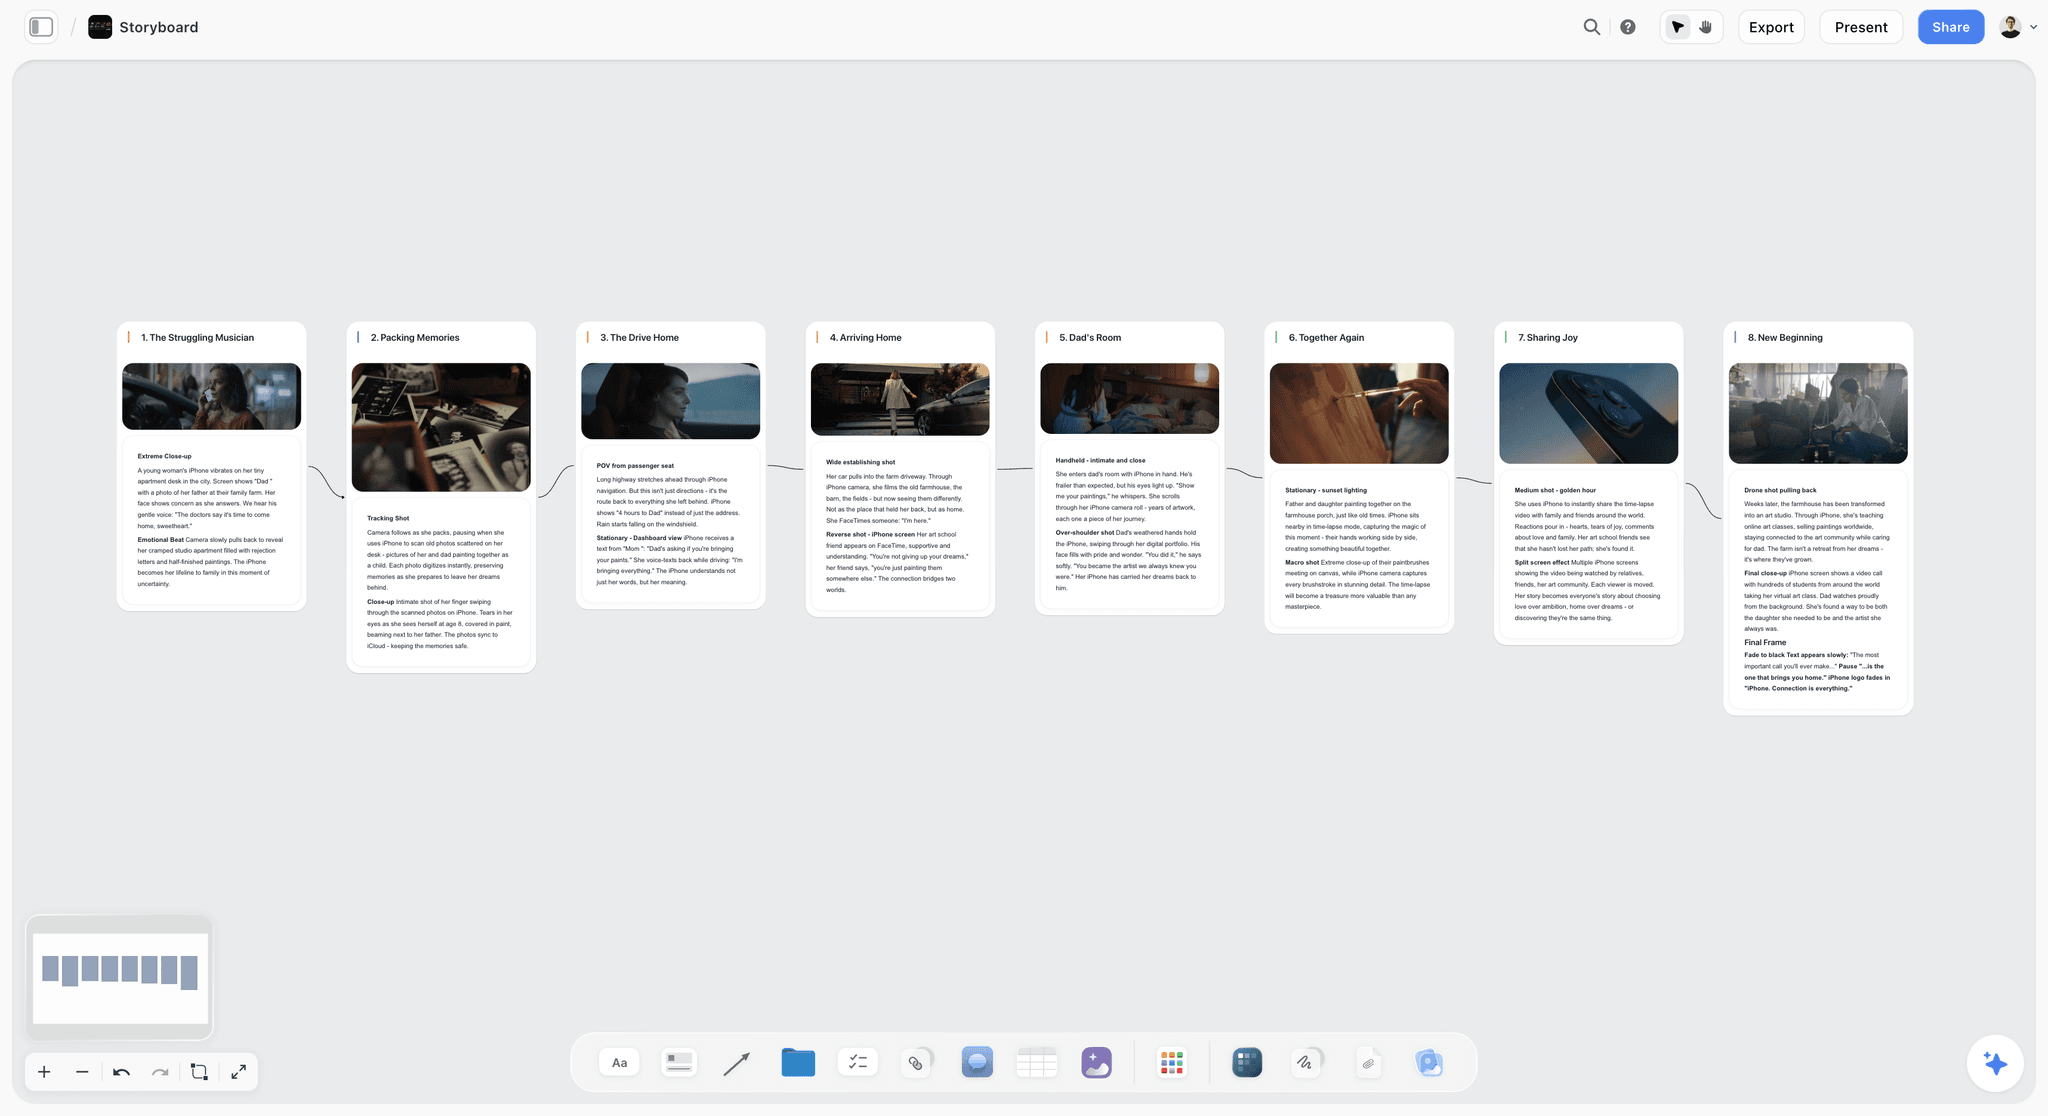
Plan a video or film shot by shot. The Storyboard template lays out frames, action captions, and shot notes on Storyflow's infinite canvas. Use the Storyboard template.
Shotlist Template
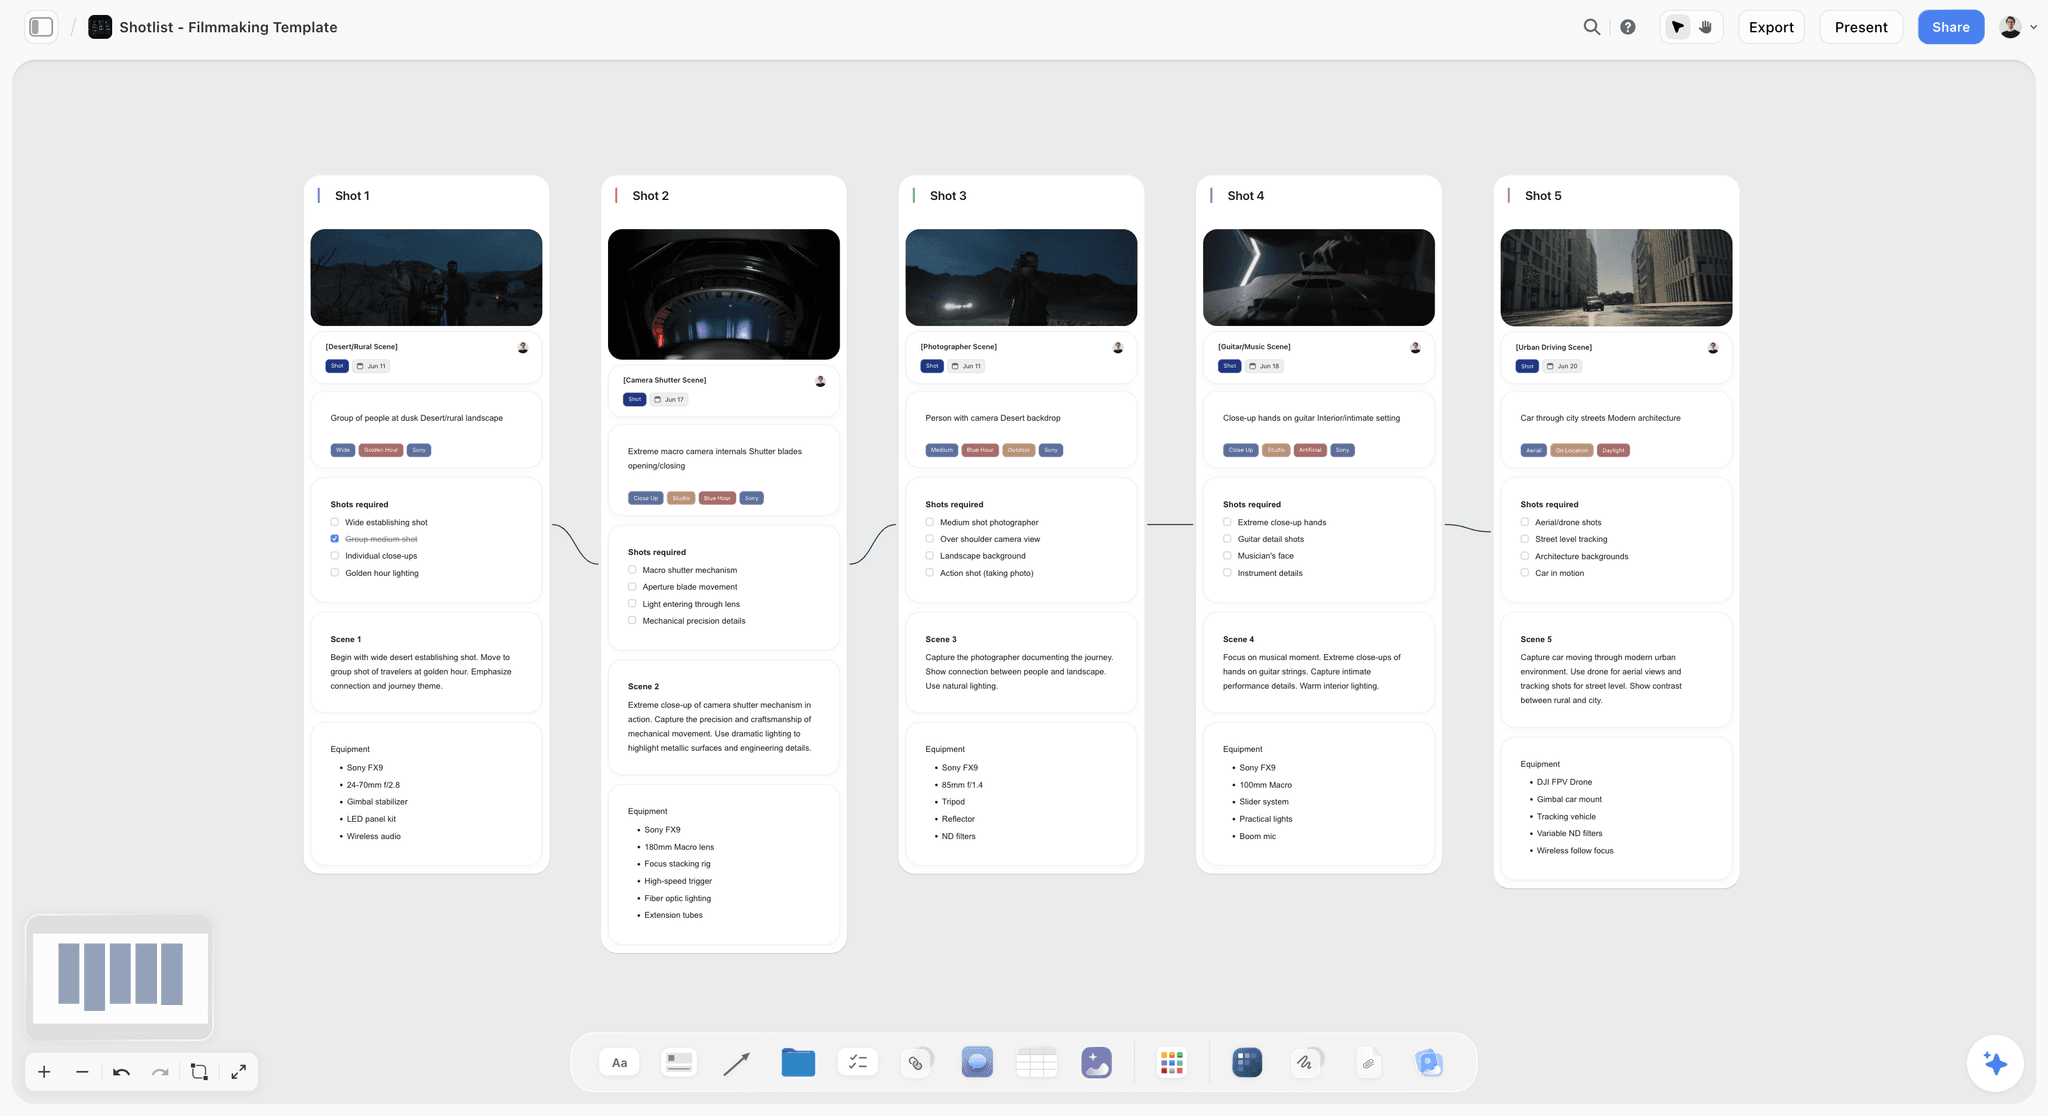
A free Shotlist template on Storyflow's infinite canvas. Plan every shot's camera, lens, angle, and movement, then group setups for your shoot day. Use the Shotlist template.
Pre-Production Board Template
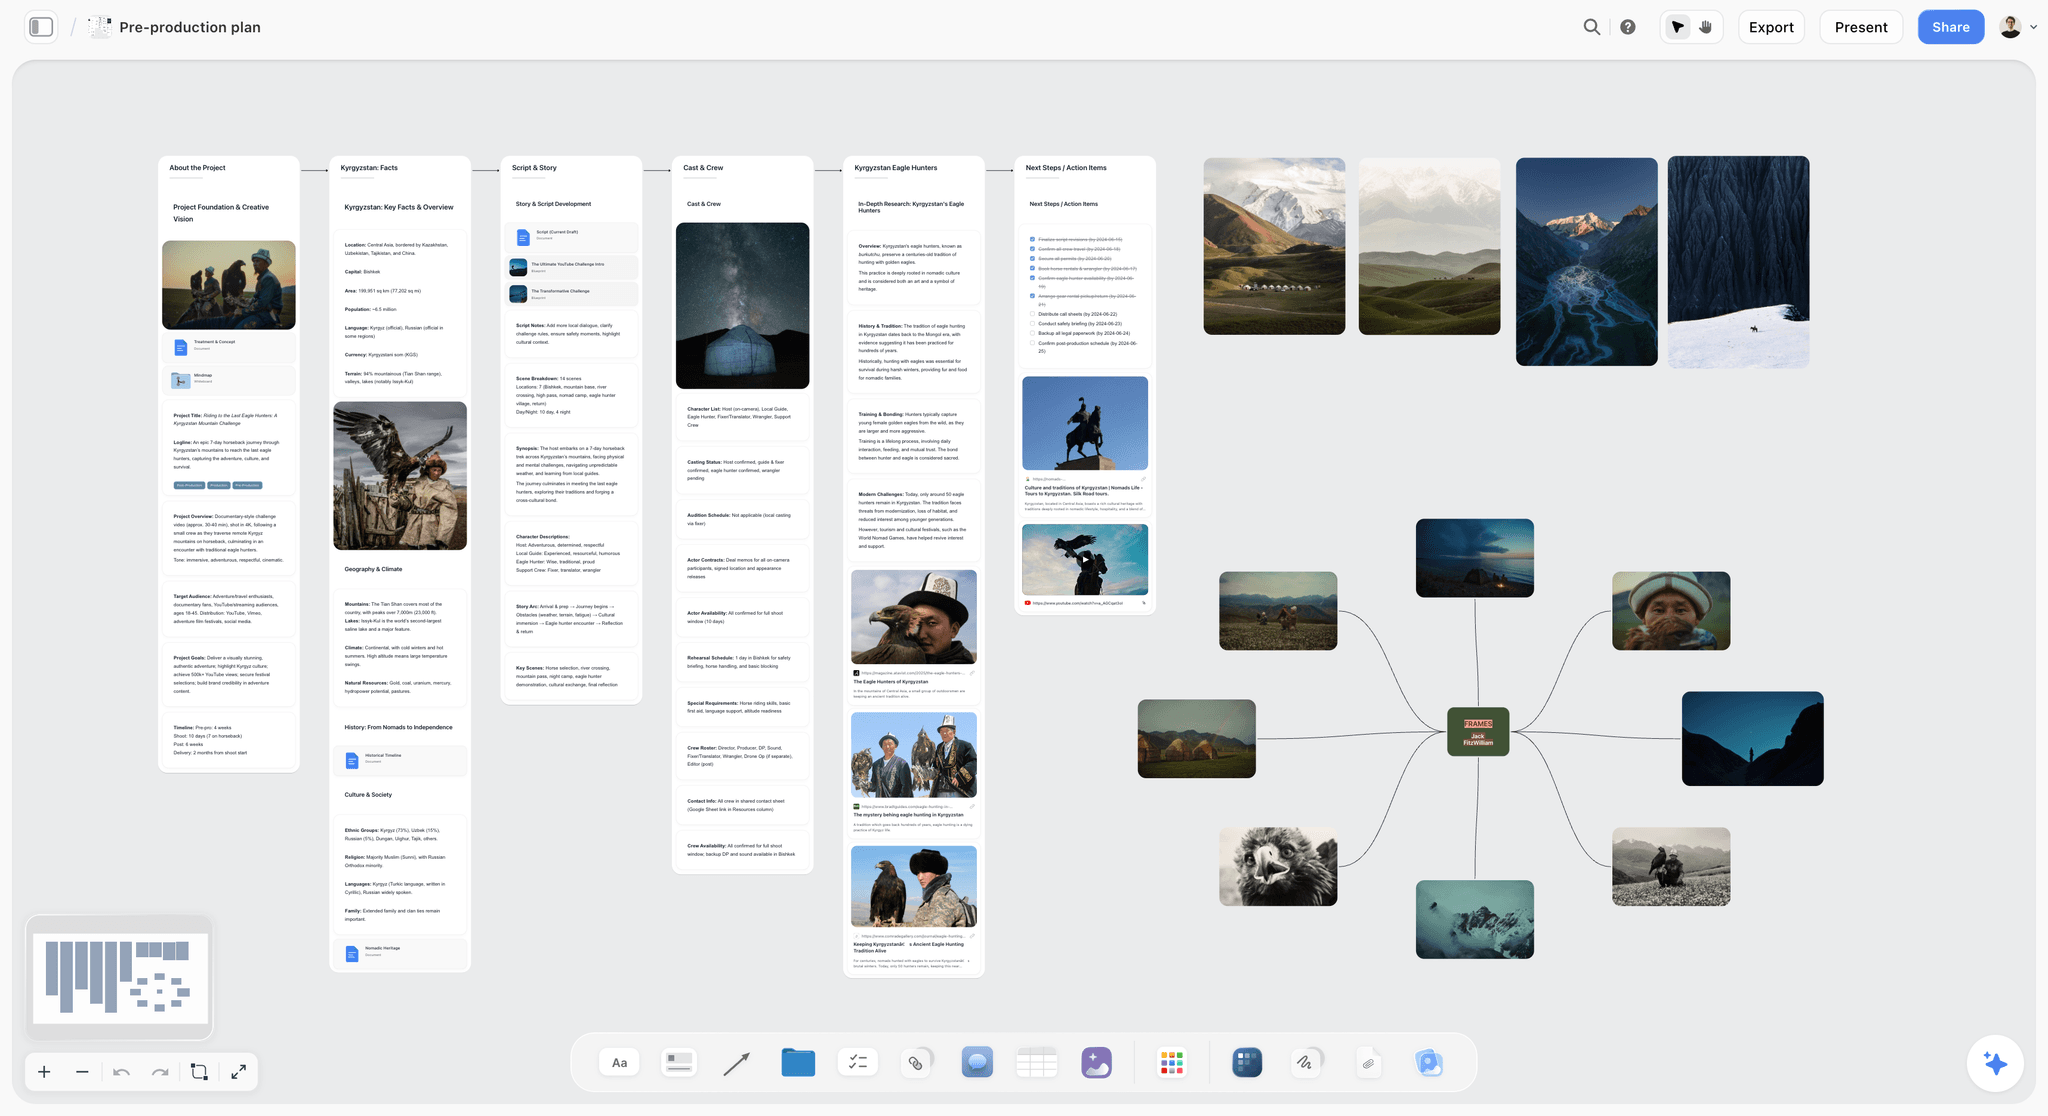
Plan a shoot from one Storyflow canvas. Keep the schedule, script, locations, cast and crew, gear, budget, and references on a single board. Use the Pre-Production Board template.
9) The Bottom Line
Making an animatic is not a drawing exercise and it is not a finishing exercise. It is a pacing test built from the cheapest possible material, run at the stage where being wrong about time is still free. Take a finished storyboard, set a rough duration for every frame, and lay scratch voiceover, temp music, and rough sound effects underneath. Sequence the frames to the audio, add the camera moves that shape the pace, and play it at real speed. Watch where it drags and where it rushes, get notes from the people who will shoot and cut it, then iterate until the scene breathes.
An animatic is not a prettier storyboard. It is a clock. The roughest animatic that plays at the right speed will protect a shoot better than the most beautiful storyboard that has never been timed.
The animatic does not live alone. It sits beside the storyboard it times, the script it tests against, and the shot list it feeds, and when those drift apart in separate apps, a timing change silently breaks the fit and you find out on set. Plan the storyboard, the timing, the script, and the references on one connected canvas with AI that reads the whole board, then take the timed frames into a dedicated animatic tool to play them. Start a free Storyflow workspace and build the plan your animatic comes from in one place.
8) FAQ: How to Make an Animatic
How do you make an animatic step by step?
Make an animatic in eight steps. Finalize the storyboard for your scene. Set a rough duration for each frame. Record scratch voiceover, temp music, and rough sound effects. Sequence the frames on a timeline against the audio. Add simple camera moves like a push in or a pan. Review the pacing by watching it play at real speed. Get notes from your team and a fresh viewer. Then iterate on the timing until the scene plays right. The fidelity does not matter. The pacing does.
What is an animatic?
An animatic is a timed, moving version of a storyboard with rough audio. You hold each frame on screen for the length the shot will run, string them together as a video, and lay scratch voiceover, temp music, and placeholder sound effects underneath. The result plays at the real running time of the scene, so you can test pacing and rhythm before you shoot. It is a low-fidelity preview of the finished edit, built from drawings or stills instead of footage, made specifically to answer whether the scene works in time.
What is the difference between an animatic and a storyboard?
A storyboard is static and silent. An animatic is timed and moving with sound. The storyboard answers what the shots are and what order they go in, frame by frame, with nothing on a clock. The animatic takes that same board, assigns each frame a real duration, adds scratch audio, and plays it back so you can feel the pacing. The storyboard settles composition and order. The animatic settles speed and rhythm, which a frozen board cannot show you.
What is the difference between an animatic and a rough cut?
An animatic is made of placeholder frames; a rough cut is made of real footage. The animatic comes first, in pre-production, using drawings or stills to test pacing before anything is filmed, so every change is cheap. The rough cut comes after the shoot, assembling the footage you captured, so every change is expensive and a missing shot means a reshoot. The animatic is the cheap pacing test; the rough cut is the real assembly.
Do I need to know how to draw to make an animatic?
No. An animatic tests timing, not artwork. The frames can be rough storyboard sketches, stick figures, or quick photos and reference stills. What matters is that each frame is held for the right duration against the right audio, so the pacing reads true. A polished frame timed badly is worse than a rough frame timed well. If you cannot draw, use stills or AI-assisted frames. The clock is what the animatic tests, not the drawing.
How long should each frame stay on screen in an animatic?
As long as the shot will actually run in the finished scene. A quick reaction might hold for one second, a line of dialogue for the length of the line, an establishing shot for four to six seconds. There is no fixed rule, because the whole point of the animatic is to discover the right durations by watching them play. Start with your instinct, then adjust based on what feels too fast or too slow on playback. The timing you end with is the timing the animatic taught you, not the timing you guessed.
What audio do I need for an animatic?
You need scratch audio, which means rough placeholder sound that exists to test length and timing, not quality. Record a scratch read of the dialogue or a scratch voiceover, add temp music under any beat that music will carry, and drop in rough sound effects for moments that depend on a sound. A phone recording of yourself reading the lines is enough. The audio is half the pacing test, because a scene timed correctly for picture can still fall apart when you hear how long the narration really takes.
Can I make an animatic from a storyboard?
Yes, and that is the standard workflow. The animatic is the storyboard set to a clock. You take the finished panels, assign each one a duration, sequence them on a timeline, and add scratch audio. Tools like Boords and Storyboarder let you set frame timings inside the storyboarding step and play the result back, and a video editor like DaVinci Resolve does the same with more control. The storyboard is the input; the timed playback is the animatic.
What tools do I use to make an animatic?
For a purpose-built animatic, use Boords or Storyboarder, which let you set per-frame durations and play back a timed sequence with audio. For full control over timing, mixing, and camera moves, use a video editor like DaVinci Resolve, which is free, or Premiere Pro. To plan the storyboard, timing notes, script, and references on one connected canvas, use a visual workspace like Storyflow, then take the frames into a dedicated tool to render the timed playback.
When in pre-production should I make an animatic?
Make the animatic after the storyboard is locked or near-locked, and before the shoot is scheduled. Made too early, against a board that is still changing, it wastes the work, because every storyboard change re-times the animatic. Made too late, it leaves no room to act on the pacing problems it reveals. The animatic belongs where the board is settled but the shoot can still be adjusted, so a timing fix changes the plan instead of forcing a reshoot.
Filmmaking templates you can use in Storyflow
Skip the blank canvas. Open one of these filmmaking boards in Storyflow and the AI builds on the structure that is already there, from research through the shot list.


See Storyflow in Action
A visual AI workspace where every feature lives inside one canvas. No tab-switching, no context lost.
Build your entire board from a single message
Type what you need in the AI chat at the bottom of your canvas. The AI adds cards, headings, and structure directly onto your board.
Use expert frameworks as AI context
Type @ in the AI chat and choose any Tactic. The AI tailors every response to that framework instead of giving generic advice.
Turn your board into a mind map in seconds
Ask the AI to restructure your canvas as a mindmap. It connects your ideas into a visual hierarchy so you can see how everything relates.
Why Storyflow Exists
Storyflow actually began as a personal tool while working on creative and research projects.
We kept running into the same problem: ideas were scattered everywhere: notes, documents, and whiteboards.
Nothing helped us see how everything connected.
So we started building a workspace designed around how ideas actually grow.
→ Read how Storyflow was createdJustkay
Documentary Filmmaker & Founder at Storyflow
Published: 2026-06-18
Start creating with AI and become more productive
Transform your creative workflow with AI-powered tools. Generate ideas, create content, and boost your productivity in minutes instead of hours.
Ask Storyflow to