How to Plan a Photo Essay (Step-by-Step, 2026)
A photographer's step-by-step guide to planning a photo essay: find the subject and angle, build the shot list a story needs, plan access and ethics, shoot for sequence, then edit and sequence the selects into a story on one board.

Category
Photography
Author

Justkay
Documentary Filmmaker & Founder at Storyflow
Topics
2026-07-21
•
15 min read
•
Photography- how to plan a photo essay
- photo essay
- photo essay ideas
- narrative photo essay
- photo essay shot list
- how to sequence a photo essay
How do you plan a photo essay?
To plan a photo essay, plan the story before you plan the shoot: pick a subject with an angle worth arguing, decide whether the essay is narrative (it follows a sequence of events) or thematic (it circles one idea from many sides), research your subject and secure honest access, then build a shot list a story actually needs, an establishing shot, portraits, details, interaction, a decisive moment, and a closing frame. Shoot for sequence, not for single trophy frames, so the images connect. Then edit and sequence the selects into an order that carries a reader from the first frame to the last, and write the captions and text that anchor it. A photo essay is not a gallery of your best pictures; it is a set of images arranged to make a point, and the arrangement is the work. I have built visual stories for years, and the thing that took me longest to accept is that a photo essay is won or lost in two places most people ignore: the planning before the shoot and the sequencing after it. The shooting matters, but a photographer with an average eye and a clear story beats a brilliant eye with no story every time. This guide is the working method I use, and it is honest about the moment when the job stops being planning and becomes editing, because pretending a story board can cull ten thousand RAW files helps no one.

Full disclosure: Storyflow is our own product, so weigh its placement with the skepticism you would apply to any tool a company recommends on its own blog. We rank it first for one job, planning the story and sequencing the selects on one AI-readable canvas, and we are explicit that Lightroom culls and grades the RAWs better than any board and that the camera, not the canvas, takes the picture.
Quick Comparison
Where photographers actually plan and sequence a photo essay, and the one job each tool is best at.
| Tool | Best For | AI Features | Price |
|---|---|---|---|
| Storyflow | Planning story, sequencing selects | Reads the whole board | $7.99 mo annual (free plan late 2026) |
| Adobe Lightroom | Culling + grading RAWs | AI masking | Trial / ~$9.99 mo |
| Milanote | Reference + mood | Limited | Free / ~$12.50 mo |
| Notion | Subject + caption database | Notion AI | Free / paid |
| Prints / contact sheet | Sequencing physical prints | None | Cost of prints |
Why a Photo Essay Is Planned, Not Just Shot
Watch a photo essay fall flat and it is rarely the pictures. Each frame can be technically strong, well lit, sharp, nicely composed, and the whole thing still says nothing, because it is a gallery pretending to be an essay. A gallery is a collection: here are my best shots of this place, arranged by how good they look. An essay is an argument: here is what I want you to understand about this subject, built from images that each do a job. The gallery asks you to admire. The essay asks you to follow. That difference is decided in the planning, not on the day, because a set of frames that were never meant to connect will not connect no matter how you hang them.
Here is what makes an essay its own discipline. A single photograph has to work alone; it carries its whole meaning in one frame. An essay works the opposite way: no single frame has to carry everything, because the images share the load and hand meaning from one to the next. That means you are not hunting for one perfect picture; you are building a sequence where the establishing frame sets the place, the portrait gives it a face, the detail grounds it, the interaction shows the stakes, and the closing frame lands the point. Plan for that and each frame knows its role. Shoot without it and you come home with twelve good pictures that refuse to add up to one story.
The reason planning matters so much is that you usually cannot reshoot a photo essay. Documentary and photojournalistic subjects move on, seasons turn, the person you photographed will not sit for the same afternoon twice. So the planning is not a formality you do to look organized; it is how you make sure that when the moment is in front of you, you know which frame you still need and you take it. A photographer working from a clear shot list catches the closing frame because they were watching for it. A photographer working on instinct alone gets home, sits down to edit, and discovers the story has a hole exactly where the ending should be.
Narrative or Thematic: Two Kinds of Photo Essay
Before you plan a single frame, decide which kind of essay you are making, because it changes everything downstream. There are two broad shapes, and most strong essays commit to one.
A narrative essay tells a story that moves through time. It has something like a beginning, a middle, and an end: a day in a working kitchen from the first delivery to the last plate, a boxer from the weigh-in to the decision, a town through a single flood. The sequence follows events, so the order of your images is close to the order things happened, and your job is to find the frames that mark the turns. Narrative essays live or die on the ending, because a story that moves through time has to arrive somewhere.
A thematic essay does not follow time; it circles an idea. It gathers images that each approach one subject from a different angle, and the meaning comes from the accumulation rather than from a sequence of events: portraits of people who all do the same disappearing job, the many faces of a single street, what "home" looks like across ten households. There is no clock, so the order is built on rhythm and contrast, not chronology, and your job is to find enough distinct angles on the theme that the reader feels its full shape. Thematic essays live or die on range, because an idea shown from one angle is a single picture, not an essay.
Knowing which one you are making tells you what to shoot for. The narrative essay needs beats and an ending; the thematic essay needs variety and depth on one note. A lot of essays fail because the photographer never chose, so they came back with half a story and half a theme and neither one is whole. Choose first, and let the choice drive the shot list.
The Shots a Photo Essay Needs
Every photo essay that held together was built from the same kinds of frames, whether the photographer named them or not. This is the shot list a story needs, and it is not a list of your favorite compositions; it is a list of jobs the sequence has to fill. Miss one and the story has a gap the prettiest picture cannot fill.
- An establishing shot. The scene-setting frame that tells the reader where they are and what world they are entering. Usually wider, it orients before the story tightens in. Without it, a reader is dropped into close-ups with no ground under them.
- Portraits. The face or faces the story is about. A portrait gives the essay a person to care about and a set of eyes to follow, and even a story about a place needs a human somewhere in it to matter. Plan for at least one strong portrait, more if the essay has several subjects.
- Detail shots. The close, quiet frames that ground the story in specifics: hands at work, a worn tool, a texture, an object that carries meaning. Details are the texture of the essay and the rhythm between the big frames, and they are what make a place feel real rather than described.
- Interaction or action. People doing something, together or alone: the work, the exchange, the gesture. Interaction shows the stakes and the relationships, and it is where the story stops being a set of portraits and starts moving. A static essay is often an essay with no interaction in it.
- The decisive moment. The frame where everything aligns, the peak that could not have been planned to the second but that you were ready for because you planned for it. It is the picture the essay is quietly building toward, the one you would run if you could run only one. You cannot schedule it, but you can put yourself in the place and the readiness where it can happen.
- A closing shot. The frame that ends the essay and lands the point, the visual equivalent of a last line. It resolves a narrative or seals a theme, and a reader should feel the essay close on it. An essay with no closing frame does not end; it just stops, and the reader feels the difference.
The list works because each frame does a job the others cannot. The establishing shot orients, the portrait gives a face, the details ground, the interaction moves, the decisive moment peaks, and the closing frame lands. Plan the shoot around filling every job and you come home with a sequence that can be built into a story. Shoot only the frames that look good in the moment and you come home with a pile of pictures that all do the same job and leave four of the six empty. This shot list is the spine of the plan, and every step below exists to fill it.
Quick Picks: Where to Plan and Sequence a Photo Essay
Best for planning the story and sequencing the selects on one canvas: Storyflow. The surface where the subject research, the shot list, and then the actual selects live together on one infinite canvas, so you can lay the images out, drag them into an order, and see the sequence as a reader will, with AI that reads the whole board to help draft the sequence and the captions and flag a story with a missing beat. Plus is $7.99/month billed annually. The honest limit: it is not a RAW editor and it does not take the picture.
Best for culling and editing the RAW selects: Adobe Lightroom. The moment your job is rating, culling, and grading thousands of RAW files, a real photo editor with a contact-sheet grid beats any planning board. Do the technical edit here, then bring the selects out to sequence. Paid, around $9.99/month for the photography plan.
Best for a visual reference and mood board: Milanote or Pinterest. For gathering the look and the references before you shoot, a mood board is the right tool. Milanote is built for it (free with an item cap, paid from around $12.50/month); Pinterest is free for gathering references.
Best for a structured subject and caption log: Notion. If you want the subject research, the release forms, and the captions as a database, Notion works. Free plan, paid tiers.
The honest split: plan the story and sequence the selects on a board, cull and grade the RAWs in a real photo editor, and gather references on a mood board. Try Storyflow to plan and sequence your essay.
Comparison Table: Where to Plan a Photo Essay
| Tool | Best for | AI on the story | Visual planning | Free tier | Starting price |
|---|---|---|---|---|---|
Storyflow | Planning the story, sequencing selects | Reads the whole board | Yes, infinite canvas | Coming late 2026 (invited collaborators join free now) | $7.99/mo annual |
Adobe Lightroom | Culling and grading RAW selects | AI masking and denoise | Contact-sheet grid | No, trial only | ~$9.99/mo |
Milanote | A visual reference and mood board | Limited | Yes | Yes, item cap | ~$12.50/mo |
Gathering visual references | Limited | Yes | Yes | Free | |
Notion | A subject and caption database | Notion AI | Limited | Yes | Free + paid |
Prints / contact sheet | Sequencing physical prints | No | Physical | n/a | Cost of prints |
Pricing checked July 2026. Competitor prices move and are quoted per plan, so verify on each vendor's page. Storyflow is paid-only during early access, and its Free plan (which will run the whole planning and sequencing method) launches before the end of 2026; the paid tier adds the 200+ Story Blueprints and unlimited file uploads. No single tool does the whole job, so most photographers cull and grade in a photo editor, then plan and sequence the story on a board.
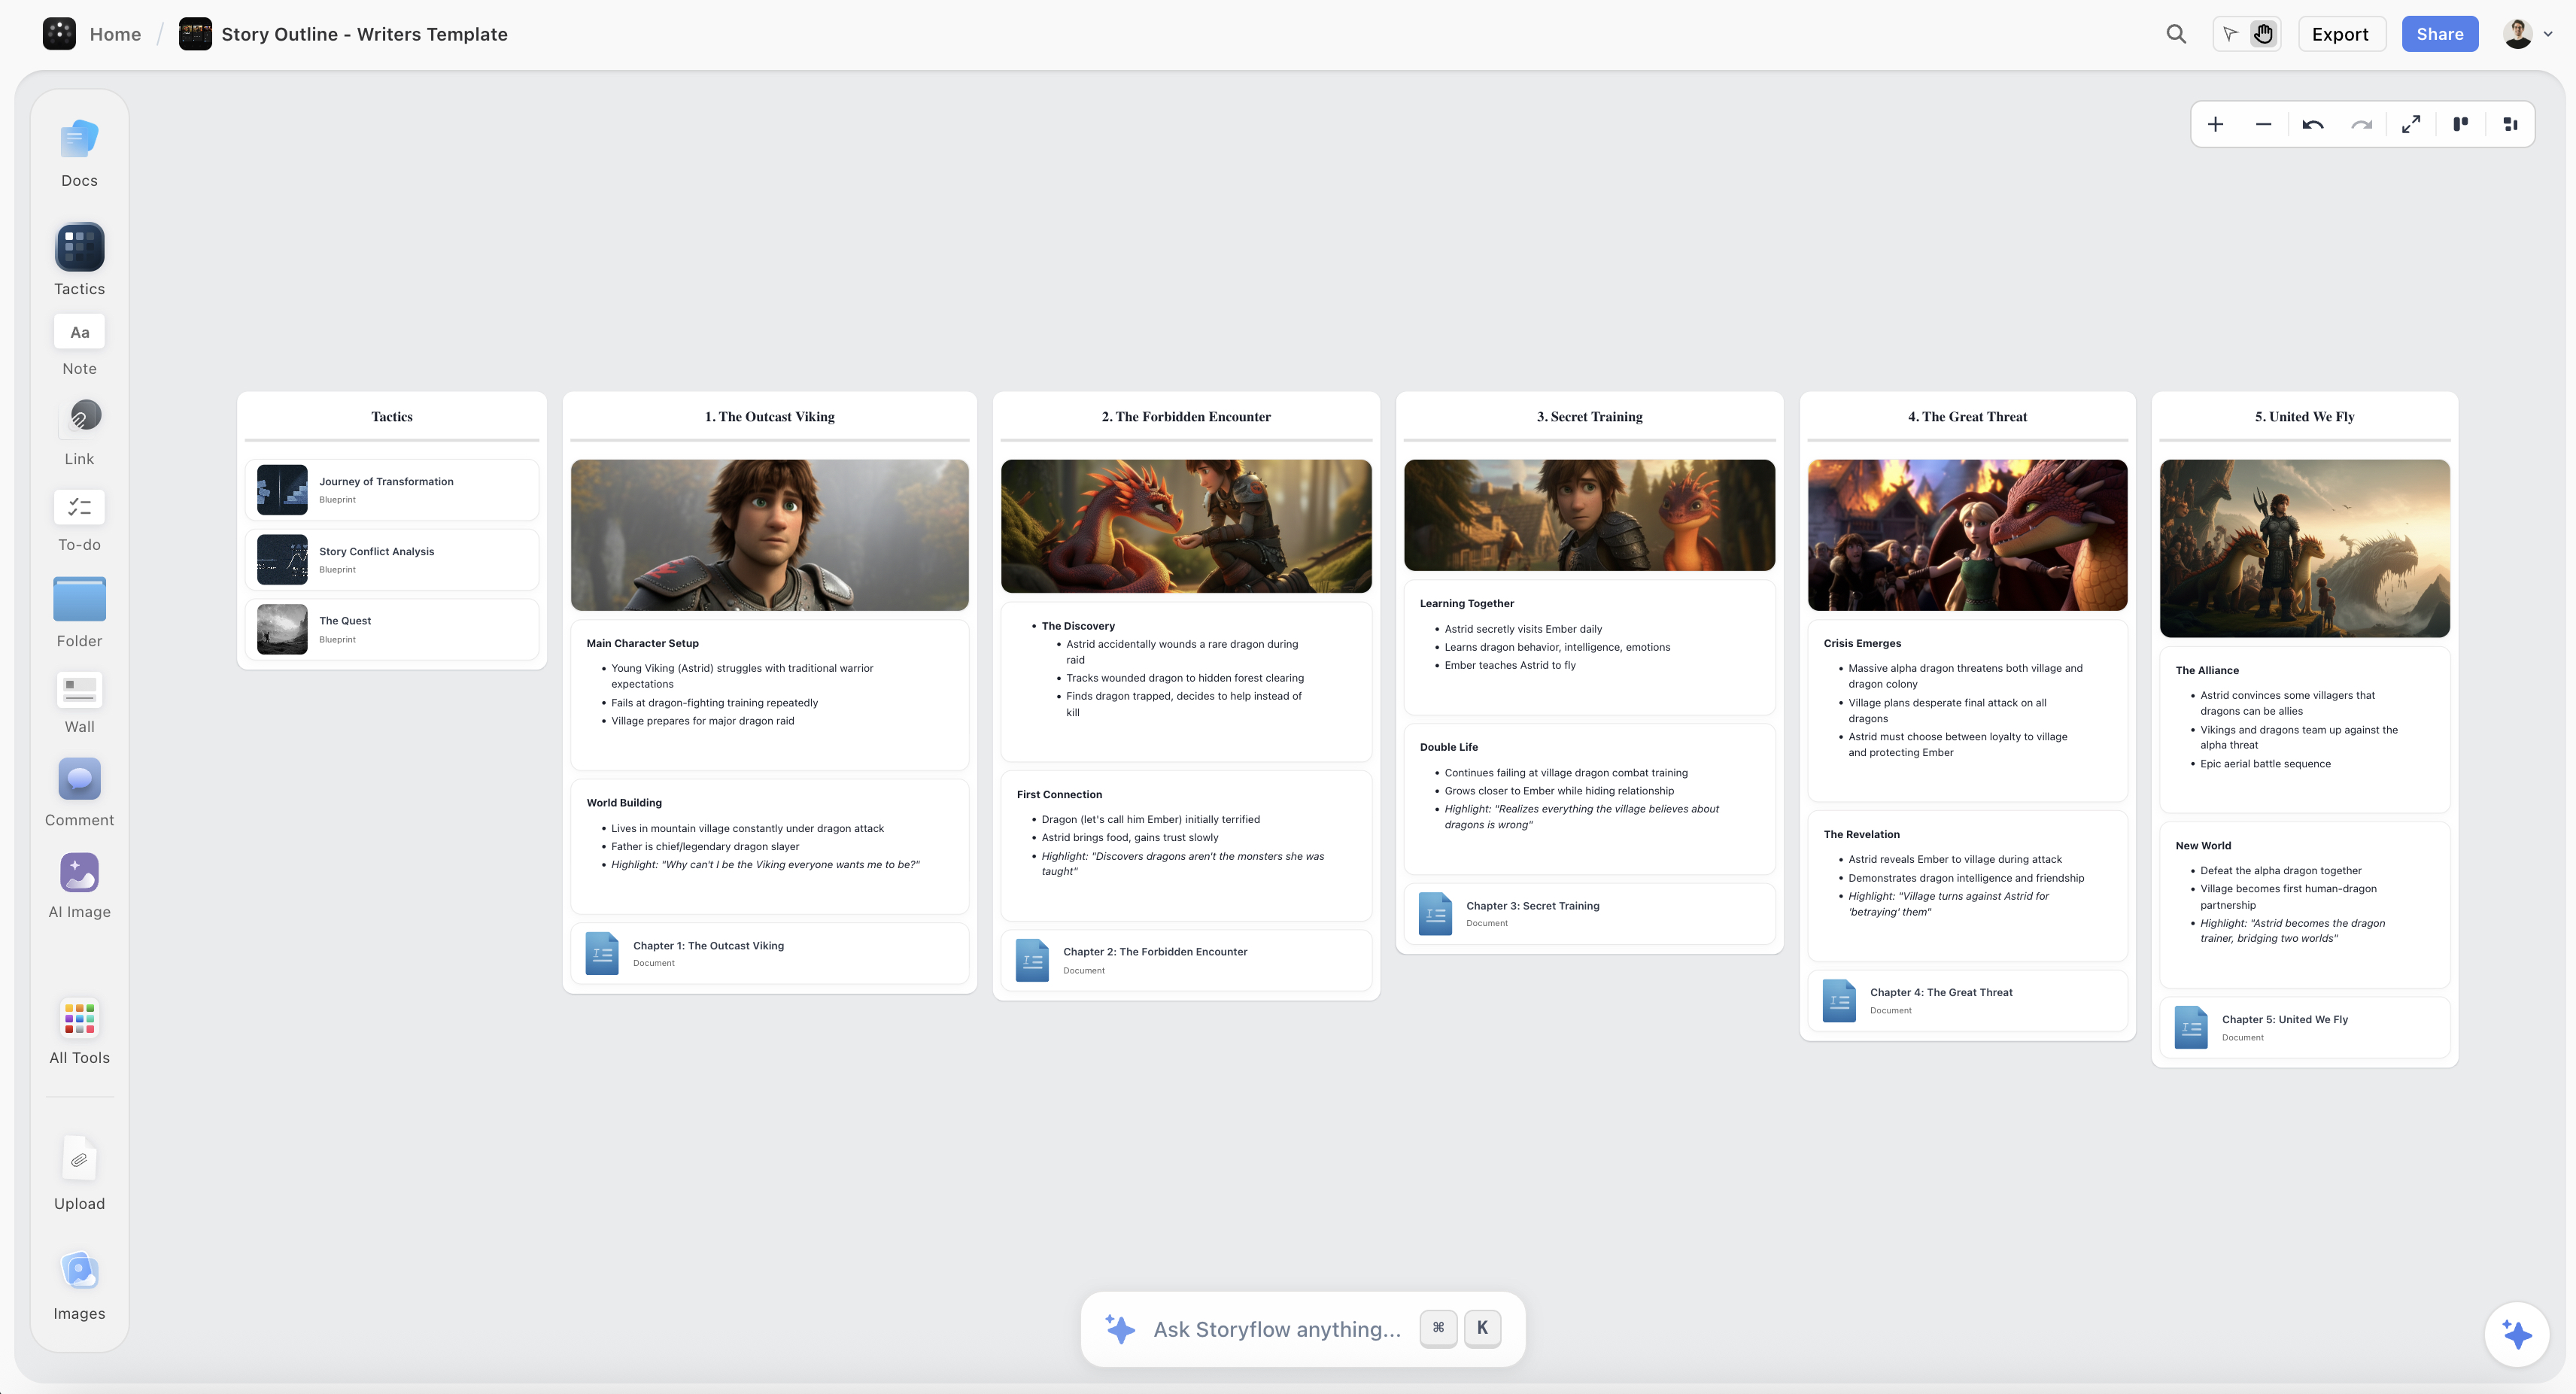
A photo essay sequenced on the Storyflow canvas, with the selects laid out in an order that carries a reader from the establishing shot to the closing frame
Plan and sequence your photo essay on one canvas
The subject research, the shot list, and then the graded selects live in one place, and the AI reads the whole board to draft the running order and the captions, so a pile of good frames becomes a story that makes a point.

How to Plan a Photo Essay, Step by Step
Here is the full method, from an idea to a sequenced, captioned essay ready to publish. It assumes a single photographer shooting a documentary or photojournalistic essay over a few sessions. Scale it up for a longer project, but keep the order, because the value is in planning the story before the shoot and sequencing it honestly after, not in shooting first and hoping a story appears in the edit.
Step 1: Find a subject and an angle worth arguing
Start with a subject you can actually access and an angle that makes it an essay rather than a topic. "A local bakery" is a topic; "the last hour before a bakery that has run for forty years closes for good" is an angle, and the angle is what gives every future frame a job. Ask what you want a reader to understand or feel by the last image, because that sentence is the thesis the whole essay argues. A subject with no angle produces a gallery; a subject with a sharp angle produces an essay where you already know, before you shoot, which frames you are hunting for. Write the angle down in one line and keep it in front of you, because the shoot will constantly tempt you toward pretty frames that have nothing to do with it.
Step 2: Research the subject and decide the shape
Before you shoot, learn your subject. Read about it, talk to the people involved, visit without a camera, and understand the world well enough that you know where the story lives and when the moments happen. Research is what lets you be in the right place for the decisive moment instead of stumbling on it. As you research, decide the shape: narrative or thematic, because that choice sets your shot list. A narrative essay means mapping the sequence of events you need to follow; a thematic essay means listing the distinct angles on the idea you need to gather. Come out of this step with a one-line angle, a chosen shape, and a rough list of the frames the story will need, so the shoot has a target instead of a hope.
Step 3: Plan access and shoot ethically
A photo essay is only as good as the access behind it, so plan it honestly. Get permission from the people and places you are photographing, be clear about what the images are for, and secure model or property releases where you need them. The ethics are not paperwork; they are the difference between a story you can stand behind and one you cannot. Photograph people as they are, not as a caricature that serves your angle; do not stage what you present as candid; and do not take a frame that betrays someone's trust for a better picture. Documentary and photojournalistic work carries a duty to the truth of the subject, and an essay built on a misrepresentation is worthless however striking it looks. Plan the access, earn the trust, and let the honesty of the access show up as honesty in the frames.
Step 4: Build the shot list the story needs
Now turn the angle and the shape into the shot list from the section above: an establishing shot, portraits, details, interaction, a decisive moment, and a closing frame, plus the specific frames your particular story needs to fill each job. For a narrative essay, tie the list to the beats: what marks the beginning, the turns, the end. For a thematic essay, tie it to the angles on the idea you need to cover. This list is not a cage; it is a checklist you carry so that when the shoot gets busy and instinct takes over, you can glance down and see you still need a closing frame or you have no strong detail yet. The photographers who come home with a complete story are almost always the ones who shot against a list, because the list is what catches the gap while you can still fill it.
Step 5: Shoot for sequence, not single frames
On the shoot, hold two things at once: be present enough to catch the unplanned moment, and disciplined enough to shoot for the sequence rather than for trophies. Shooting for sequence means thinking about how frames connect: getting a wide and a tight of the same moment so the edit can move between them, catching the reaction as well as the action, shooting the approach and the arrival so a transition exists, and covering each job on the list rather than taking twenty versions of the one shot you already love. It also means shooting more coverage than feels necessary around the beats you cannot reshoot, because an essay is built in the edit from what you brought back, and a beat you shot once and slightly missed is a hole. Think like a filmmaker cutting a scene: you are gathering the frames a sequence will need, not collecting single pictures.
Step 6: Cull and grade the selects in a photo editor
Here the job changes, and it is worth saying plainly. Once you are home with thousands of RAW files, the next step is not storytelling; it is editing in the technical sense, and it belongs in Lightroom or Capture One, not on a story board. Cull hard: rate and flag, cut the near-duplicates, and get from thousands of frames down to a few dozen real candidates, the selects. Grade them so they share a consistent look, because an essay whose frames were shot across different light needs to feel like one body of work. Use the contact-sheet grid to see them together. This is a photo editor's job and a story board cannot and should not do it, so do it in the right tool. Come out of this step with a folder of graded selects, the raw material the sequencing works from.
Step 7: Sequence the selects into a story on a board
Now the job turns back into storytelling, and this is where a visual board earns its place. Bring the graded selects onto one canvas and lay them out so you can see them all at once, then start arranging: which frame opens, what follows it, where the portrait sits, how the details pace the big frames, where the decisive moment falls, and which frame closes. Sequencing is not sorting by quality; it is building an order that carries a reader, and it is a physical, spatial job of dragging images next to each other and feeling whether the cut works. This is exactly what photographers have always done on a light table or a wall of prints, and it is why I do it on one infinite canvas in Storyflow: every select as an image on the board, the sequence built by moving them, and the AI reading the whole board, plus up to 1 Tactic and 3 Documents I point it at, to draft a running order and flag where the story has a missing beat or two frames doing the same job. You can even pull a frame from a reference film on YouTube or Vimeo straight onto the board to hold the tone you are chasing next to your own frames. Arrange, stand back, re-cut, and keep going until the sequence reads as a story rather than a slideshow.
Step 8: Write the captions and the text
Finally, write the words. Most photo essays carry text, a title, a short introduction, and captions, and the text is not decoration; it anchors what the images cannot say alone. Captions give the reader the who, where, and when that a frame cannot, and a short lead-in sets the angle so the reader knows what they are looking at. Write captions that add information rather than describing what is already visible, and keep the text honest to the subject, because a caption that oversells or misleads betrays the same trust the shoot was built on. Because the selects and the sequence already live on the board, I write the captions right against the frames they belong to, so the words and the images are edited together rather than bolted on at the end. Then read the whole essay top to bottom as a reader would, images and words together, and cut anything that does not serve the angle you wrote down in Step 1.
Where the Job Is Really Editing (and Where AI Helps)
Here is the honest part, because two different jobs hide inside "making a photo essay," and confusing them wastes your time.
One job is editing in the technical sense: culling thousands of RAW files, cutting duplicates, grading for a consistent look. That is a photo editor's job, and Lightroom, Capture One, and a contact sheet do it far better than any planning board. If your problem is ten thousand frames and no idea which fifty are keepers, you do not need a story tool; you need to cull, and you should go do it in the editor built for it. Pretending a canvas can sort RAW files helps no one, and I will not pretend Storyflow does that, because it does not.
The other job is storytelling: choosing the angle before the shoot, filling the shot list, and sequencing the selects into an order that carries a reader. That is not a RAW-editing job and a photo editor is a clumsy place to do it, because you are moving whole frames around to feel out a sequence, not adjusting exposure. This is where a visual board wins and where AI genuinely helps. Because Storyflow's AI reads your full board, plus up to 1 Tactic and 3 Documents you point it at, it can draft a running order from your actual selects, suggest which frame opens and closes, write a first pass of the captions, and flag where the essay has a hole, a missing establishing shot, no real closing frame, three details and no interaction. What it cannot do is take the picture, feel whether a frame is honest to the subject, or make the judgment that this sequence lands and that one does not. Use the photo editor to cull and grade, use the board and its AI to plan and sequence, and keep the final call, the one about whether the story is true, for yourself. AI drafts the sequence. You decide what the story says.
Common Photo Essay Mistakes
- A gallery, not an essay. Twelve great frames that were never meant to connect stay disconnected. Choose an angle first and shoot frames that do a job.
- No chosen shape. Half a narrative and half a theme is a whole story of neither. Decide narrative or thematic before you plan the shot list.
- No angle. A subject with no argument produces pretty pictures that add up to nothing. Write the one-line angle and shoot against it.
- Shooting trophies, not sequence. Twenty versions of your favorite frame and none of the connective tissue leaves the edit with holes. Shoot the wides, the reactions, and the transitions a sequence needs.
- No closing frame. An essay with no ending stops instead of landing. Hunt for the closing frame on the shoot, while you still can.
- Sequencing by quality. Ordering by which frames are best is not sequencing; it is a leaderboard. Order for the reader's journey, even if it means opening on a quieter frame.
- Ignoring access and ethics. A striking frame that betrays the subject's trust or misrepresents them is worthless. Plan the access and shoot honestly.
- Trying to cull on a story board, or story-tell in the RAW editor. Cull and grade in a photo editor; plan and sequence on a board. Each tool does one job well.
The Bottom Line
A photo essay is not a gallery of your best pictures. It is a set of images arranged to make a point, and the point is decided before the shoot and built after it. Pick a subject with an angle worth arguing, choose whether the essay is narrative or thematic, research the subject and plan honest access, and shoot against a list that fills every job a story needs: an establishing shot, portraits, details, interaction, a decisive moment, and a closing frame. Shoot for sequence, not trophies, so the frames connect.
The honest boundary holds. Cull and grade the RAWs in a photo editor, because that is an editing job and Lightroom is built for it. Plan the story and sequence the selects on a board, because that is a storytelling job and a canvas is built for it, with AI that reads the whole board to draft the sequence and the captions and catch the missing beat. The two jobs are different tools, and the essay that respects the difference is the one that turns a shoot into a story rather than a slideshow.
If your next essay is still a subject you care about and a folder of frames you cannot order, plan the story and sequence the selects on one canvas in Storyflow and build the pictures into something that makes a point.
FAQ: Photo Essays
How do you plan a photo essay?
Plan the story before the shoot: pick a subject with a clear angle worth arguing, decide whether the essay is narrative or thematic, research the subject and secure honest access, and build the shot list a story needs, an establishing shot, portraits, details, interaction, a decisive moment, and a closing frame. Then shoot for sequence rather than single frames so the images connect, cull and grade the selects in a photo editor, sequence them into an order that carries a reader, and write the captions. A photo essay is a set of images arranged to make a point, so the planning is about deciding what point and gathering the frames that build it, and the sequencing after the shoot is where the story is actually made.
What is the difference between a photo essay and a photo gallery?
A photo gallery is a collection arranged by quality: here are my best pictures of this subject. A photo essay is an argument arranged by story: here is what I want you to understand about this subject, built from images that each do a job and hand meaning to the next. The gallery asks you to admire individual frames; the essay asks you to follow a sequence to a point. The practical difference shows up in the planning, because a gallery is shot for standout single frames while an essay is shot for a set of connected frames, an establishing shot, portraits, details, interaction, a peak, and a closing frame, that only mean something in order. If any single image could be removed without changing the meaning, you have a gallery; if the sequence would break, you have an essay.
What is the difference between a narrative and a thematic photo essay?
A narrative essay tells a story that moves through time, with something like a beginning, middle, and end, so the images roughly follow the order events happened and the work is finding the frames that mark the turns and the ending. A thematic essay circles a single idea instead of following time, gathering images that each approach the theme from a different angle so the meaning accumulates rather than progresses, and the work is finding enough distinct, deep angles that the reader feels the whole shape of the idea. Narrative essays live or die on the ending; thematic essays live or die on range. Choosing which one you are making before you plan the shot list is what keeps you from coming home with half of each and a whole of neither.
What shots does a photo essay need?
A photo essay needs six kinds of frame, each doing a job the others cannot: an establishing shot that sets the scene and orients the reader; portraits that give the story a face to follow; detail shots that ground it in specifics and pace the big frames; interaction or action that shows the stakes and gets the story moving; a decisive moment where everything aligns into the peak the essay was building toward; and a closing frame that lands the point like a last line. You plan the shoot to fill every job, because a story with three strong portraits and no establishing shot or closing frame has holes no single great picture can fill. Treat the six as a checklist you carry on the shoot so you catch a missing job while you can still shoot it.
What tools do you use to make a photo essay?
Most photographers use a few tools for their strengths: a photo editor like Adobe Lightroom or Capture One to cull thousands of RAW files down to a few dozen graded selects, a mood board like Milanote or Pinterest to gather references before the shoot, and a visual board to plan the story and sequence the selects afterward. Storyflow is strongest for the planning and sequencing, because it puts the subject research, the shot list, and then the actual selects on one infinite canvas, so you can drag the images into an order and see the sequence as a reader will, and its AI reads the whole board to draft the running order and the captions and flag a missing beat. For a wider look at visual-planning tools, see The Best Pre-Production Tools in 2026. Cull and grade in the photo editor, plan and sequence on the board, and never ask one to do the other's job.
Can AI help make a photo essay?
Yes, for the planning and the sequencing, not for the shooting or the culling. Once your graded selects are on a board, AI can draft a running order, suggest which frame opens and closes, write a first pass of the captions, and flag where the essay has a hole, a missing establishing shot, no closing frame, or three details and no interaction. Because Storyflow's AI reads your full canvas board, plus up to 1 Tactic and 3 Documents you point it at, it works from your actual selects and notes rather than generic prompts, so its help is specific to your story. What AI cannot do is take the picture, judge whether a frame is honest to the subject, or make the final call that a sequence lands. Use it to draft the sequence and pressure-test the story, and keep the judgment about what the essay says for yourself.
Is Storyflow free for planning a photo essay?
Not during early access. Storyflow is paid-only right now, with a Free plan launching before the end of 2026 that will include unlimited objects and boards, unlimited collaboration, basic AI, and 20 file uploads, enough to cover planning a real essay: the subject research, the shot list, and a first sequence of your selects laid out on one canvas. Paid tiers start at Plus for $7.99/month billed annually ($9.99 monthly), which adds the 200+ Story Blueprints and unlimited file uploads, with Pro at $14/month and Max at $39/month for more AI and, on Pro and Max, AI image generation. There is no separate Team plan; Max is the team tier. Anyone a paid member invites to a board joins free today, so you can build and share the essay with an editor without them paying, and you still cull and grade the RAWs in a photo editor built for that job.
Where does Storyflow lose for a photo essay?
In the RAW editing and the shooting entirely. Storyflow does not cull, rate, or grade RAW files, does not do the technical edit, and does not take the picture, so the culling and grading belong in Lightroom or Capture One and the shooting belongs to you and your camera. What Storyflow does is hold the story: the subject research, the shot list, and then the graded selects on one infinite canvas, so you can sequence them into an order that carries a reader and write the captions against the frames, with AI that reads the whole board to draft the sequence and flag a missing beat. Used for planning and sequencing the story, which is what it is built for, it is where a pile of good frames becomes an essay; used as a RAW editor, it is the wrong tool, and the honest workflow uses a photo editor for the edit and a board for the story.
Table of Contents
- Why a Photo Essay Is Planned, Not Just Shot
- Narrative or Thematic: Two Kinds of Photo Essay
- The Shots a Photo Essay Needs
- Quick Picks: Where to Plan and Sequence a Photo Essay
- Comparison Table: Where to Plan a Photo Essay
- How to Plan a Photo Essay, Step by Step
- Where the Job Is Really Editing (and Where AI Helps)
- Common Photo Essay Mistakes
- The Bottom Line
- Author
- FAQ: Photo Essays
- Related Reading
Templates to check out for this topic


Templates you can use in Storyflow
Every Storyflow board starts from real structure and an AI that reads the whole canvas. Open one of these templates and make it yours.


See Storyflow in Action
A visual AI workspace where every feature lives inside one canvas. No tab-switching, no context lost.
Build your entire board from a single message
Type what you need in the AI chat at the bottom of your canvas. The AI adds cards, headings, and structure directly onto your board.
Use expert frameworks as AI context
Type @ in the AI chat and choose any Tactic. The AI tailors every response to that framework instead of giving generic advice.
Turn your board into a mind map in seconds
Ask the AI to restructure your canvas as a mindmap. It connects your ideas into a visual hierarchy so you can see how everything relates.
Why Storyflow Exists
Storyflow actually began as a personal tool while working on creative and research projects.
We kept running into the same problem: ideas were scattered everywhere: notes, documents, and whiteboards.
Nothing helped us see how everything connected.
So we started building a workspace designed around how ideas actually grow.
→ Read how Storyflow was createdJustkay
Documentary Filmmaker & Founder at Storyflow
Published: 2026-07-21
Extremely simple, seriously capable


See how easy it is to get started
Watch a real project come together, from a blank board to a finished plan, clicked through step by step.
Start creating with AI and become more productive
Transform your creative workflow with AI-powered tools. Generate ideas, create content, and boost your productivity in minutes instead of hours.